To avoid possible electrical shock, be sure electricity
is turned off at the main fuse box before wiring.
WARNING
How To Wire Your Ceiling Fan
2.
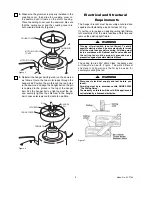
Carefully lift the fan and seat the hanger
ball/downrod assembly on the hanger bracket that
was just attached (Figure 9). Be sure the groove in
the ball is lined up with the tab on the hanger
bracket.
TWO SCREWS
HANGER
BRACKET
TAB
Figure 9
NOTE: CEILING COVER, SUPPLY WIRES AND FAN WIRES
OMITTED FOR CLARITY.
HANGER
BRACKET
HANGER BALL/
DOWNROD
ASSEMBLY
THREADED
STUD (2)
Figure 10
Failure to seat tab in groove could cause damage to
electrical wires and possible shock or fire hazard.
WARNING
To avoid possible fire or shock, do not pinch wires
between the hanger ball/downrod assembly and
hanger bracket.
WARNING
6
Model No.: ACF765
1.
Securely attach the hanger bracket to the ceiling
joist using the two screws supplied (Figure 9).
FLOOR
CEILING
AT LEAST
2.1 METER
Figure 8
The fan must be hung with at least 2.1 meters of
clearance from floor to blades (Figure 8).
WARNING
The ceiling joist must be securely mounted and
capable of supporting at least 31 Kg.
WARNING
How To Hang Your Ceiling Fan
1.
Securely connect the green/yellow earth wires
from the hanger ball and the hanger bracket and
the supply green/yellow earth wire to the terminal
block as shown in Figure 11.
2.
Securely connect the blue fan motor wire and the
black supply neutral to the “N” terminal of the
connector block as shown in Figure 11.
3.
Securely connect the brown fan motor wire and the
red (Active) supply wire to the “L1” terminal of the
connector block as shown in Figure 11. After
connections have been made, turn leads upward
and carefully push leads into the recess making
sure there is separation between connectors.

