


57
5.6.2 Motion Alarm
Motion includes two sub menus: motion and schedule. The steps to set motion alarm are as follows:
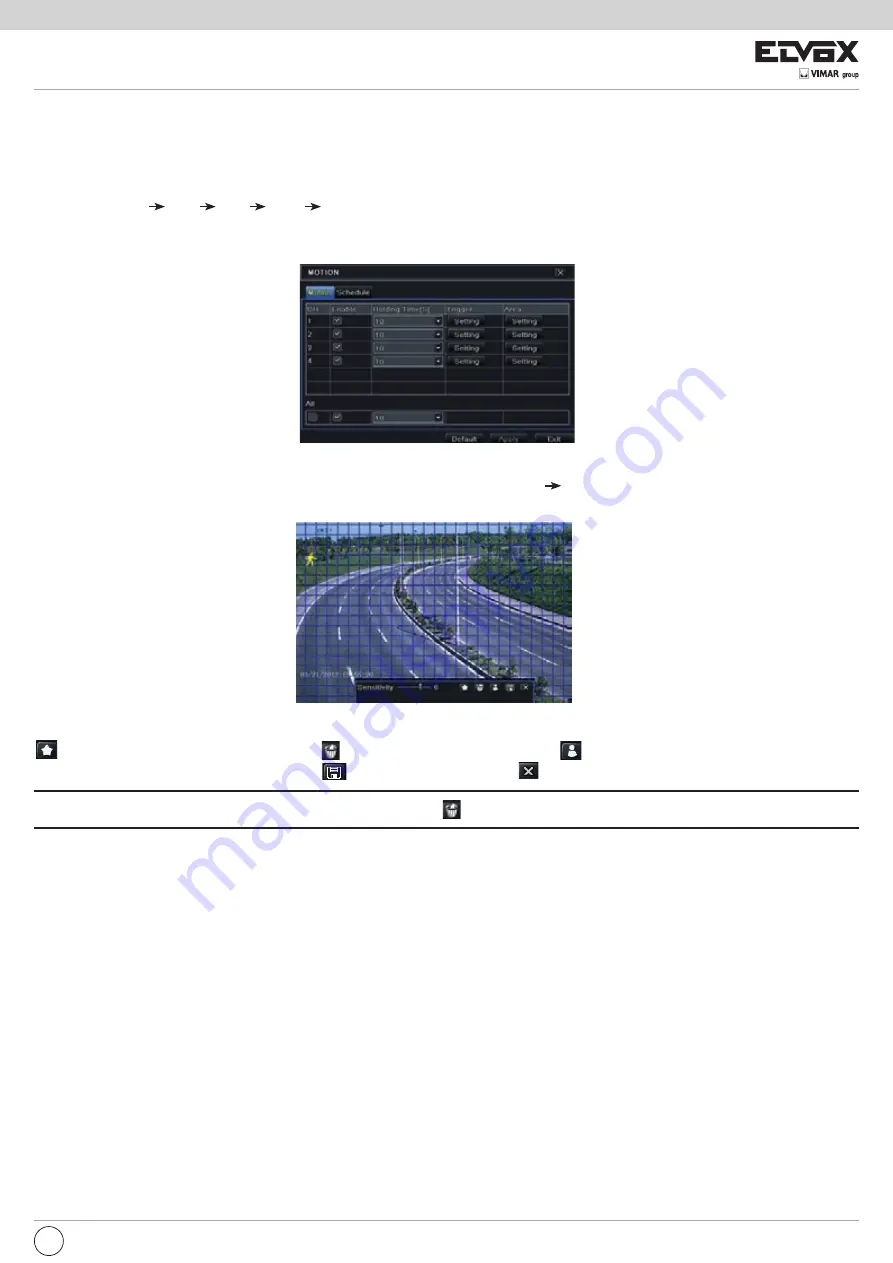
1 - Go to Main Menu Setup Alarm Motion Motion tab. Refer to Fig. 5-19.
2 - Enable motion alarm, set alarm hold time which refers to the time till which the system will wait for further detection of motion. e.g. If the holding time is set
to 10 seconds, once the system detects a motion, it will go to alarm but would not detect any other motion alarm (specific to channel) until 10 seconds. If
there is other motion detected during this period it is considered it as continuous movement, otherwise it will be considered as a single motion.
Fig 5-19 Alarm Configuration-Motion
3 - The setup steps of motion trigger are similar to “Alarm Handling” (See Chapter 5.6.1 Sensor Alarm Handling setting for more details).
4 - After clicking Area button, a dialog box will pop up as Fig 5-20.
EN
5 - In the Area interface, you can drag slide bar to set the sensitivity value (1-8). The higher the value is the more sensitive it is to motion. Since the sensitivity
is influenced by color and time (day or night), you can adjust its value according to the practical conditions. Left click the grid and drag to delete area. Click
icon to set the whole area as detection area. Click
icon to clear the set detection area. Click
icon to test the sensitivity as per the local conditions.
Once motion is sensed, it displays a figure icon. Click
icon, to save the setting. Click
icon to exit the current interface.
Note: Prior to setting motion detection field it is recommended that you click
icon to clear the existing field and set afresh.
6 - Select “All” to set the same settings for all channels.
7 - Click “Apply” button to save the setting.
8 - Go to Schedule tab. The setting steps for schedule for motion based alarm are similar to normal schedule setup (see Chapter 5.5.1 for more details).
1- Set schedule for sensor alarm. The setting steps are similar to normal schedule recording (See Chapter
5.4 Record Configuration
for details).
Note:
The timelines of these two schedules (schedule for sensor based recording and schedule for sensor alarm) must match; otherwise you will not get the
record in some time).


