Elvox 46241.F04A Скачать руководство пользователя страница 32

30

I


3 -   Prendere nota dell’indirizzo IP, la Subnet Mask ecc., quindi, nell’NVR, andare a Main Menu   Setup   interfaccia Network per inserire manualmente 

l’indirizzo IP, la Subnet Mask e il Gateway copiati dalla configurazione del computer. Il segmento di rete deve essere uguale a quello del computer. Se si 

utilizza il protocollo DHCP, attivarlo sia nell’NVR sia nel router.

4 -   Dopo aver inserito le suddette informazioni è possibile inserire l’IP della LAN e la porta HTTP in Safari. Ad esempio, inserire: http://192.168.1.100:81 

(nell’esempio 192.168.1.100 è l’IP della LAN dell’NVR, 81 è la porta HTTP dell’NVR). Fare clic sul pulsante “


“. Il browser scarica il controllo ActiveX 

come illustrato di seguito:

5 - Fare clic sull’icona 


, quindi selezionare il controllo ActiveX, verrà visualizzata l’interfaccia di benvenuto. Fare clic su “Continua” pulsante “Installa”.

Viene visualizzata la seguente finestra.

Inserire nome utente e password del computer Apple quindi fare clic su “OK” per installare il controllo ActiveX.

6 - Al termine dell’installazione del controllo ActiveX, uscire da Safari. Fare clic con il pulsante destro sull’icona Safari sul desktop e selezionare “Esci” per-

chiudere il browser. Riavviare Safari. Inserire l’indirizzo IP e la porta HTTP per accedere all’interfaccia di accesso dell’NVR.

8.3.2 Tramite WAN

Sono disponibili due modi per collegare l’NVR a Internet.

1. Collegare l’NVR a Internet tramite il router o il server virtuale

1 - Le configurazioni di rete sono le stesse descritte dal passaggio 1 al passaggio 4 del punto 1 della procedura per la sorveglianza in remoto da Internet 

Explorer su WAN.

2 - Inserire l’indirizzo IP della WAN e la porta HTTP in Safari per installare il controllo ActiveX. Viene visualizzata una finestra in cui inserire il nome utente e

la password. Inserire correttamente le credenziali e premere Invio.

2. Collegare l’NVR a Internet direttamente.

1 - Le configurazioni di rete sono le stesse descritte al passaggio 1 del punto 2 della procedura per la sorveglianza in remoto da Internet Explorer su WAN.

2 - Inserire l’indirizzo IP della WAN e la porta HTTP o il nome del dominio in Safari per installare il controllo ActiveX. Viene visualizzata una finestra in cui

inserire il nome utente e la password. Inserire correttamente le credenziali e premere Invio.

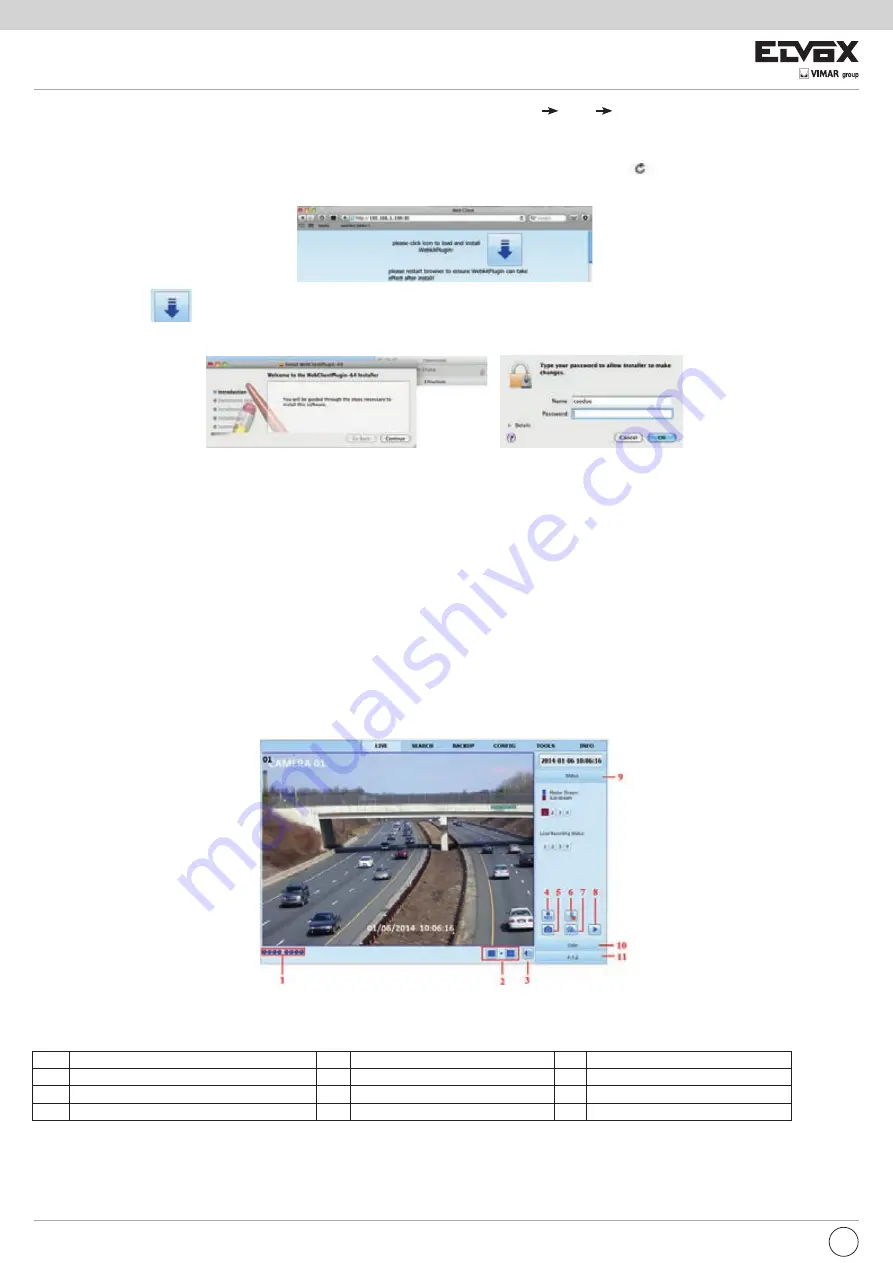
8.4 Visualizzazione dell’anteprima in remoto

1

Indicatore canale

2

Modo schermo

3

Volume

4

Avvia registrazione da Internet Explorer

5

Istantanea

6

Inzia a chattare

7

Avvia registrazione

8

Riproduzione

9

Stato flusso principale/secondario

10

Colore

11

Controllo PTZ

Definizione dei simboli e delle funzioni:

Fig 8-1 Visualizzazione dell’anteprima in remoto

Содержание 46241.F04A

Страница 1: ...46241 F04A NVR 4 canali 1080P 4 channel 1080P NVR Manuale per il collegamento e l uso Installation and operation manual...

Страница 2: ...5 4 5 Riciclo della registrazione 16 5 4 6 Istantanea 16 5 5 Configurazione programmazione 16 5 5 1 Programmazione 16 5 5 2 Programmazione movimento 17 5 5 3 Programmazione sensore 17 5 6 Configurazio...

Страница 3: ...positivo senza l ausilio o l approvazione di un tecnico Quando il prodotto in uso sono applicabili i contenuti di Microsoft Apple e Google Le immagini e le schermate di questo manuale hanno lo scopo d...

Страница 4: ...questo pieno Registrazione 1080P 960P 720P D1 Risoluzione frame rate e qualit dell immagine regolabili Due modalit di ricerca della registrazione ricerca cronologica e ricerca per evento Riproduzione...

Страница 5: ...Utilizzare il disco rigido raccomandato dal costruttore per garantire la sicurezza 2 Calcolare la capacit dell HDD in base alle impostazioni di registrazione Fare riferimento all Appendice B Calcolo d...

Страница 6: ...ione Spia di alimentazione Spia di alimentazione quando collegata la luce blu Spia HDD La luce diventa blu durante la lettura scrittura su HDD Spia rete La luce diventa blu quando attivo l accesso all...

Страница 7: ...valore in una schermata specifica spostare il cursore nella casella di inserimento e fare clic Viene visualizzata una tastiera virtuale Consente di immettere numeri lettere e simboli Fare clic sul pul...

Страница 8: ...a risoluzione commuta fra 1920x1080 e VGA e viceversa 3 1 2 Spegnimento possibile spegnere il dispositivo dal telecomando IR o con il mouse Andare a Menu principale e selezionare l icona Shut Down Spe...

Страница 9: ...giungere le telecamere IP tramite LAN Andare a Main Menu scheda IP Camera Fare riferimento alla Fig 4 1 Fare clic sul pulsante Search Cerca per cercare i dispositivi nella stessa rete possibile aggiun...

Страница 10: ...l indirizzo IP del dispositivo come mostrato nella Fig 4 5 Fig 4 4 Ricerca dei dispositivi Fig 4 5 Modifica di dispositivi Per aggiungere le telecamere IP tramite WAN Andare a Main Menu scheda IP Cam...

Страница 11: ...logo seguente 1 Attivare Mirror e Flip 2 Selezionare la modalit di messa a fuoco Focus Mode Sono disponibili due opzioni manuale e automatica 3 Regolare il valore della messa a fuoco e dello zoom 4 Fa...

Страница 12: ...su canale singolo o come griglia da diverse telecamere Il modo Dwell attivato solo quando il modo di visualizzazione selezionato non in grado di visualizzare tutte le telecamere disponibili Colore att...

Страница 13: ...e il sistema viene avviato viene visualizzata la procedura di impostazione guidata in cui possibile eseguire la configurazione di base Video Output Uscita video risoluzione dell interfaccia di visuali...

Страница 14: ...ostazioni di una telecamera canale specifici per visualizzare la finestra illustrata di seguito 2 In questa interfaccia possibile regolare la luminosit il colore la saturazione e il contrasto per la v...

Страница 15: ...c sul pulsante Setting Impostazioni per passare all immagine live 3 Premere il pulsante sinistro del mouse e trascinare il cursore per impostare l area da mascherare come illustrato sotto 4 Fare clic...

Страница 16: ...ondizioni locali 5 Fare clic sull icona per salvare le impostazioni Fare clic sull icona per uscire dalla schermata corrente 5 4 Configurazione della registrazione La configurazione della registrazion...

Страница 17: ...Bit rate velocit in bit massima Valori consentiti 256 12288kbps Se il parametro viene impostato a un valore che supera le risorse massime del sistema il sistema lo corregge automaticamente 5 4 3 Tempo...

Страница 18: ...chie registrazioni e ricicla lo spazio liberato La procedura di impostazione la seguente 1 Andare a Main Menu Setup Record interfaccia Recycle Record 2 Selezionare la casella Recycle Record Ricicla re...

Страница 19: ...ic sul pulsante per eliminare la programmazione selezionata Se si desidera applicare l impostazione della programmazione di un canale ad altri o tutti i canali selezionare il canale e fare clic sul pu...

Страница 20: ...5 6 2 Allarme movimento L allarme movimento comprende due sottomenu movimento e programma La procedura per impostare l allarme movimento la seguente 1 Andare a Main Menu Setup Alarm Motion scheda Moti...

Страница 21: ...nfigurare il dispositivo in modo che rilevi la perdita video La procedura di impostazione la seguente 1 Andare a Main Menu Setup Live Video Loss 2 La procedura di impostazione dell attivazione per per...

Страница 22: ...IP gateway e il server DNS Se ci si collega a Internet tramite PPPoE deselezionare Obtain an IP address automatically e selezionare la casella PPPoE quindi immettere nome utente e password Al termine...

Страница 23: ...Inserire l IP server suddetto la porta server e l ID dispositivo nell interfaccia del server Fare clic sul pulsante Apply Applica per salvare le impostazioni Il sistema CVM Elvox ora connetter automat...

Страница 24: ...re manualmente l indirizzo IP nella scheda Network Rete quindi fare clic nella scheda Other Settings Altre impostazioni 2 Selezionare DDNS 3 Selezionare www autoddns com nella colonna DDNS Type Tipo D...

Страница 25: ...ter specificato identificato dall indirizzo MAC 5 Selezionare la scheda Authority Autorizzazioni e assegnare i diritti di utilizzo per gli utenti specifici Fare riferimento alla Fig 5 30 6 Fare clic s...

Страница 26: ...estro Se la data ha il bordo evidenziato significa che sono presenti dei dati 3 Selezionare Motion Movimento Sensor Sensore o All Tutti in base alle necessit 4 Fare clic sul pulsante Search Cerca per...

Страница 27: ...Main Menu Search scheda Image 2 Selezionare i dati e i canali sul lato destro 3 Premere il pulsante Search Cerca per cercare un immagine registrata 4 Dopo aver identificato l immagine registrata fare...

Страница 28: ...per canale Il rapporto pu essere salvato su una memoria USB in formato html utilizzando il pulsante Export Esporta 7 1 3 Informazioni sul log In questa scheda possibile cercare i log pertinenti per da...

Страница 29: ...in sull interfaccia SUPERLIVE PRO ed il telefono cellulare connesso al DVR NVR 7 2 Allarme manuale In questa interfaccia possibile attivare un allarme manuale 7 3 Gestione disco 1 Formattazione del di...

Страница 30: ...ramite il router o il server virtuale 1 Nell NVR andare all interfaccia Main Menu Setup Network per inserire l indirizzo IP la Subnet Mask ecc Se si utilizza il protocollo DHCP attivarlo sia nell NVR...

Страница 31: ...punto 1 8 3 Sorveglianza in remoto da computer Apple Nota l attuale versione client end del plug in supporta solo la modalit a 32 bit di conseguenza il browser Safari deve essere avviato in modalit 3...

Страница 32: ...ta HTTP per accedere all interfaccia di accesso dell NVR 8 3 2 Tramite WAN Sono disponibili due modi per collegare l NVR a Internet 1 Collegare l NVR a Internet tramite il router o il server virtuale...

Страница 33: ...rotazione apertura diaframma iris e zoom regolare la focale specificare le preimpostazioni ecc Definizione dei pulsanti Pulsanti Descrizione per ruotare la telecamera dome verso l alto per ruotare la...

Страница 34: ...Fare clic con il pulsante destro per selezionare lo zoom avanti sull immagine Fare doppio clic con il pulsante sinistro o fare clic con il pulsante destro per uscire 8 5 Riproduzione e backup in remo...

Страница 35: ...e management Fare riferimento alla Fig 8 7 2 Selezionare la data e i canali evidenziati 3 Fare clic sul pulsante Search Cerca per cercare i file registrati Fig 8 7 interfaccia di gestione file Lock Bl...

Страница 36: ...onfigurazione dell utente Selezionare un opzione dall elenco sulla sinistra quindi impostare i parametri relativi La configurazione pu essere eseguita da un solo utente per volta Fare clic sulla sched...

Страница 37: ...l NVR b Potrebbe essere un problema di cablaggio Controllare i cavi dati e alimentazione dell HDD c L HDD potrebbe essere danneggiato Sostituirlo con uno nuovo D6 Il sistema non registra Perch a Veri...

Страница 38: ...in remoto Modulo PC Parametri CPU Intel Celeron 2 4G Scheda madre Intel 845 HDD 80G RAM 512M VGA NVIDIA GeForce MX440 FX5200 ATIRADEON 7500 X300 SISTEMA OPERATIVO Windows 2000 SP4 o successivo Windows...

Страница 39: ...r il calcolo la seguente Capacit di registrazione totale spazio utilizzato per ora MB h velocit di copertura del disco rigido tempo di registrazione ora numero di canali Ad esempio un cliente imposta...

Страница 40: ...le Timer Rilevamento movimento Simplex Duplex Triplex Pentaplex Portadi rete comune RJ45 1 Porta di rete PoE RJ45 4 Interfaccia di comunicazione USB 2 0 2 una per il backup una per il mouse USB Info d...

Страница 41: ...5 Recycle Record 55 5 4 6 Snap 55 5 5 Schedule Configuration 55 5 5 1 Schedule 55 5 5 2 Motion Schedule 56 5 5 3 Sensor Schedule 56 5 6 Alarm Configuration 56 5 6 1 Sensor Based Recording 57 5 6 2 Mo...

Страница 42: ...rt Do not try to repair the device by yourself without technical aid or approval When this product is in use the relevant contents of Microsoft Apple and Google will be involved in The pictures and sc...

Страница 43: ...ording Support recycle after HDD full Support 1080P 960P 720P D1 recording Resolution frame rate and picture quality are adjustable Two record search mode time search and event search Support 4 screen...

Страница 44: ...ve the manufacturers recommend specially for security and safe field 2 Please calculate HDD capacity according to the recording setting Please refer to Appendix B Calculate Recording Capacity 1 Loosen...

Страница 45: ...rding Record button Record manually Play button Enter play interface REW button Rewind key FF button Fast forward MENU button 1 Enter menu in live 2 Increase the value in setup BACKUP button 1 Decreas...

Страница 46: ...n a particular screen move cursor to the input box and click An input window will appear as shown below It supports digits alphabets and symbols input Click Shift button to input Capital letters and s...

Страница 47: ...ess and hold Exit Stop key to switch the resolution of the VGA HDMI output 3 1 2 Shutdown You can shut down the device by using IR remote controller or mouse 1 Go to Main menu button and select Shut D...

Страница 48: ...nnect the IPC via WAN LAN network To add IP cameras via LAN 1 Please go to Main Menu IP Camera tab Refer to Fig 4 1 Click Search button to search the devices in the same network The IPC which supports...

Страница 49: ...tup button to modify channel IP address of the device as shown in Fig 4 5 Fig 4 4 Search Devices Fig 4 5 Modify Devices To add IP cameras via WAN 1 Please go to Main Menu IP Camera tab Refer to Fig 4...

Страница 50: ...ting button a dialog box will pop up as below 1 Enable Mirror and Flip 2 Select the focus mode Two options manual focus and auto focus 3 Adjust the value of focus and zoom 4 Click Save to save the set...

Страница 51: ...n a grid fashion from different cameras Dwell mode is enabled only when the chosen display mode is not able to display all the available cameras Color If this button is enabled you can adjust the colo...

Страница 52: ...number of concurrent user logins in the NVR Show wizard If selected the GUI would launch the startup wizard on every boot allowing user to do basic setup Video Output Resolution of live display interf...

Страница 53: ...set up color 1 Click Setting button for a particular camera channel to see a window as below 2 In this interface you can adjust brightness hue saturation and contrast in live Click OK button to save...

Страница 54: ...up mask area 1 Go to Main Menu Setup Live Mask interface Fig 5 8 Live Configuration Mask 2 Click Setting button to go to live image 3 Press and drag the left mouse button to set mask area as shown bel...

Страница 55: ...an set ROI areas The ROI area you selected is sharp detailed than other areas especially in low bitrate condition 1 Go to Main Menu Setup Live ROI interface 3 Check enable Drag the mouse to set the RO...

Страница 56: ...all channels 5 4 2 Record Bitrate 1 Go to Main Menu Setup Record Record Bitrate Refer to Fig 4 11 2 Setup rate resolution and max bit stream 3 Select All to set the same settings for all channels 4 C...

Страница 57: ...ill automatically delete the old records and recycle the space if it is com pletely utilized The setting steps are as follows 1 Go to Main Menu Setup Record Recycle Record interface 2 Checkmark recycl...

Страница 58: ...in day schedule Click button to delete the selected schedule If you want to apply the schedule setting of a certain channel to other or all channels you need to select channel and click Copy button Yo...

Страница 59: ...alue is the more sensitive it is to motion Since the sensitivity is influenced by color and time day or night you can adjust its value according to the practical conditions Left click the grid and dra...

Страница 60: ...arm Other Alarm Refer to Fig 5 21 5 6 3 Video Loss Alarm This device can be set up to detect video loss The setting steps are as follows 1 Go to Main Menu Setup Alarm Video Loss 2 The setup steps of v...

Страница 61: ...nput the IP address subnet mask gateway IP and DNS server If you connect internet through PPPoE disable Obtain an IP address automatically item and check PPPoE checkbox and then enter username and pas...

Страница 62: ...d device ID in the server interface Then click Apply button to save the setting Now the ECMS NVMS system will automatically connect this device Fig 5 26 Network Configuration NAT 5 7 6 Other Settings...

Страница 63: ...interface 1 Set the IP address manually in the network tab and then click Other Settings tab 2 Check DDNS 3 Select www autoddns com in DDNS Type column as shown above 4 Enter the host name at random...

Страница 64: ...e NVR only through the specific computer carrying the MAC address 5 Select Authority tab and then assign the operation rights for particular user Refer to Fig 5 30 6 Click OK to save the setting Fig 5...

Страница 65: ...s on the right hand side A data with highlighted borderline indicates presence of data 3 Checkmark Motion Sensor or All accordingly 4 Click Search button to display the searched event information in t...

Страница 66: ...ndicates presence of data 3 Click Search button to display the searched files in the file list box 4 Use All button to lock unlock or delete all files in the file management column 5 Double click an u...

Страница 67: ...cted online users Refresh refresh the current interface Disconnect Disconnect the online users to access NVR If this function is used by the admin the particular PC will not be able to access the devi...

Страница 68: ...electric material of the disk analysis the potential problems of the disk and warn so as to protect its data Fig 7 1 A Information Configuration In this interface you can scan the QRCODE through the m...

Страница 69: ...or virtual server 1 Go to the NVR s Main Menu Setup Network interface to input IP address Subnet Mask etc If using DHCP please enable DHCP in both the NVR and router 2 Forward IP address and port num...

Страница 70: ...tting steps are as the same as Step 3 and Step 4 in Point 1 8 3 Remote Surveillance through Apple PC Note Because the current plug in version of client end just only supports 32 bit mode so the safari...

Страница 71: ...afari browser Input the IP address and HTTP port to enter the login interface of NVR 8 3 2 Via WAN There are also two ways for NVR to connect to Internet 1 Connect the NVR to internet through router o...

Страница 72: ...ome diagonally down left to rotate the dome diagonally down right to rotate the dome towards left to rotate the dome towards right to stop rotating the dome Buttons Description Drag the scroll bar to...

Страница 73: ...ck the channel which needs to be zoomed Right click to select zoom in button to zoom in the image Double click or right click to exit 8 5 Remote Playback Backup 8 5 1 Remote Playback Click button to g...

Страница 74: ...1 Go to Search File management Refer to Fig 8 7 2 Select highlighted date and channels 3 Click Search button to search the recorded files Fig 8 7 File Management Interface Lock Select certain file ite...

Страница 75: ...tab to go to the below interface as Fig 8 9 Fig 8 9 Remote System Configuration The sub menu list and the options in every menu are similar to that of the NVR Please refer to Main Menu Setup Guide for...

Страница 76: ...be not enough for operating the NVR Please use the power adaptor supplied along with the NVR b It could be a wiring issue Please check the power and data cables of the HDD c The HDD could have gone b...

Страница 77: ...inimum configuration required for remote monitoring PC Module Parameters CPU Intel Celeron 2 4G Motherboard Intel 845 HDD 80G RAM 512M VGA NVIDIA GeForce MX440 FX5200 ATIRADEON 7500 X300 OS Windows 20...

Страница 78: ...ation format is Total Recording capacity Used space per hour MB h coverage rate of hard disk recording time hour channel numbers For instance one customer sets resolution to 720P frame rate to 25 fps...

Страница 79: ...CH 1080P 960P 720P D1 30fps HDMI VGA Resolution 1080P 1280 1024 1024 768 800 600 Record Resolution 1080P 960P 720P D1 Audio Input RCA 1 Audio Output RCA 1 Alarm Input No local input support 4 CH IPC a...

Страница 80: ...Vimar SpA Viale Vicenza 14 36063 Marostica VI Italy Tel 39 0424 488 600 Fax Italia 0424 488 188 Fax Export 0424 488 709 www vimar com 49400971A0 00 15 11 VIMAR Marostica Italy...

Отзывы: