background image

10

BASIC 

OPERA

TIONS


„

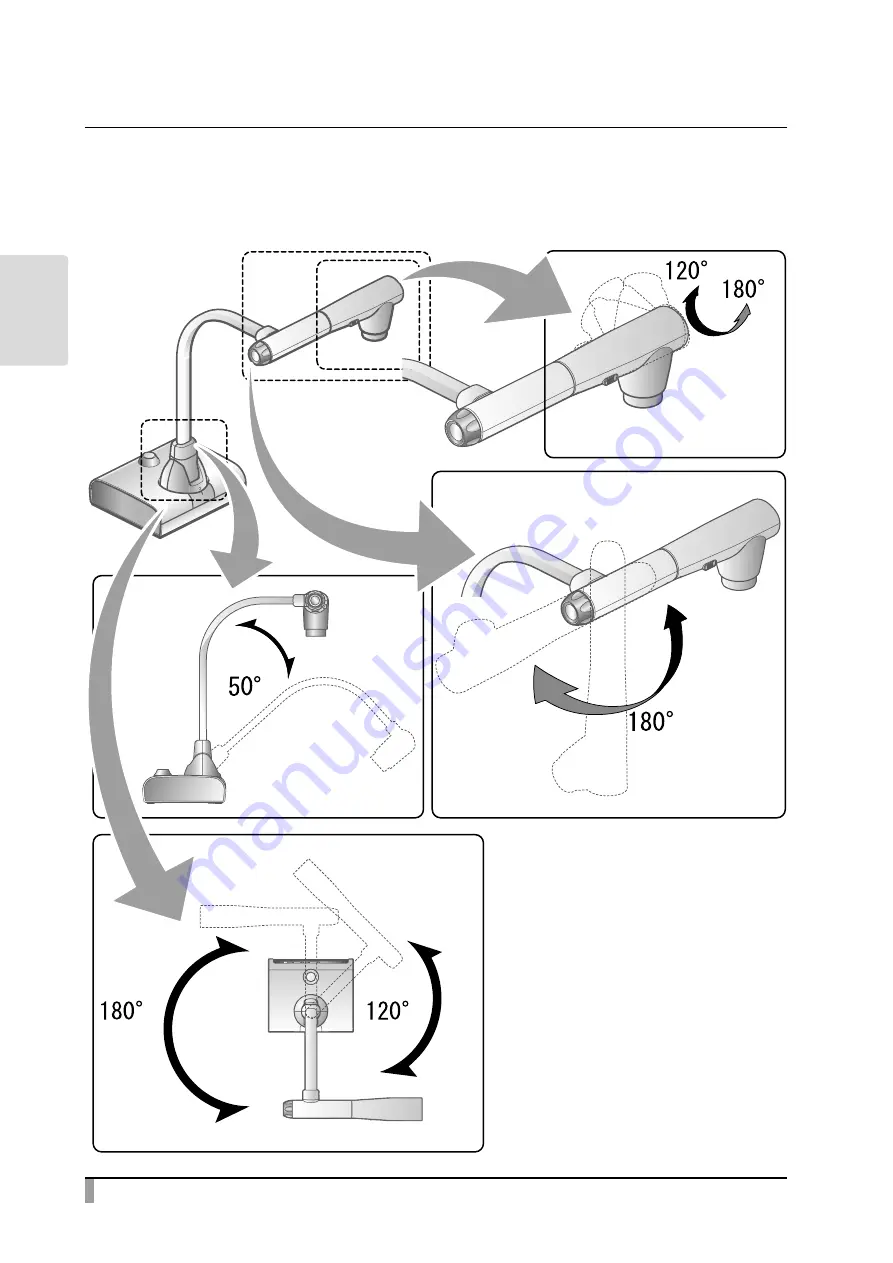
Moving parts of the document camera

The product can be moved as shown below.

Содержание L-12W

Страница 1: ...OPERATIONS BASIC OPERATIONS LIST OF ERROR MESSAGES TROUBLE SHOOTING SPECIFICA TIONS L 12W TT 12W INSTRUCTION MANUAL Please read this instruction manual carefully before using this product and keep it...

Страница 2: ...t basement or near a swimming pool and the like Placement Do not place this product on an unstable cart stand tripod bracket or table The product may fall causing serious injury to a child or adult an...

Страница 3: ...t defeat the safety purpose of the grounding type plug Power Cord Protection Power supply cords should be routed so that they are not likely to be walked on or pinched by items placed upon or against...

Страница 4: ...rols may result in damage and will often require extensive work by a qualified technician to restore the product to its normal operation If the product has been dropped or damaged in any way When the...

Страница 5: ...t operating and maintenance servicing instructions in the literature accompanying the product This symbol crossed out wheeled bin WEEE Annex IV indicates separate collection of waste electrical and el...

Страница 6: ...vironment This equipment generates uses and can radiate radio frequency energy and if not installed and used in accordance with the instruction manual may cause harmful interference to radio communica...

Страница 7: ...oduct on an unstable base or slanted surface Place or wire the unit to prevent the AC adapter cord or video cable from pulling Carry the product by holding the lower part of the main unit in both hand...

Страница 8: ...h as a CD MP3 player to the audio input port when the Audio Selector is set to Mic in Audio input is a dual purpose port microphone line in which supplies power when Mic in is selected adding external...

Страница 9: ...viii...

Страница 10: ...e remote control 11 Fixture 12 2 3 Shooting images 14 Setting up the product 14 Connecting the power cable 14 Connecting a video cable 14 Turn on o the power 15 Setting the destination 15 Start screen...

Страница 11: ...ng split screen 50 Using the QR code reader 52 Using the digital textbook 54 Connecting to the network 54 Using the share menu 55 Using Miracast 56 Using the timer 58 Using ELMO Play 59 Using the le m...

Страница 12: ...DQW 6DIHJXDUGV About AC adapter Press and slide the plug into the groove of the AC adapter as shown in the drawing Slide it until it clicks Choose the correct plug according to the outlet When removin...

Страница 13: ...ent Camera Part names No Name LED lighting switch P 23 LED lighting P 23 Built in mic Zoom dial P 21 AF button Operating panel P 6 IR receiver P 11 Side panel Left P 9 Side panel Right Rear panel P 7...

Страница 14: ...LED To switch to the Playback mode Images stored in the memory device SD card USB flash drive internal storage will be displayed To switch to the Home screen P 25 To save a still image to the memory...

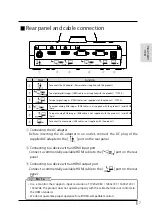
Страница 15: ...le is not supplied with the product Connecting the AC adapter Before inserting the AC adapter in an outlet connect the DC plug of the supplied AC adapter to the port on the rear panel Connecting to a...

Страница 16: ...Video signal Blue 13 Horizontal synchronizing signal 4 N C 9 N C 14 Vertical synchronizing signal 5 GND 10 GND 15 N C Connecting to a computer with a USB cable Connect a commercially available USB cab...

Страница 17: ...the output image resolution is automatically changed based on the information from the connected monitor Even if RGB OUT is selected it is not reflected Make sure to change the output image resolutio...

Страница 18: ...10 BASIC OPERATIONS Moving parts of the document camera The product can be moved as shown below...

Страница 19: ...the camera image is displayed refer to P 21 For operations when data in an SD card USB flash drive is displayed refer to P 34 Receiving IR signal from the remote control Point the IR transmitter of th...

Страница 20: ...o the HDMI port remove the screw above the HDMI port Attach the fixture and tighten the screw Pass the cable tie through the fixture and tie it around the plug of the HDMI cable Fixture 2 For HDMI cab...

Страница 21: ...ie around the root of the cable and pull it tight Remove the screw above the HDMI port and connect the HDMI cable Attach the fixture and tighten the screw Caution Depending on the shape of the plug th...

Страница 22: ...the product P 15 Connecting the power cable Connect the power cable and the AC adapter Then connect the AC adapter to the port on the rear panel of the product and insert the power cable into an outl...

Страница 23: ...button on the remote control to turn off the power The Power LED will turn red Setting the destination The Destination select screen will be displayed over the camera image when the power is turned on...

Страница 24: ...selected The Pen menu will be displayed at the left end of the screen Select a pen to perform the drawing The Pen menu will be displayed at the right end of the screen when the right tab C is selected...

Страница 25: ...te This icon will be displayed when the speaker is muted This icon does not appear when the speaker mute setting is off Miracast This icon will be displayed during Miracast communication 1 Either WiFi...

Страница 26: ...rk blue Performing a capture operation or recording operation during the drawing process will record the image with all added drawings Pen Type Icon Function Pen To draw a line Highlighter To draw a l...

Страница 27: ...ver deleted lines Only lines deleted by the last action can be recovered After deleting the selected line the Eraser becomes deselected and the last selected Pen becomes selected again Hand tool Type...

Страница 28: ...yed 0 90 180 270 Record To record a video to the specified media Long press To select the destination media Brightness 1 To display the Brightness adjustment menu The brightness can be adjusted by mov...

Страница 29: ...be shown in large size ZOOM OUT The subject will be shown in small size If you cannot get a focused image use the AF button on the camera head or the button on the remote control VPDOOHU RRP GLDO ODU...

Страница 30: ...slider left and right Mouse operation or The Brightness adjustment slider will disappear when outside area of the Brightness adjustment slider is pressed Brightness adjustment slider 7 levels 3 3 Def...

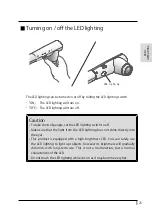
Страница 31: ...people set the LED lighting switch to off Make sure that the light from the LED lighting does not shine directly into the eyes This product is equipped with a high brightness LED You can safely use t...

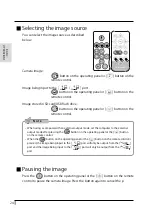
Страница 32: ...sing a computer with an external output mode set the computer to the external output mode after pressing the button on the operating panel or the button on the remote control When the button on the op...

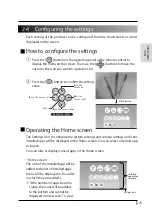
Страница 33: ...to configure the system settings and camera settings and icons installed apps will be displayed in the Home screen You can select a desired app to launch You can hide or display icons of apps in the...

Страница 34: ...net Microscope Set this mode when you use the product with a microscope Miracast To connect a device that supports Miracast Browser To start the browser to access the Internet The network configuratio...

Страница 35: ...icon to delete the app or hide the icon Before uninstalling the app you will need to connect the mouse or touchscreen Pre installed apps cannot be uninstalled Only icons will be hidden To re display...

Страница 36: ...shooting A3 size document select 4 3 Speaker volume 0 15 To adjust the volume of the speaker Mic mute Enable To set whether to mute the microphone When using the microphone set this setting to Disabl...

Страница 37: ...nce is adjusted automatically to ensure a more natural color according to the characteristics of the subject Cloudy To adjust the white balance according to dark outdoor environment Sunny To adjust th...

Страница 38: ...nstall the latest version accordingly This function is available when the product is connected to the Internet via LAN or WiFi Android Version To display the Android version of the product License To...

Страница 39: ...specified Ethernet Dhcp ON A unique IP address will be assigned automatically OFF To set the IP address manually The following settings can be configured if this item is set to OFF Static ip To set th...

Страница 40: ...Name Selection item Function Language and input Language Chinese To set the display language Japanese Deutsch English Francais Spelling correction Language To select the language subject to the Spell...

Страница 41: ...Google search during typing Advanced settings To configure the display of pictograms on the keyboard or to configure whether to display app icons in the Home screen Pointer speed To set the pointer sp...

Страница 42: ...ally available or USB flash drive commercially available into the slot on the side panel before starting the operation P 9 Recording is not possible if either an SD card or USB flash drive is not inse...

Страница 43: ...icon in the Menu area Select the bottom tab in the Document camera screen to display the Menu area RC VL RC VL About SD card SDXC card cannot be used Video recording is only possible to an SD card SD...

Страница 44: ...P 18 Still image will be recorded when is displayed on the screen Video Basic operations Press the button on the operating panel or the button on the remote control Make sure that the menu is not dis...

Страница 45: ...B flash drive The drawings on the image can also be saved The camera image and the added drawings can be recorded as video P 18 The recording will be performed at the set recording quality Video recor...

Страница 46: ...ote control to display the content items list of still images videos How to move the cursor 1 You can move the cursor using the buttons on the operating panel or the buttons on the remote control or t...

Страница 47: ...ia select Icon Name Function Internal storage To display the content items stored in the internal storage in the List of content items screen SD card To display the content items stored in the SD card...

Страница 48: ...ils Full screen image Basic operations Display the list of content items still image video Press the button on the operating panel or the button on the remote control Select a still image you want to...

Страница 49: ...the button on the remote control or click with the mouse The menu will be displayed If you want to hide the menu press the Hide icon To return to the List of content items screen press the buttons on...

Страница 50: ...ach menu Still image display menu Icon Name Function Return To return to the List of content items screen Capture To save the image being displayed as a still image You can save the image with all add...

Страница 51: ...ls Full screen image Basic operations Display the list of content items still image video Press the button on the operating panel or the button on the remote control Select a video you want to display...

Страница 52: ...ng panel or the button on the remote control or click with the mouse The selected video will be played automatically To return to the List of content items screen press the buttons on the operating pa...

Страница 53: ...will change to the Play icon during pause Press this icon again to restart the video Seek bar To change the playback position as desired by moving this bar Playback time To display the elapse time dur...

Страница 54: ...UVC video stream it may take a while before the image is displayed Be sure not to turn off the power of the product or disconnect the USB cable until the image is displayed When you change the resolut...

Страница 55: ...ctly perform such operations as zooming in out with the product Connection with the portable IWB 3RUWDEOH VROG VHSDUDWHO Set up the product as shown in the figure above and connect to a projector and...

Страница 56: ...LQ WKH SHQ 3HQ 7LS HIW PRXVH EXWWRQ XWWRQ 5LJKW PRXVH EXWWRQ XWWRQ 7R FDQFHO WKH FDOLEUDWLRQ Recognition of the write range calibration Hold down Button 1 on the pen for three seconds or more near th...

Страница 57: ...alibration mode will be canceled automatically with two short beeps if there is no pen operation for more than 30 seconds during the calibration N o t e Caution Touch the whiteboard lightly with the p...

Страница 58: ...O Play chargeable Product license will be required for downloading WPS Office For further information consult the dealer from whom you purchased this product or our branch office near your location Us...

Страница 59: ...ent items will be displayed in the split screen The check mark does not appear when no content item is selected Displaying the split screen The selected content items will be displayed in the order se...

Страница 60: ...action Using the QR code reader Using the Camera app you can read the QR code to access the specified website The WiFi configuration or the Ethernet configuration needs to be completed in advance to...

Страница 61: ...elect OK The browser will open and the relevant website will be displayed Step 5 To return to the Document camera screen press the Return icon displayed on the top left of the screen It is not possibl...

Страница 62: ...connected to the network via WiFi or Ethernet WiFi and Ethernet cannot be used at the same time Ethernet has a priority over WiFi When the product is connected to Ethernet while it is connected to WiF...

Страница 63: ...the media to copy a content item The Copy screen will be displayed Type the file name or select the destination folder Press the area around the folder and a dialog for specifying the destination fold...

Страница 64: ...LED Status Miracast LED WiFi connected Blue WiFi connecting Flash blue WiFi disconnected Off Selecting a device to connect Before connecting a Miracast device to the product for the first time you wi...

Страница 65: ...e display If no connection device is found after the Miracast icon is pressed an error will occur and the Connection device select screen will be displayed Then after the connection device is selected...

Страница 66: ...icon is tapped 10sec 1min 10min Home To return to the Home screen Document Camera To display the camera image How to set the timer Step 1 Click the Time select icon with the mouse to set the time Ste...

Страница 67: ...displayed You can view files in the folder or open them Using the automatic deskew function By using this function the product will automatically detect the skew angle of the document such as a printi...

Страница 68: ...hooting condition the Auto deskew function may not work properly Using a whiteboard A white blank screen will be displayed You can draw on the white blank screen by using Pen or Highlighter Step 1 Sel...

Страница 69: ...awings added to each whiteboard will be maintained while the Camera app is running Drawings can also be added on the external monitor by using the mouse Icon Name Function Return To return to the Home...

Страница 70: ...Select either the left tab or right tab to open the Pen menu for drawing Step 3 Start drawing By selecting the Pen icon you can start drawing over the live camera image For details refer to Pen menu f...

Страница 71: ...n P31 If the dhcp is set to ON the system will connect the network automatically Set it to OFF if you need to enter the IP address manually Step 1 Press the Settings button to open the Settings screen...

Страница 72: ...put from the HDMI OUT port P7 For information about switching the image source from the camera image refer to Selecting the image source P24 The status of the image currently displayed on the monitor...

Страница 73: ...era lens GMXVW GMXVW 0LFURVFRSH DWWDFKPHQW OHQV VROG VHSDUDWHO Microscope mode operations When the Microscope icon in the menu displayed by pressing the MENU button on the remote control or the operat...

Страница 74: ...attachment lens Attach the microscope attachment lens to the eyepiece Match the centers of the microscope attachment lens and eyepiece and use the three screws to evenly tighten the lenses against eac...

Страница 75: ...Depending on the type of eyepiece you may not be able to view the object clearly even after adjusting the zoom We recommend using a WF type eyepiece If you do not use a WF type we recommend using an e...

Страница 76: ...roken Image capture Could not capture image The SD card or the USB flash drive is not recognized There is a malfunction in the internal storage Check if the recording media is inserted properly Not en...

Страница 77: ...m is not supported The file is broken The file size is too large Check if the file is broken Check if the file extension is supported by the product Check if the file size is too large Browser Not con...

Страница 78: ...n setting is set to AUTO If you turn the power ON immediately after turning it OFF the product may not start Wait for several seconds after turning the power OFF and then turn it back ON Reconnect the...

Страница 79: ...lution setting of the unit This is not a malfunction The UVC video stream is upside down Check that the graphics driver and other device drivers on your computer are updated The latest device drivers...

Страница 80: ...sition The default setting of the speaker volume may be set to mute when an external microphone or speaker is connected for the first time Using the product near a device which uses infrared signals m...

Страница 81: ...pped and the amount of memory will be increased The automatic miracast function is to start miracasting automatically when the product is started When the menu screen is displayed the camera function...

Страница 82: ...x1 Output terminal RGB output Mini Dsub 15P connector female x 1 HDMI output terminal x 1 Line out terminal 3 5mm stereo minijack x 1 Input terminal RGB input Mini Dsub 15P connector female x 1 HDMI i...

Страница 83: ...l 3840 Vertical 2160 60fps Horizontal 3520 Vertical 2640 30fps Resolution HDMI 1920 1080 1280 720 RGB 1920 1080 1280 720 1024 768 USB 1920 1080 1280 720 1600 1200 1024 768 640 480 White balance Auto C...

Страница 84: ...was obtained from a video provider licensed from MPEG LA LLC Additional information including that relating to promotional and commercial uses may be obtained from MPEG LA LLC Unless used for personal...

Страница 85: ...0 Fax 516 501 0429 E mail elmo elmousa com Web https www elmousa com ELMO Europe SAS Headquarters 12 place de la D fense Maison de la D fense 92974 Paris la D fense Cedex FRANCE Tel 33 0 1 73 02 67 06...

Отзывы: