background image

77

English

AD

VANCED 

OPERA

TIONS

• 

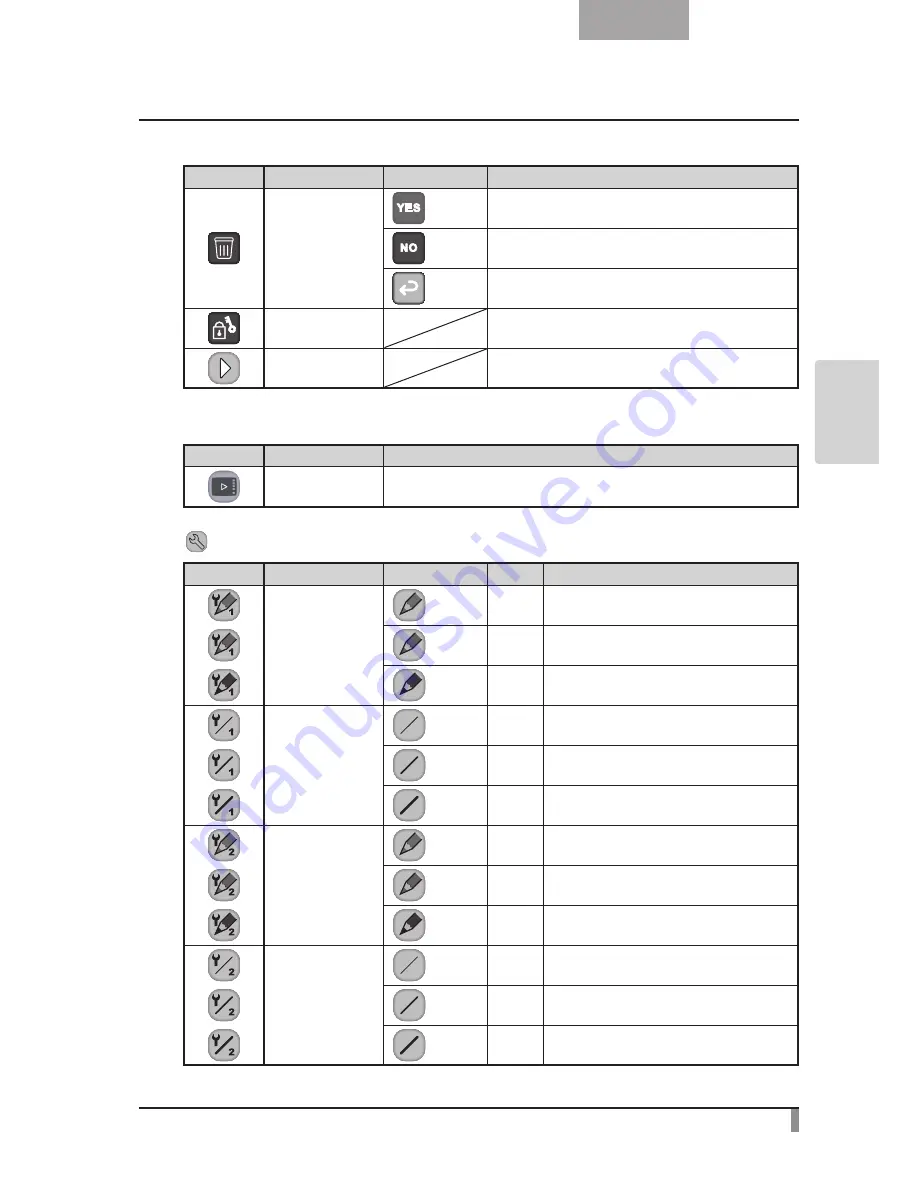
Main Menu 3

Icon

Name

Selection Item

Function

Delete

Yes

To delete the displayed image. (You cannot delete locked 
images.)

No

To cancel deletion.

Exit

To go back one layer in the menu.

Memory Lock

To lock (set as protected) or unlock (set as unprotected) the 
selected image.

Next Menu

To go to Main Menu 1.

• 

Main Menu 4

Icon

Name

Function

Show

To show the menu.

Setting Menu (when Setting Menu is selected)

Icon

Name

Selection Item Default

Function

Pen 1 Color

Red

To set the pen color to red.

Blue

To set the pen color to blue.

Black

To set the pen color to black.

Pen 1 Thickness

Thin

To decrease the pen thickness.

Medium

To set the pen thickness to medium width.

Thick

To increase the pen thickness.

Pen 2 Color

Red

To set the pen color to red.

Blue

To set the pen color to blue.

Black

To set the pen color to black.

Pen 2 Thickness

Thin

To decrease the pen thickness.

Medium

To set the pen thickness to medium width.

Thick

To increase the pen thickness.

Содержание L-12 ID

Страница 1: ...VANCED OPERATIONS BASIC OPERATIONS TROUBLE SHOOTING SPECIFICA TIONS English Document Camera INSTRUCTION MANUAL Please read this instruction manual carefully before using this product and keep it for f...

Страница 2: ...a wet basement or near a swimming pool and the like Placement Do not place this product on an unstable cart stand tripod bracket or table The product may fall causing serious injury to a child or adul...

Страница 3: ...o not defeat the safety purpose of the grounding type plug Power Cord Protection Power supply cords should be routed so that they are not likely to be walked on or pinched by items placed upon or agai...

Страница 4: ...controls may result in damage and will often require extensive work by a qualified technician to restore the product to its normal operation If the product has been dropped or damaged in any way When...

Страница 5: ...rtant operating and maintenance servicing instructions in the literature accompanying the product This symbol crossed out wheeled bin WEEE Annex IV indicates separate collection of waste electrical an...

Страница 6: ...l environment This equipment generates uses and can radiate radio frequency energy and if not installed and used in accordance with the instruction manual may cause harmful interference to radio commu...

Страница 7: ...se or slanted surface Place or wire the unit to prevent the AC adapter cord or video cable from pulling Carry the product by holding the lower part of the main unit in both hands Never hold the produc...

Страница 8: ...such as a CD MP3 player to the audio input port when the Audio Selector is set to Mic in Audio input is a dual purpose port microphone line in which supplies power when Mic in is selected adding exte...

Страница 9: ......

Страница 10: ...anual CD ROM 13 2 3 Shooting Images 14 Setting up the main unit 14 Connecting the AC cord 14 Connecting the video cable 15 Turning the power ON OFF 15 Adjusting the size 16 Adjusting the brightness 17...

Страница 11: ...e IWB both sold separately 57 Connection with the wireless pen tablet 57 Basic operations of the pen tablet 58 Selecting how to use the pen tablet from the tablet menu 60 Connection with the portable...

Страница 12: ...USB cable P 8 for Connecting to PC Image Mate Installation Manual Image Mate Installation Manual Quick Start Guide Quick Start Guide 3S Service Registration Form 3S Service Registration Form 1 Operat...

Страница 13: ...TIONS 2 2 1 Document Camera Part Names Operation of the main unit P 11 No Name Illumination switch P 19 Illumination P 19 Built in mic Zoom dial P 16 AF button Operating panel P 6 Rear panel P 7 Side...

Страница 14: ...to restart Image select LED To switch the screen to images stored on the SD card USB flash drive The LED is lit when the button is selected P 20 LED To switch the screen to camera image The LED is lit...

Страница 15: ...ut to RGB IN terminal can be output from the RGB OUT terminal A cable is supplied with this product VIDEO To output video images RCA cable is not supplied with this product USB To connect to a PC USB...

Страница 16: ...inal on the rear panel Only 1 RGB cable is supplied with the product Specifications of the RGB IN terminal Signal allocation 10 9 8 7 6 5 4 3 2 1 15 14 13 DSUB 15P shrink terminal Female 12 11 Video s...

Страница 17: ...f the connected device When using a PC with an external output mode set the PC to the external output mode after pressing the button on the operating panel We recommend using a USB 2 0 compliant USB c...

Страница 18: ...he output image resolution is automatically changed based on information form the connected monitor Even if RGB OUT is selected it is not reflected We recommend that you change the output image resolu...

Страница 19: ...11 English BASIC OPERATIONS Moving Parts of the Document Camera This unit can be moved as shown below 180 45 180 120 180 120...

Страница 20: ...USB flash drive is displayed P 37 Receiving signal from the remote control Point the infrared light lens of the remote control at the infrared sensor and press the button of the desired function Rece...

Страница 21: ...S Image Mate CD ROM Instruction manual CD ROM The CD ROM contains the software for connecting to a PC and the Instruction Manual For software installation follow the instructions in the separate Image...

Страница 22: ...ain unit Set up the main unit as shown in the figure above Then connect the main unit to a projector or a PC monitor and turn on the power of the main unit P 15 Connecting the AC cord Connect the AC c...

Страница 23: ...e to turn OFF the power for all of the devices Turning the power ON OFF Press the on the operating panel or the button on the remote control to turn the power ON After the Button flashes blue it is il...

Страница 24: ...ZOOM IN The object can be shown in large size ZOOM OUT The object can be shown in small size Zoom dial ZOOM OUT smaller ZOOM IN larger ZOOM IN ZOOM OUT Zoom ratio Optical 12x Digital 8x When the opti...

Страница 25: ...lecting Brightness from the menu on the screen Automatic brightness adjustment Auto To ensure a constant degree of brightness the brightness of the image changes automatically according to the brightn...

Страница 26: ...ing On the setting details are displayed on the screen To return to the factory settings press the buttons on the operating panel at the same time or select Rst Brightness from the menu In places wher...

Страница 27: ...ts of people turn the illumination light switch to OFF Make sure that the light from the illumination light does not shine directly into your eyes This product is equipped with a high brightness LED l...

Страница 28: ...ote control When using a PC with an external output mode set the PC to the external output mode after pressing the button on the operating panel or the button on the remote control Image of the RGB IN...

Страница 29: ...s the button to select the function to be changed Select Front operating panel Move the cursor up Move the cursor left Move the cursor right Display hide the menu on the screen Move the cursor down Ca...

Страница 30: ...tons on the operating panel or the buttons on the remote control to change the level of brightness The brightness of the image will not change automatically in response to the brightness of the shooti...

Страница 31: ...e camera image when the white balance is set to Manual Use Up or Down to increase or decrease the blue color Down Exit To go back one layer in the menu Digital Zoom Valid To set the digital zoom to Va...

Страница 32: ...s use different systems and analog TVs are sold according to the system NTSC Japan U S Video output NTSC from the VIDEO terminal on the rear panel PAL Others Video output PAL from the VIDEO terminal o...

Страница 33: ...a set size and allow scrolling of the enlarged section P 31 Compare Picture To display a still image and live image together The still image is displayed on the left side of the screen and the camera...

Страница 34: ...e highlighted display area Shorten Height Lengthen Width stretch Shorten Width Exit Exit Mask Icon Name Function Exit Scroll Icon Name Function x2 To set the digital zoom magnification to 2x when the...

Страница 35: ...ture Next Picture To show the next picture Change Window To switch the sub screen and the main screen Exit Mosaic Icon Name Function Coarse To make the mosaic pattern coarser Fine To make the mosaic p...

Страница 36: ...trol or on the menu while a camera image or a Play mode is displayed the highlight function uses the darkness and size set previously You can move the highlighted area using the buttons on the remote...

Страница 37: ...You can change the darkness of a particular section by changing the setting of on the menu while the section is highlighted You can also change the size of the highlighted display area by changing the...

Страница 38: ...ge or a Play mode is displayed the mask effect is applied with the darkness set previously You can move the masked area using the buttons on the remote control The mask display is cleared when you pre...

Страница 39: ...remote control or on the menu again Scroll Normal Digital zoom Scroll x2 x2 x2 x2 The Scroll function cannot be used when the button is selected in the Image Selection When digital zoom has already b...

Страница 40: ...e left side of the screen The Compare Picture function is cleared when you press the button on the remote control or on the menu again Compare Picture Camera image Camera image Picture Compare Picture...

Страница 41: ...ht of the screen When you press the on the menu while the picture stored on the SD card USB flash drive is displayed a camera image is displayed at the bottom right of the screen The Picture in Pictur...

Страница 42: ...rking Camera image Picture Picture Camera image The Picture in Picture function cannot be used when the button is selected in the image selection When using the Picture in Picture function the image c...

Страница 43: ...e is displayed the mosaic effect is applied The mosaic effect is cleared when you press the on the menu again Mosaic Mosaic Mosaic setting Operations You can change the extent of mosaic by selecting o...

Страница 44: ...cken the color section in the image Normal Marker Mask 1 1 2 1 2 3 1 3 4 2 3 4 1 1 2 1 2 3 1 3 4 Marker Mask Answers are marked with a color pen Questions are in black Areas marked with a color pen ar...

Страница 45: ...D card The SDXC card cannot be used Formatting the SD card with this product before you use is recommended Using the SD card to record movies is recommended Using the SD card class 6 or higer is recom...

Страница 46: ...to display the menu From the menu select to switch the menu Select from the menu Select to start formatting If you do not want to format select N o t e Saving images Picture Basic operations Press the...

Страница 47: ...erations Press the button on the operating panel or the button on the remote control Press the button on the remote control Recording begins when appears at the top left of the screen When you press t...

Страница 48: ...720p Use a memory card with a faster read write speeds in case of SD card Class 6 or better or the image quality may deteriorates How to select the destination to save when both SD card and USB flash...

Страница 49: ...PERATIONS Displaying the stored data Thumbnail display list of pictures movies Basic operations Press the button on the operating panel or the button on the remote control to display the thumbnails li...

Страница 50: ...rsor 1 You can move the cursor using the or button on the operating panel or the button on the remote control 2 You can display the selected picture movie full screen by pressing the button on the ope...

Страница 51: ...thumbnails are displayed on the screen Move the cursor using the or button on the operating panel Press the button on the operating panel to select the menu item If you press the next set of menu icon...

Страница 52: ...s thumbnails between movies and pictures It can be switched with the button on the remote control too Picture Next Menu To move to the next menu page Memory Lock Lock Unlock To lock set as protected o...

Страница 53: ...ing panel to display the Thumbnail Menu Then the current status of the selection is displayed at the button right of the screen 1 If you see in the menu the list of pictures has already been displayed...

Страница 54: ...or Select the picture you want to display full screen Press the button on the operating panel or the button on the remote control In this status press the button on the control panel or the button on...

Страница 55: ...et as protected or unlock set as unprotected the selected image Exit To return to the previous level of menu Support Function Icon Name Function Highlight To highlight part of the image you want to em...

Страница 56: ...ened not highlighted area makes the dark area less transparent and harder to see through and makes the area more transparent and easier to see through Lighten Exit Size Lengthen Height stretch To chan...

Страница 57: ...next picture Exit PIP Icon Name Function Prev Picture To show the previous picture Next Picture To show the next picture Change Window To switch the sub screen and the main screen Exit Mosaic Icon Na...

Страница 58: ...nel to display the Thumbnail Menu Then the current status of the selection is displayed at the button right of the screen 1 If you see in the menu the list of movies has already been displayed 2 If yo...

Страница 59: ...the button on the remote control to move the cursor Select the movie you want to display full screen Press the button on the operating panel or the button on the remote control The movie automatically...

Страница 60: ...Pause Cueing Up To set the output audio volume Down Repeat On To play the movie on loop Repeat Off You cannot display pictures other than DCF system compliant files and file structures Movie files ot...

Страница 61: ...C via USB you can save the image data stored on the SD card to the PC The operating system OS for the connected PC should be Microsoft Windows XP SP2 or later Windows Vista Windows 7 or Windows 8 Turn...

Страница 62: ...ote control This may cause a malfunction While the equipment is in the USB connection mode do not switch USB Mode to another mode from the Preferences menu on the screen We recommend using a USB 2 0 c...

Страница 63: ...t by connecting the device to the USB port on your PC Operation is not guaranteed for all applications You can also use the Image Mate bundled software and perform the operations described below Captu...

Страница 64: ...power to the device or disconnect the USB cable until the image is displayed The image displayed using USB only supports MJPEG Depending on the software you are using you may not be able to display a...

Страница 65: ...a images directly and record the result You can also directly perform such operations as zooming in out with the device Connection with the wireless pen tablet ELMO Wireless Slate Tablet CRA 1 CODE 13...

Страница 66: ...lines Touch the tip of the pen to the surface of the tablet and move the pen If or has been selected the pen will draw a line Use this function to draw erase lines Keep pressed down Keep pressed down...

Страница 67: ...button Touch once Touch once CAUTION Press the tablet lightly with the pen do not press hard Hold the pen as upright as possible holding the pen at an angle may result in a failure of the tablet to r...

Страница 68: ...Display an image on the document camera as a background and draw on it with the pen tablet P 65 Write on a white screen Whiteboard Mode Display a white image as a background and draw on it using the p...

Страница 69: ...1343 Set up the device as shown in the figure above and connect to the projector and then turn on the power Connect the portable IWB or special wireless adapter supplied with the IWB to the device For...

Страница 70: ...t use rechargeable batteries in the pen Pen Tip Left mouse button Button 1 Right mouse button Button 2 Middle mouse button wheel Recognition of the write range calibration Hold down Button 1 on the pe...

Страница 71: ...ration for more than 30 seconds The calibration cannot be performed when the resolution is set to VGA 640 x 480 N o t e Drawing Touch the pen to the portable IWB installed whiteboard and move it When...

Страница 72: ...ith the pen Do not press hard on the whiteboard Holding the pen at an extreme angle may result in a failure of the whiteboard to recognize the position of the pen Hold the pen perpendicular to the whi...

Страница 73: ...NS Using the pen tablet or portable IWB to draw on the camera image You can draw on camera images Next Menu descriptions Pressing or switches the menu pages Next Next Support Function menu Switch page...

Страница 74: ...he cursor and menu icons are not captured Rec To record the image currently displayed on the screen as a movie and save it on the SD card This does not record the lines drawn with the tablet the menu...

Страница 75: ...ain Menu 1 Main Menu 4 Icon Name Function Show To show the menu Setting Menu Icon Name Selection Item Default Function Pen1 Color Red To set the pen color to red Blue To set the pen color to blue Blac...

Страница 76: ...pen thickness Medium To set the pen thickness to medium width Thick To increase the pen thickness Erase Area Narrow To decrease the area of partial erasure Medium To set the area of partial erasure t...

Страница 77: ...ode a still image saved in the SD card is displayed at the bottom right of the screen In Playback mode a Camera image is displayed at the bottom right of the screen while a still image saved in the SD...

Страница 78: ...2 The initial color setting is Black You can change the settings for the pen in the Setting menu Clear Screen To clear all lines drawn on the screen To clear just a part of the screen move the cursor...

Страница 79: ...portable IWB P 73 Hide To hide the menu Only Main Menu 3 is displayed Next To go to Main Menu 1 Main Menu 3 Icon Name Function Show To show the menu Setting Menu Icon Name Selection Item Default Func...

Страница 80: ...lection Item Default Function Erase Area Narrow To make the area of partial erasure smaller Middle To set the area of partial erasure to the medium range Wide To increase the area of partial erasure E...

Страница 81: ...portable IWB and an SD card You can display a picture or movie stored on the SD card and use the pen tablet or portable IWB to draw or write on it Thumbnail display When you select an image from the t...

Страница 82: ...o Thumbnail Mode Menu 2 Thumbnail Mode Menu 2 Icon Name Selection Item Function Prev Page To move the thumbnail to the previous page Next Page To move the thumbnail to the next page Camera Mode To dis...

Страница 83: ...ed image Lock All To lock set as protected all thumbnail images Unlock All To unlock set as unprotected all thumbnail images Exit To go back one layer in the menu Delete Yes To delete the selected ima...

Страница 84: ...to the SD card as a still im age The camera image and the lines drawn are saved but the menu and cursor are not saved Setting To specify the settings for Pen and Eraser Next To go to Main Menu 2 Main...

Страница 85: ...tting Menu when Setting Menu is selected Icon Name Selection Item Default Function Pen 1 Color Red To set the pen color to red Blue To set the pen color to blue Black To set the pen color to black Pen...

Страница 86: ...To play pause or cue the movie Pause Cueing Movie Play Menu 2 Icon Name Function Show To show or hide Movie Play Menu 2 Hide Menu To go to Movie Play Menu 3 Camera Mode To display an image on the docu...

Страница 87: ...D OPERATIONS Movie Play Menu 3 Icon Name Function Show To show or hide Movie Play Menu 3 Hide Menu To go to Movie Play Menu 1 Up To set the audio output volume Down Repeat On To repeat the playback of...

Страница 88: ...ay the enlarged image through the document camera lens Adjust Adjust Option MicroScope attachment lens CODE 1332 Procedure Change the setting of this equipment for using a microscope Press the button...

Страница 89: ...he lenses against each other CAUTION If the screws are screwed too tightly the microscope eyepiece or tube may be damaged The screws may leave scratches where they come in contact with the microscope...

Страница 90: ...clearly even after adjusting the zoom We recommend using a WF type eyepiece If you do not use a WF type we recommend using an eyepiece of 10x or less Adjust the focus manually when it is hard to focus...

Страница 91: ...tion changes automatically When the HDMI monitor is connected the output image resolution is automatically changed based on information from the connected monitor No image is displayed from the USB No...

Страница 92: ...he SD card USB flash drive operations cannot be performed The SD card USB flash drive is not being read correctly Use the SD card USB flash drive after formatting it twice as described below First for...

Страница 93: ...o the camera image When the portable IWB and the device are connected Lines cannot be drawn The menu cannot be displayed The symbols are not displayed on the screen after the calibration If you perfor...

Страница 94: ...5P connector female x 1 Composite video output RCA pin jack 75 unbalanced x 1 NTSC PAL HDMI output terminal x 1 Line Out terminal 3 5mm stereo minijack x 1 Input terminal RGB input Mini Dsub 15P conne...

Страница 95: ...Vertical 1536 Synchronized signal Internal Resolution Analog RGB Horizontal 800TV lines or more Vertical 800TV lines or more Video output Horizontal 500TV lines or more Analog RGB output Analog RGB o...

Страница 96: ...PAL Brightness Control Auto W Level adjustment Manual Posi Nega conversion Provided Color B W selection Provided Image rotation Provided 0 180 Image Mode Text1 Text2 Text3 Graphics1 Graphics2 Gamma se...

Страница 97: ...rcial use of a consumer to i Play AVC Video that was recorded by a consumer engaged in a personal and a non commercial activity and or ii Play AVC Video that was obtained from a video provider license...

Отзывы: