


Initial operation
© Elma GmbH & Co KG
BA/Elmasteam/GB/0306
13
3.11.1 Flexible
hand
piece
The connection socket for the flexible hand piece is on the back
of the unit
(see illustration 3.3).
For mounting the flexible hand piece please follow the
instructions given in
section 7.3.
Mounting
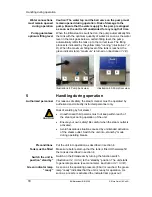
The nozzle is controlled by means of the two keys on the hand
piece:
Control
activates compressed air
(see A illustration 3.6)
Right key (white)
activates steam
(see B illustration 3.6)
Left key (red)
On Elmasteam 10, the outlet on the right can be operated with
hot water, too.
B
A
C
Illustration 3.6: Flexible hand piece
4 Initial
operation
4.1
Placement and ambient conditions
Check the Elmasteam for possible transport damages before
initial operation.
Check for transport
damages
In case of visible damages
do not
connect the unit to the mains.
Contact your supplier and forwarding agent immediately.
Place the unit in a dry and sufficiently ventilated place.
Keep a clear space of approx.10 cm at the back of the unit:
Placement
The outlet of the safety pressure valve is behind the ventilation
openings on the back of the unit. When the valve is activated,
steam will be discharged through the ventilation openings for a
short period.


