background image

17

16

W W W. I N E L S . C O M / K I T S

U S E R ´S   M A N U A L   2 . 0

ADDITIONAL SETTINGS

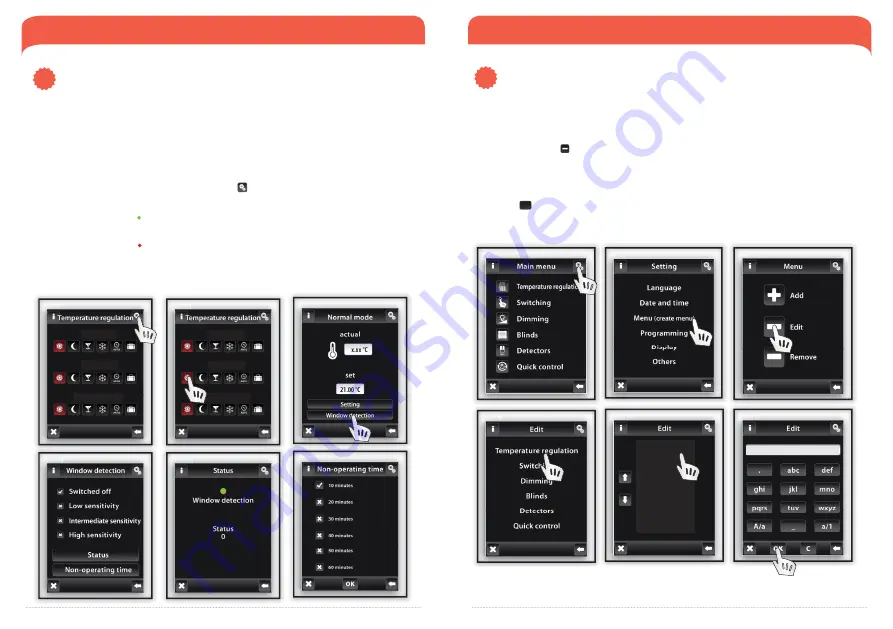
Click on the „Settings“ and then on the „Menu“ (create a title) to edit the title of the heating circuit 
(Fig. 2).

By pressing the icon      the menu will be displayed, then select the section whose title you want to 
change (Fig. 4) –  in this case Temperature regulation. Mark the Heating circuit by touch (Fig. 5) and 
then edit the text by using keyboard. 

Press the  

OK

  button to save (Fig. 6).

 Fig. 

3

Fi

3

 Fig. 

3

 Fig. 

4

Fi

4

 Fig. 

4

 Fig. 

5

Fi

5

Fig.

5

Heating 1

Heating 2

Heating 3

 Fig. 

6

Fi

6

Fig. 

6

Heating 1

ADDITIONAL SETTINGS

Open window detection 

2.

The function of Open window detection (Fig.4) monitors the sharp temperature drop and close Wireless 
thermovalve to a preset time. You can choose 3 sensitivity levels of open window detection or switch the 
function off  (Default Switch OFF).

Low sensitivity

 –  temperature drop by over 1,2°C/min.

Medium sensitivity

 – temperature drop by over 0,8°C/min.

High sensitivity

 –  temperature drop by over 0,4°C/min.

To set open window detection press the button Settings 

 (Fig. 1). Then click on the Heating mode (for the 

chosen Heating circuit) that will be adjusted (Fig. 2).

Window detection (Fig. 5)        a green dot indicates the current heating interruption for a specifi ed  


 period of inactivity


                               a red dot indicates that function of window detection is not active

The period of inactivity - non-operating (Fig. 6) – used to set the period of inactivity after open window 
detection.

Status (Fig. 5) –  Status 0 indicates that Wireless thermovalve is functioning correctly. 

 Fig. 4

Fi

4

 Fig. 4

 Fig. 6

Fi

6

 Fig. 6

 Fig. 3

Fi

3

Fig. 3

 Fig. 1

Fi

1

 Fig. 1

Heating 1

Heating 2

Heating  3

 Fig. 2

Fi

2

 Fig. 2

Heating  1

Heating 2

Heating 3

 Fig. 2

Fi

2

 Fig. 2

 Fig. 1

Fi

1

 Fig. 1

Edit title of heating circuit

3.

  Fig.  5

Fi

5

  Fig.  5

Содержание iNELS 5174

Страница 1: ...S PERFECT TEMPERATURE IN EACH ROOM WITHOUT THE UNNECESSARY EXPENSE WIRELESS KIT TO CONTROL HEATING VIA RF TOUCH UNIT S A VING ENER G Y Q U I C K INSTALL A T I O N Y E A RS GUARAN T E E www inels com kits User s manual 2 0 ...

Страница 2: ...ose the valve You can set heating programs in the weekly schedule separately for each circuit room HEATING WITH SAVINGS HEATING CONTROL VIA WIRELESS TOUCH UNIT www inels com kits Another kits and additional units can be found on the last pages of the manual or at our webpage 420 800 100 671 support inels com TECHNICAL SUPPORT Would you like some help This kit will open up new horizons for home aut...

Страница 3: ...uch 3 5 color display dimension 94 94 mm power supply AC 230V clips or the plug in adapter included in the package Kit content How does it work The range of RF signal Installing a wireless thermovalve Installing a wireless touch unit Default screen Settings Heating modes Temperature adjustment Time programs Additional settings Assigning other units Technical parameters of RFATV 1 Technical paramet...

Страница 4: ...tween wireless thermovalve you have the following possibilities RELOCATE WIRELESS THERMOVALVES USE REPEATER plug in signal repeater install between wireless touch unit and wireless thermovalve which is out of the range Place a wireless touch unit in the best possible position from Wireless thermovalves Optimal placement of Wireless touch unit is in the middle of space between each wireless thermov...

Страница 5: ...ter placing a valve to vent and inserting batteries it is necessary to calibrate the valve on vent It is can be done by pressing blue button directly on a thermovalve using the key During this operation please do not manipulate with the thermo valve Auto calibration is finished by a blink of green LED diode on thermovalve Blue button Green LED Press using the key Dismounting Wireless thermo valve c...

Страница 6: ...VER tick automatic changeover to active thesummer wintertimechangeover GTM 01 00 Fig 8 THE TIME FORMAT SETTINGS Tick this box to activate automatic time settings 12 h 24 h mode To save settings press the button OK SETTINGS THE DEFAULT SCREEN Setting the clock 1 Touch the top right corner to select the type of clock to display on the screen An ANALOG Fig 2 or DIGITAL Fig 3 display Fig 2 Fi 2 Fig 2 ...

Страница 7: ...gulation Fig 1 is used to control and set the heating mode Touch on Temperature regulation and then you will see the list of Heating Circuits Fig 2 Wireless thermovalves are preset in Wireless touch unit Heating 1 Heating 2 Heating 3 It corresponds to the number 1 2 3 marked on Wireless thermovalves Normal mode Sleep mode Party mode Anti frost mode is used to keep the minimum target temperature in...

Страница 8: ...g the arrow keys you will set the ON time and OFF time Using the arrow keys next to the icon you will adjust the target temperature Note You can create up to 5 heating programs for one day But programs must not overlap in time should not have overlapping time ranges Fig 5 By long press of the arrow key you can switch back and forth between the figures more quickly By touching on the individual day ...

Страница 9: ...detection or switch the function off Default Switch OFF Low sensitivity temperature drop by over 1 2 C min Medium sensitivity temperature drop by over 0 8 C min High sensitivity temperature drop by over 0 4 C min To set open window detection press the button Settings Fig 1 Then click on the Heating mode for the chosen Heating circuit that will be adjusted Fig 2 Window detection Fig 5 a green dot in...

Страница 10: ...erature regulation Fig 8 Celsius and Fahrenheit degrees C to F heating hysteresis setting the lower and upper limits of the range 0 5 5 C Fig 9 the offset setting to compensate inaccuracies in the temperature measurement in the range from 5 to 5 C thermostat Heating Cooling Home screen set Favorites panel to your home screen Fig 10 11 Left 1 option middle 2 option right 3 option pic 11 pic 11 pic 8...

Страница 11: ...on the screen Fig 1 Press the battery to display the unit name Use arrow keys to switch between the name and the address of the unit Fig 2 3 More about the address location can be found on the page 10 Fig 1 Fi 1 Fig 1 Fig 2 Fi 2 Fig 2 The display 7 Background select the type of screen background color black blue green purple Screensaver the desired brightness 25 50 75 100 will be activated after a...

Страница 12: ...it is less than 20 please relocate the unit or use Repearer RFRP 20 Press Return to Programming to get back to the main menu of programming Note Communication test can not be performed for battery powered devices Fig 5 Fig 5 room 1 Fig 7 Fig 7 Fig 5 Fig 5 Fig 3 Fig 3 Fig 3 Fig 4 Fig 4 RFATV 1 Fig 8 Fig 8 Fig 9 Fig 9 Fig 6 Fig 6 Fig 2 Fig 2 Heating 1 Heating 2 Heating3 ating ng g 2 2 ting ng ng g 2...

Страница 13: ...max 5W Power supply terminals Range 100 m 1 m A1 A2 Frequency Connection no screw push in terminal box or jack plug diameter 2 1 mm max 2 5 mm2 1 5 mm2 with a hollow Min distance RFTouch Actuator 868 MHz Cross section of connecting wires 320 x 240 pixels 262 144 colors 3 4 Power supply 52 5 x 70 mm Backlighting Touch area Visible surface active white LED resistive 4 conductor 3 5 Control Diagonal ...

Страница 14: ...to control colou redRGB Stripswithmax power70W channelthatcorrespondsto approximately 10 m of RGB strip Power supply DC 12 24 V option ofcolorblendingmode controlthroughkeychain RFPilotorApp DIMMER FOR COLOURED RGB LED STRIPS 4681 6 channel switching actuator intended to be installed in the swit chboard contains 6 independent 8A contacts that can switch any deviceconnectedinswitchboard Powersupply...

Страница 15: ...ersupply12V COLOURED RGB LED STRIP 5 METERS 6589 Power supply 230V 12V 60W to power 5m of RGB strip Intended for outdoor use IP67 dimension 162 5 x 42 5 x 32 mm POWER SUPPLY FOR 5 M RGB STRIP 7 2W RGB 30LED M DC12V 5A 60W This RGB LED bulb consists of 3 color chips which can mix up any color at different temperatures Bulb has a built in rece iver and dimmer so it can be easily replaced for the orig...

Страница 16: ...sit your cottage and don t want to come to unheated place KIT TO CONTROL HEATING VIA SMARTPHONE ORDER CODE 5162 ORDER CODE 5159 This kit enables convenient and quick control of heater oil heater panel heater or portable air conditioner Just plug the controlled device into switching socket and appropriately place your controller RFTC 50G The desired temperature is set on the controller that compare...

Страница 17: ...command back to switch on switch off the heating circuits It is possible to connect up to 4 temperature switching units Advice 1 If just one reference temperature is enough for you so then it can be measured by tempe rature sensor RFTI 10B and to switch up to 6 independent heating circuits you can use 6 channels switching actuator RFSA 66M Advice 2 The wireless unit RF Touch can be replaced by Smar...

Страница 18: ... required switch OFF time on 23 59 Please contact the manufacturer Forgot your password Please contact the manufacturer for further infor mation Impossible to control display Forced calibration is performed when restarting RF Touch and then hold your finger on screen RF Touch logo NOTIFICATION AND THEIR SOLUTIONS RF TOUCH UNIT NOTIFICATIONS Notification is displayed in case of incomplete inaccurat...

Страница 19: ...Manufacturer ELKO EP Ltd Palackeho 493 Holešov Všetuly 769 01 Czech Republic phone 420 800 100 671 e mail elko elkoep com www elkoep com ...

Отзывы: