Elite Screens Saker Series Скачать руководство пользователя страница 2

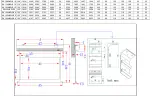
SK106NXW-E18  106"(16:10)  2580 

2283 

1780 

2383 

50 

2463 

2052 

1427 

1944 

457 

60 

100 

102 

108 

35 

23 

SK110NXW-E10  110"(16:10)  2668 

2369 

1868 

2469 

50 

2549 

1903 

1481 

1795 

254 

60 

100 

102 

108 

35 

23 

SK120NXW-E12  120"(16:10)  2883 

2585 

2083 

2685 

50 

2765 

2088 

1615 

1980 

305 

60 

100 

102 

108 

35 

23 

SK135NXW-E6 

135"(16:10)  3198 

2908 

2398 

3008 

50 

3088 

2154 

1817 

2029 

152 

60 

118 

118 

125 

35 

23 

SK150NXW2-E6  150"(16:10)  3521 

3231 

2721 

3331 

50 

3411 

2356 

2019 

2231 

152 

60 

118 

118 

125 

35 

23 

SK165NXW2-E6  165"(16:10)  3844 

3554 

3044 

3654 

50 

3734 

2558 

2221 

2433 

152 

60 

118 

118 

125 

35 

23 

SK180NXW2-E6  180"(16:10)  4167 

3877 

3367 

3977 

50 

4057 

2760 

2423 

2635 

152 

60 

118 

118 

125 

35 

23 


Содержание Saker Series

Страница 1: ...70 2040 610 60 100 102 108 35 23 SK120XHW E10 120 16 9 2955 2657 2155 2757 50 2837 1916 1494 1808 254 60 100 102 108 35 23 SK120XHW E20 120 16 9 2955 2657 2155 2757 50 2837 2170 1494 2062 508 60 100 1...

Страница 2: ...3 2685 50 2765 2088 1615 1980 305 60 100 102 108 35 23 SK135NXW E6 135 16 10 3198 2908 2398 3008 50 3088 2154 1817 2029 152 60 118 118 125 35 23 SK150NXW2 E6 150 16 10 3521 3231 2721 3331 50 3411 2356...

Страница 3: ...avoid electrical shock or product damage do not install this device in a damp place Do not place any heavy objects over the power cord Position the power cord properly to avoid creating a trip hazard...

Страница 4: ...ference Increase the distance between the screen and the interfering device s receiver Connect the projection screen to another power source apart from the interfering device Pre Installation 1 Carefu...

Страница 5: ...additional support for the screen Two or more people are required while one holds the screen in place B Ceiling Mount I Ceiling Mount movable position This mount method allows the screen to slide hor...

Страница 6: ...ge 1 After ensuring the power outlet screen are compatible voltage plug the power cord into the power outlet 2 Once the screen has power you ll be able to control it using any of the 6 methods describ...

Страница 7: ...ts to your projector s trigger output via a separate cable that may or may not be provided by the manufacturer of the projector The trigger feature will not work without an output cable from the proje...

Страница 8: ...Wait 5 seconds and then release the UP button Step 7 Your 5 12V wireless trigger should now be activated with your screen and ready to be used and able to control your screen with your projector s pow...

Страница 9: ...ry and get more out of your standard black masking drop Please contact Elite Screens before making any adjustments Tools required A 5 32 allen wrench is needed to adjust the limit screws Screen Limit...

Страница 10: ...the way up and drop the screen again to see the difference in the adjustment Increasing the length of the top black drop should be made only if there is no top black drop showing when fully deployed P...

Страница 11: ...ill cause permanent damage to the motor s gears To adjust the rise for this instance instead of turning the allen wrench counter clock wise turn it clock wise about ten full circles at a time When mak...

Отзывы: