background image

Electrical requirements

IMPORTANT

Observe all governing codes and ordinances.

It is the customer’s responsibility:

To contact a qualified electrical installer.

To assure that the electrical installation is adequate and in 

conformance with National Electrical Code, ANSI/NFPA 70

- latest edition*, or CSA Standards C22.1-94 Canadian

Electrical Code, Part 1 and C22.2 No. 0-M91 - latest edition** 

and all local codes and ordinances.

If codes permit and a separate ground wire to be used, it is 

recommended that a qualified electrician determine that the 

ground path is adequate.

Do not ground to a gas pipe.

Check with a qualified electrican if you are not sure range

hood is properly grounded.

Do not have a fuse in the neutral or ground circuit.

IMPORTANT

Save Installation Instruction for electrical inspector’s use.

The range hood must be connected with copper wire only. 

The  range  hood  must  be  connected  directly  to  the  fused 

disconnect (Or circuit breaker) box through metal electrical 

conduit.

Wire sizes must conform to the requirements of the Nation-

al Electrical Code ANSI/NFPA 70 -- latest edition*, or CSA 

Standards C22.1-94, cANADIAN eLECTRICAL cODE pART 

1 AND C22.2 No. 0-M91 - latest edition** and all local codes 

and ordinances.

A U.L. - or C.S.A. - listed conduit connector must be provided 

at each end of the ppower supply conduit (at the range hood 

and at the junction box).

Copies of the standards listed may be obtained from:

* National Fire Protection Association Batterymarch Park Quincy.

**  CSA  International  8501  East  Pleasant  Vallery  Road  Cleveland,  Ohio 
44131-5575

Before installing the hood

For  the  most  efficient  air  flow  exhaust,  use 

a  straight  run  or  as  few  elbows  as  possible.                                                                              

CAUTION: 

Vent unit to outside of building, only.

At least two people are necessary for installation.

Fittings material is provided to secure the hood to most 

types  of  walls/ceilings,  consult  a  Qualified  Installer, 

check if they perfectly fit with your cabinet/wall.

Do not use flex ducting.

COLD  WEATHER  installations  should  have  an  addi-

tional backdraft damper installed to minimize backward 

cold air flow and a nonmetallic thermal break to mini-

mize conductions of outside temperatures as part of the 

ductwork. The damper should be on the cold air side of 

the thermal break.

Make up air: Local building codes may require the use 

of Make-Up Air Systems whe using Ducted Ventilation 

Systems greater than specified CFM of air movement. 

The specified CFM varies from locale to locale. Consult 

your HVAC professional specific requeriments in your 

area.

Removing the packaging

CAUTION!

Remove  carton  carefully,  Wear  gloves  to  protect  against 

sharp edges.

WARNING:

Revome  the  protective  film  convering  the  product  before 

putting into operation.

1.

2.

3.

4.

5.

6.

4

Electrical & Installation requirements

Содержание Hood

Страница 1: ... Installation Guide Guide d utilisation d entretien et d installation Guía de instalación uso y mantenimiento READ AND SAVE THESE INSTRUCTIONS LISEZ CES INSTRUCTIONS ET CONSERVEZ LES LEA Y GUARDE ESTAS INSTRUCCIONES ...

Страница 2: ...ntrols 11 Maintenance and user service instructions 12 Cleaning 12 Grease Filter 12 Replancing the light bulb 13 Charcoal Filter 13 Warranty 14 APPROVED FOR RESIDENTIAL APPLIANCES FOR RESIDENTIAL USE ONLY READ AND SAVE THESE INSTRUCTIONS PLEASE READ ENTIRE INSTRUCTIONS BEFORE PROCEEDING INSTALLATION MUST COMPLY WITH ALL LOCAL CODES IMPORTANT Save these Instructions for the Local Electrical Inspect...

Страница 3: ...f fire or electical shock do not use this hood with any external solid state speed control device WARNING TO REDUCE THE RISK OF A RANGE TOP GREASE FIRE a Never leave surface units unattended at high settings Boilovers couse smoking on low or medium settings b Always turn hood ON when cooking at high heat or when f lambeing food I e Crepes Suzette Cherries Jubilee Peppercom Beef Flabe c Clean venti...

Страница 4: ...ed at each end of the ppower supply conduit at the range hood and at the junction box Copies of the standards listed may be obtained from National Fire Protection Association Batterymarch Park Quincy CSA International 8501 East Pleasant Vallery Road Cleveland Ohio 44131 5575 Before installing the hood For the most efficient air flow exhaust use a straight run or as few elbows as possible CAUTION V...

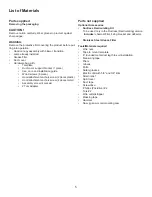
Страница 5: ...c Hood attachment anchors screw 4 pieces metal Assembly screw 4 pieces 2 Torx adapter Parts not supplied Optional Accessories Ductless Recirculating Kit To be used only in the Ductless Recirculating version Includes charcoal filter fixing bracket and deflector Stainless Steel Grease Filter Tools Materials required Wire nuts Tape to mount template 8 rounded metal duct legth to suit installation Mea...

Страница 6: ...6 Dimensions and Clearances Ductless Recirculating version Only Ducted version Only 10 3 4 13 19 5 8 36 14 3 4 1 9 16 27 3 8 Mín 46 Máx 27 3 8 Mín 42 1 4 Máx ...

Страница 7: ...s version 8 Round Pipe Preparation Do not cut a joist or stud if absolutely necessary If a joist or stud must be cut then a supporting frame must be constructed Fitting material is provided to secure the hood to most types of walls ceilings However a qualified technician must verify suitability of the materials in accordance with the type of wall ceiling Before marking cutots make sure there is pr...

Страница 8: ...to wood If there is no wood to screw into additional wall framing supports may be required Remove the template Drill 3 16 4 8 mm pilot holes at all locations where screws are being installed into wood Install the 2 5 X 45 mm mounting screws Leave a 1 4 6 4 mm gap between the wall and the back of the screw head to slide range hood into place Secure the bracket to the wall Attach vent cover bracket ...

Страница 9: ...ed size X Remove the air deflector Slide the duct onto the bottom of the air deflector Place the assembled air deflector and duct over the ex haust outlet from the hood Reassemble the air deflector to the duct cover bracket with 2 assembly screws Seal connections with vent clamps WARNING Disconnect power Remove terminal box cover Remove the knockout in the terminal box cover and install a UL liste...

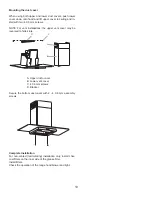
Страница 10: ...ns the upper vent cover may be reversed to hide slots A Upper ducto cover B Lower vent cover C 4 X8 mm screws D Bracket Secure the bottom duct cover with 2 4 X 8 mm assembly screws Complete Installation For non vented recirculating installation only install char coal filters on the inner side of the grease filter Install filters Check the operation of the range hood blower and light 10 C D A B ...

Страница 11: ...up the and buttons are dedicated to the timer and no motor action will occur Once the timer is initiated it can be cancelled by pressing the timer button again 3 Display Shows the hood settings The display will be lit at low intensity when the hood is not operating Pressing and key the display will light up at high intensity The display will be lit at high intensity when the hood is operating If n...

Страница 12: ...lusion or exclusion can be set by pressing the and buttons at the same time for 5 seconds The inclusion or exclusion of chacoal filter must be selected while the lamps and the motor are OFF When the carcoal filter has been excluded the charcoal filter alarm is disabled Heat sensor The control is equipped with a heat sensor that will turn on the blower at third speed if excessive heat occurs over 1...

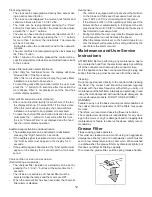
Страница 13: ...the three slots and presing them firmly in place Bulb Charcoal Filter If the model is not vented to the outside the air will be recir culated through disposable charcoal filters that help remove smoke and odours The charcoal filters cannot be cleaned They must be replaced The charcoal filters are clipped inside of each metal grase filter mounting instructions included with charcoal filters kit The...

Страница 14: ...erator abuse improper maintenance use of corrosive or abrasive cleaning products pads and oven cleaner products WHO IS COVERED This warranty is extended to the original purchaser for products purchased for ordinary residential use in North America Including the United States Guam Puerto Rico US Virgin Islands Canada This warranty is non transferable and applies only to the original purchaser and d...

Страница 15: ...ltres à charbon 26 Garantie 27 APPROUVÉ POUR LES APPAREILS DE TYPE RÉSIDENTIEL POUR UNE UTILISATION RÉSIDENTIELLE SEULEMENT LISEZ CES INSTRUCTIONS ET CONSERVEZ LES VEUILLEZ LIRE CES INSTRUCTIONS AU COMPLET AVANT DE COMMENCER L INSTALLATION DE L APPAREIL DOIT RESPECTER TOUS LES CODES EN VIGUEUR IMPORTANT Conservez ces instructions afin de pouvoir les remettre à l inspecteur électricien de votre rég...

Страница 16: ...RTISSEMENT POUR RÉDUIRE LES RISQUES D INCEDIES DE GRAISSE SUR LES CUISINIÈRES a Ne laissez jamais la cuisinière sans surveillance lorsqu elle est réglée à une haute température Les débordements par bouillonnement causent de la fumée et des débordements de gras qui peuvent s enflammer Faites chauffer l huile lentement à une température basse ou moyenne b Faites toujours fontionner la hotte lorsque ...

Страница 17: ...jonction Vous pouvez obtenir un exemplaire des normes indiquées en vous ad ressant à La National Fire Protection Association Batterymarch Park Quincy CSA International 8501 East Pleasant Vallery Road Cleveland Ohio 44131 5575 Avant d installer hotte Pour assurer la ventilation la plus efficace possible in tallez la conduite en ligne droite ou avec le moins de coudes possibles ATTENTION La sortie d...

Страница 18: ...que pièce Vis d accrochage de la hotte 4 métal pièce Vis d assemblage 4 pieces 2 Adaptateurs Torx Pièces no fournies Accessories optionnel Trousse de conversion en hotte à recyclage À utiliser seulement avec la version sans conduit À recyclage comprend filtres au charbon soutien de filtre au charbon et support de fixation et déflecteur Filtre à graisse en métal Outils nécessaires Encrous métalliqu...

Страница 19: ...19 Dimensions et Dégagement Seulement avec la version sans conduit à recyclage Seulement avec la version version à conduit 10 3 4 13 19 5 8 36 14 3 4 1 9 16 27 3 8 Mín 46 Máx 27 3 8 Mín 42 1 4 Máx ...

Страница 20: ...er une solive ou un montant vous devez construire un cadre de soutien La quincaillerie fournie permet de fixer la hotte à la plupart des murs et des plafonds Vous devez cependant demander à un technicie qualifé de vérifier la solidité des matériaux selon le type de mur ou de plafond Avant de couper assurez vous qu il y a un dégagement suffisant dans le plafond ou le mur pour passer la conduite de ...

Страница 21: ...es AVERTISSEMENT Toutes les vis doivent être vissées dans du bois Si l on ne peut pas visser les vis dans du bois des tasseaux suplémentaires pour accrochage mural seront peut être nécessaires Retirer le gabarit Percer des avant trous de 3 16 4 8 mm à tous les em placements de pose des vis dans du bois Installee les 2 vis de montage de 5 X 45 mm Laisser un espace de 1 4 6 4 mm entre la mur et l ar...

Страница 22: ...e déflecteur d air Faire couliser le conduit sur le bas du déflecteur d air Placer le déflecteur d air et le conduit assemblés sur la sortie d évacuation de la hotte Réassembler de déflecteur d air sur la bride de cache conduit à l aide de 2 vis d assemblage Assurer l étanchéité des connexions avec une bride de conduit AVERTISSEMENT Déconnecter la sourde de courant électrique Ôter le couvercle du ...

Страница 23: ...l extérieur le cache conduit supérieur peut être inversé pour dissimuler les fentes A Section supérieure du cache conduit B Section inférieure de cache conduit C Vis de 4 2 X 8 mm D Bride Fixer le fond du conduit avec 2 vis d assemblage de 4 2 X8 mm Installation complète Pour les non ventilé recyclage d installation seulement installer des filtres à charbon sur la face interne du filtre à graisse ...

Страница 24: ...la fonction Timer ou le réglage du temps le compte à rebours commence Durant le setup du Timer les touches et sont dédiées à la temporisation et ne font pas varier la vitesse du moteur 3 Display Montre l état de la hotte Quand la hotte n est pas en fonction le display s allume à faible intensité En appuyant sur n importe aquelle touche le display s illumine à forte intensité Quand la hotte est en ...

Страница 25: ... L activation et la désactivation du signal saturation fil tre charbon peut être réglé en appuyant simultanément pendant 5 secondes sur les touches e L activation ou la désactivation doit être réglée avec mo teur et lampes OFF Quand le signal Filtre Charbon est désactivé l alarme est désahabilitée Heat sensor La hotte est équipée d un détecteur de température qui active le moteur en troisième vite...

Страница 26: ...placer par un autre n enlever pas les ressorts de fixation poussez les simplement et faites les tourner vers l extérieur Ressort de fixation Filtre au charbon Côté supérieur filtre anti graisse Remplacement des ampoules ATTENTION Avant de remplacer les lampes couper le courant au niveau de la boite fusiblie et verrouiller cette derniere pour prevenir tout risque qu on remette le courant accidentel...

Страница 27: ...onsommable Usure normale Usure due à une mauvaise utilisation du propriétaire un entretien incorrect une utilisation de substances nettoyantes corrosives ou abrasives et produits de nettoyage pour four QUI EST COUVERT Cette garantie s étend à l acheteur original de produits achetés pour un usage domestique habituel en Amérique du Nord Y compris Etats Unis Guam Porto Rico les lles virgin Américaine...

Страница 28: ...tro contra la grasa 38 Reemplazo deLuces 39 Filtro de carbón 39 Garantía 40 APROBADO PARA APARATOS DE USO DOMÉSTICO SÓLO PARA USO DOMÉSTICO LEA Y GUARDE ESTAS INSTRUCCIONES ANTES DE CONTINUAR LEA LAS INSTRUCCIONES POR COMPLETO LA INSTALACIÓN DEBE CUMPLIR TODA LA NORMATIVA LOCAL IMPORTANTE guarde estas instrucciones para su uso por parte del inspector de electricidad local INSTALADOR entregue al pr...

Страница 29: ... o descarga eléctrica no uti lice esta campana con ningún dispositivo externo en estado sólido para el control de la velocidad ADVERTENCIA PARA REDUCIR EL RIESGO DE INCENDIO OCASIONADO POR GRASA a No deje nunca ninguna unidad externa desatendida y con valores de fuego alto La cocción puede causar humo o reboses de grasa que pueden prender fuego Caliente el aceite a fuego lento o medio b Encienda s...

Страница 30: ...ener copias de los estándares enumerados en National Fire Protection Association Batterymarch Park Quincy Massa chusetts 02269 CSA International 8501 East Pleasant Vallery Road Cleveland Ohio 44131 5575 Antes de instalar la campana Para obtener una circulación del flujo de aire más efi caz utilice un tubo de tramo recto o el número posible de tubos acodados PRECAUCIÓN el conducto de ventilación so...

Страница 31: ...erno de anclaje 4 piezas metálicas Tornillos de montaje 4 piezas 2 Adaptador Torx Piezas no suministradas Accesorios Opcionales Kit de conversión sin tubos Recirculante Solamente se puede utilizar en la versión sin tubos Recirculante Incluye Filtros de carbón abrazadera de sujeción del filtro de carbón y deflector Filtro Anti grasa Herramientas Materiales necesarias Tapones de cable Cinta para mon...

Страница 32: ...32 Dimensiones y Espacios libres Solamente en la versión sin ductos Recirculante Solamente en la versión con ductos 10 3 4 13 19 5 8 36 14 3 4 1 9 16 27 3 8 Mín 46 Máx 27 3 8 Mín 42 1 4 Máx ...

Страница 33: ...na vigueta o un perno a menos que sea absolutamente necesario Si fuera necesario efectuar el corte deberá construirse un marco de soporte Se suministra el material de ajuste necesario para fijar la campana a la mayoría de tipos de muro o techo No obstante un técnico calificado debe comprobar la idoneidad de los materiales de acuerdo con el tipo de muro o techo Antes de efectuar algún corte asegúre...

Страница 34: ...ra atornillar puede re querir de algun apoyo adicional Retire la plantilla Taladro 3 16 4 8 mm realice orificios en todos los lugares donde se instalan los tornillos en la madera Instale el 2 de 5 X 45 mm tornillos de montaje Deja un 1 4 6 4 mm de distancia entre la pared y la parte posterior de la cabeza del tornillo para que se deslice campana en su lugar Asegure el soporte de pared Fije el sopo...

Страница 35: ... tamaño X Retire el deflector de aire Deslice el conducto por la parte interior del deflector de aire Coloque el deflector de aire y la cubierta conducto so bre la salida de gases de la campana Asegure el deflector de aire con la cubierta del con ducto con 4 tornillos Selle la conexión con la abrazadera ADVERTENCIA Desconecte la alimentación Quite la tapa de la caja Quitar el punzonado knockout de...

Страница 36: ...a superior hasta el techo e instale con 2 tornillos de 4 X 8 mm NOTA Para instalaciones con tubos la parte superior de la cubierta ve ventilación puede ser invertida para ocultar las rejillas A Cubierta de ventilación superior B Cubierta de ventilación inferior C Tornillos de 4 X 8 mm D Soporte Fije el cubre ducto con 2 tornillos de ensamble de 4 X8 mm 36 C D A B ...

Страница 37: ...iciado el conteo este puede ser anu lado pulsando la tecla Temporizador 3 Pantalla Muestra el estado de la campana Cuando la campana no es operativa la pantalla será iluminada con baja intensidad Pulsando cualquier tecla la pantalla se iluminará con una intensidad alta Cuando la campana es operativa la pantalla será iluminada con alta intensidad Si no se pulsa ninguna tecla por 1 minuto la pantall...

Страница 38: ...Carbón versión Fil trante La activación y la desactivación de la señal saturación filtro carbón puede ser ajustada pulsando simultanea mente por 5 segundos las teclas y La activación o la desactivación debe ser realizada con motor y lámaparas OFF Cuando la señal Filtro Carbón está desactivada se de sactiva la alarma Sensor térmico La campana está equipada con sensor de temperatura que activa el mo...

Страница 39: ...sustituirlo por uno nuevo no quite los seguros simplemente extraiga uno y rotar hacia fuera Seguro de fijación Filtro de carbón Filtro de grasa parte superior Reemplazo de Luces PRECAUCIÓN Antes de reemplazar las lámparas el interruptor debe estar apagado y bloquear el panel para evitar que se pueda an cender accidentalmente NOTA Apagar las luces y el ventilador Las luces deben en friarse antes de...

Страница 40: ...onsumible Desgaste normal Desgaste terminal debido a abusos del usuario mantenimiento inadecuado uso de productos toallas de limpieza cor rosivos o abrasivos y por uso de limpiadores para hornos QUIEN ESTA CUBIERTO Esta garantía se extiende al comprador original de productos adquiridos para uso residencial en Norte America incluyendo Estados Unidos Guam Puerto Rico Islas Vírgenes de USA y Canadá E...

Страница 41: ...LI3Y8A Ed 04 10 ...
Отзывы: