background image


Kit Contents 

 
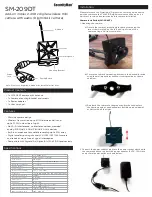
The following components should be present in the kit: 
 

-


1 PCB panel 

-


1 headset (ear buds) 

-


1 plastic bag with all electronic components 

-


1 length of wire (approximately 40 cm) 

 
The plastic bag should contain the following items: 

-


2 small bags with small parts 

-


1 coil 

-


2 Cinch plugs 

-


1 Cinch panel-mount connector 

 
The small bags should contain the following components: 
 

Bag 1: 
-


1 resistor 1 kΩ (R5) 

-


2 resistors 10 kΩ (R2, R3) 

-


1 transistor BSR17 (T1) 

-


2 transistors BC847B (T2, T3) 

-


1 capacitor 10 nF (C1) 

-


2 standoffs M2x6  

-


2 screws M2x6 

 
Bag 2: 
-


2 resistors 100 kΩ (R1, R4) 

-


3 capacitors 10 µF (C2, C3, C4) 

-


1 diode BAT54S (D1) 

-


1 switch 

-


1 3.5 mm audio jack 

-


1 spring for battery 


Required Items 

 
The following items are required for the proper assembly of this kit: 
- A well lit and tidy work surface 
- The TAPIR kit 
- A soldering iron or soldering station with a fine tip 
- Tweezers for placing small SMDs on the board 
- Resin-core solder with a maximum diameter of 0.5 mm (0.02 inch) 
- A small drill bit for countersinking the cover screws 
- One AAA battery 
- A length of heat-shrink tubing or electrical tape 
- If necessary, a magnifying glass for checking 

component markings and solder joints 

- A coping saw and a file or Dremel tool as necessary 
- Clamping tweezers as necessary 

Содержание TAPIR

Страница 1: ...1 Elektor Construction Guide TAPIR The TAPIR is a three dimensional assembly To ensure good access to all soldering points we recommend assembling the kit exactly according to the described sequence...

Страница 2: ...ws M2x6 Bag 2 2 resistors 100 k R1 R4 3 capacitors 10 F C2 C3 C4 1 diode BAT54S D1 1 switch 1 3 5 mm audio jack 1 spring for battery Required Items The following items are required for the proper asse...

Страница 3: ...s properly insulated Soldering SMDs We recommend soldering the SMD components in the TAPIR kit one at a time It s easy to get them confused and they are so small that they can easily get lost if they...

Страница 4: ...PCB panel They collectively form the enclosure for the circuit Each of these PCBs is numbered 1 Top piece 2 Side piece with switch 3 Bottom piece with components 4 Side piece with headset connector 5...

Страница 5: ...soldering method 1 C3 10 F no marking large SMD 2 R1 R4 100 k marking 1003 3 R2 R3 100 k marking 1002 4 R5 1 k marking 1001 5 C1 10 nF no marking small SMD 6 T1 BSR17 marking U92 7 T2 T3 BC847 marking...

Страница 6: ...inch connector For now solder only the pad at the bottom right Remove PCB 6 from the panel and fit it perpendicular to PCB 3 with the marking M2 6 facing you For now solder only the pad at the bottom...

Страница 7: ...mated and correct this if necessary If everything is as it should be solder the joints between PCBs 2 3 and 6 and between PCBs 2 3 and 6 Place the TAPIR on the bench with PCB 2 facing down and solder...

Страница 8: ...check that the cover fits properly and can be screwed in place Now fit the small spring and then insert the battery as shown on the PCB The spring can be soldered in place if necessary Now you can pla...

Страница 9: ...strip off approximately 3 mm of the insulation and slide the Cinch connector shell over the wire Solder the wire to the centre pin of the Cinch connector Screw the connector together and straighten t...

Отзывы: