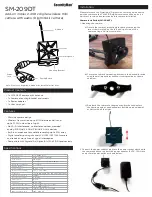


Lens
Power
Jack
Pairing Button
Mounting Bracket
Antenna
Microphone
SM-209DT
Add-on indoor 2.4GHz digital wireless mini
camera with audio (DigiminiAir camera)
Product Contents
Specifications
Features
• Mini size camera design
• Wireless transmission up to 200ft between walls and
up to 350ft in clear line of sight
• No Wi-Fi interference; no interference from crowded
analog 900MHz/2.4GHz/5.8GHz/6.0GHz devices
• Built-in microphone for audible recording up to 20ft away
• Digital wireless pairing channel (Ch1/Ch2/Ch3/Ch4) camera
and receiver, worry-free of signal interception
• Compatible with DigiminiAir/DigioutAir SM-451DR receiver only
• 1 x SM-209DT camera with antenna
• 1 x Camera mounting bracket and screws
• 1 x Power adapter
• 1 x User’s manual
Note: Please see DigiminAir manual for detailed instructions.
Image Sensor
Resolution
View Angle
Audio
Minimum Illumination
Pairing Button
Power Supply
Dimensions (LxWxH)
Frequency
Transmission power
Receiver Sensitivity
Modulation
Antenna
Transmission Distance
Operating Temperature
Operating Humidity
1/4” CMOS Color
510 x 492 pixels (NTSC)
60 degree
Microphone built-in (up to 20ft)
3 Lux/F1.2
1
DC 5V / 1.5A
1.45” x 1.45” x0.8”
ISM 2400 – 2480 MHz (CH1/CH2/CH3/CH4)
17 dBm
≤
-85dBm
GFSK
Omni 3dBi
Up to 350 ft clear line of sight;
up to 200ft (indoor)
-20°C to 60°C (-4°F to 140°F)
20% -80% RH
Installation
Please reference the DigiminiAir/DigioutAir user’s manual on how to
pair the camera to the SM-451DR digital receiver and then give it a
quick test for video transmission before camera installation.
Camera Installation (SM-209DT)
1. Mounting the camera:
a) Detach the cameras mounting bracket by removing the
two screws located on the left and right side of the
camera using a Philip screw driver.
b) Secure the camera’s mounting bracket in the desired location
using the wall mount bracket and screws provide as shown
on below.
c) Re-attach the camera to the mounting bracket and adjust
the viewing angle as needed (adjust by tilting up and down)
as illustrated on the right.
2. Connect the power adapter plug into the power socket attached to
the camera and then connect the power adapter (5VDC, 1.5A) into
an electrical power outlet as shown below.


