background image

12

· 

Tighten the carrier shaft with the carrier screw.


There should be an O-ring under the screw. 


This must also be replaced with a new one. 

· 

Rotate the shaft and check that the rotation is continuous 
and soft.   

· 

Pump in grease into the bearing. See the section for   Lub-
rication of agitator axel. About 350 g of grease is required*.

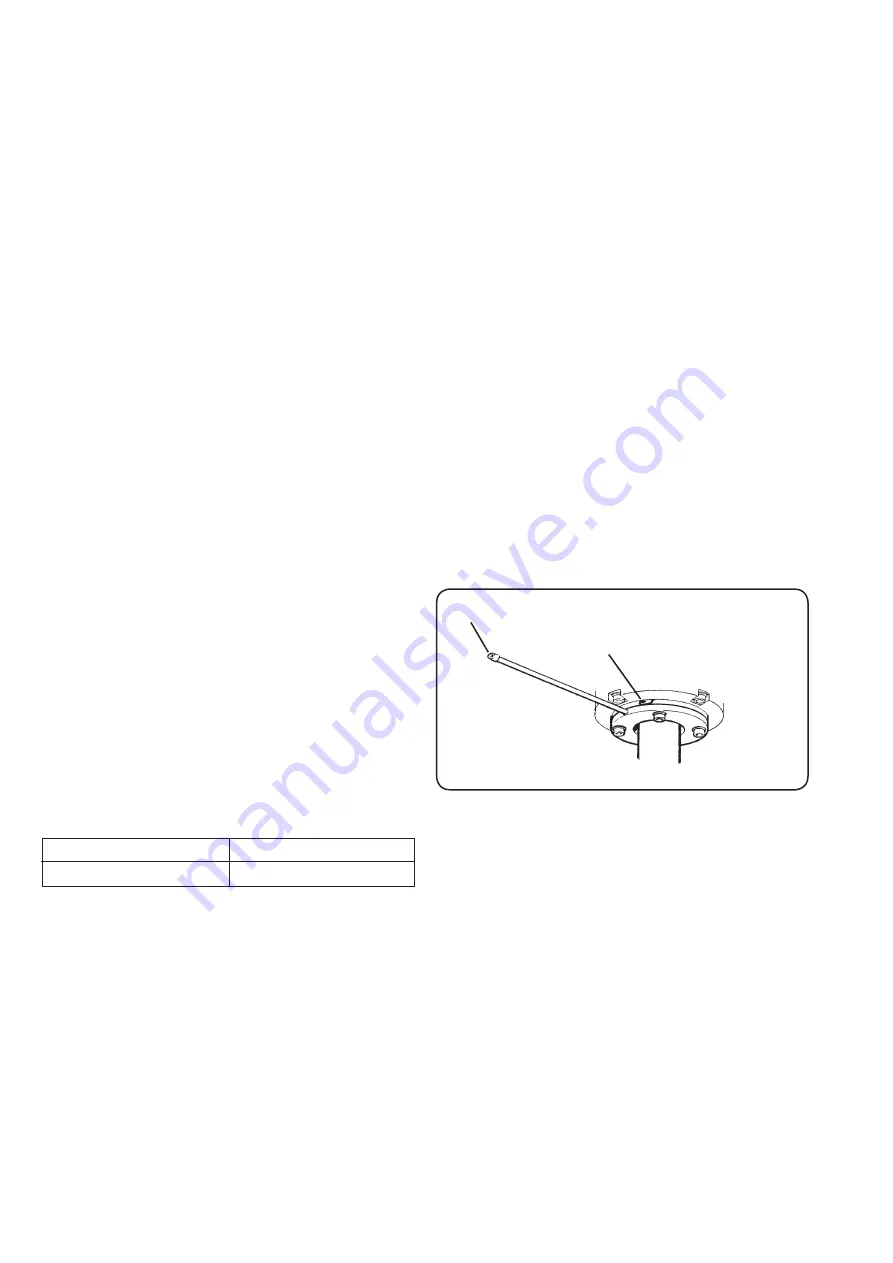
Lubrication of agitator axel 

(See fig. 6)

Control/Filling with grease of agitator’s bearing
The agitator’s bearing is filled with grease from the factory. 
Refilling grease should take place during installation and then at 
least twice per year. 
Should be performed by trained personnel. 
•  Use grease with high temperature properties*. 
*  Order the maintenance service kit ST12335-00.

•  Grease should be pumped in so that it is forced out through 

the overflow hole on the bearing housing. 

•  Check the grease that is forced out. If it shows signs of being 

mixed with water, the agitator’s bearing and seal should be 
removed for inspection and if necessary replacement. 

Dismantling of agitator bearing 

(See fig. 5)

· 

Dismantle the worn gear motor.

· 

Lossen the carrier screw from inside the pan and

  pull out the carrier. The O-rings, under the carrier  
  screw and the carrier must be replaced each time  
  they have been fitted and used. 
· 

Pull the sliding bearing seal top straight out.  


Note that the small key which ensures that the seal  
 

rotates with the shaft.

NOTE!


  Do not touch the sealing surfaces, and  

protect the surface from knocks and scratches. Any 
grease stains or finger marks on the sealing surfaces 
can be wiped clean with pure acetone and a cotton 
cloth.

·  Lossen the bottom to the bearing. Make sure the rubber 

seal in the bottom is not damaged by the key to the work 
gears.

· 

The bearing can be pressed out from inside the pan. 

· 

Dismantle the fixed part of the sliding bearing seal.

· 

Dismantle the holder and upper rubber packing, the holder 
can be pressed out from underside of the pan.

Fitting of agitator bearing

·  Make sure that the bearing housing and sealing is well 

cleaned and dried. 

·  Fit the top part of the sliding bearing seal, then fitt them 

in the bearing housing.

NOTE! 

The ring should be open downwards and is pressed 

straight in from above so that it does not become 
twisted and bear against it`s position. 

·  Fitt the fixed part of the slide bearing in to the rotative 

part of it.

NOTE! 

This requires a special tool which can be ordered 

from 

Spare Parts Division

. This will require special 

tools, can be ordered through spare parts department, 
place the tool on the slide bearing and press down with 
the carrier shaft.

Order no: 

50 & 100 liters 

482 01 23-00 

150,200 & 300 liters 

482 01 23-01

Before fitting:

 Lubricate with soapy water to facilitate fitting.

NOTE!

 Only soapy must be used. 

· 

Press the ball bearing on the shaft, the smallest bearing on 
top. 

· 

Press in the shaft and bearing from underneath. 

· 

Fit the top part of the sliding bearing seal.

 NOTE!


Do not forget the key.


NOTE!


Do not touch the sealing surfaces and 

protect the surface from knocks and scratches.


Any grease stains or fingermarks can be wiped


clean with pure acetone and a cotton cloth.

· 

Fit the carrier and accompaying O-ring. The O-  ring


must be replaced each time the carrier has been removed 
and in use.

Overflow hole

fig. 6

Lubrication point

Содержание Smart Promix

Страница 1: ...Service manual Boiling pan Smart Smart Variomix Smart Promix DOC NO ST0 9153 02 EDITION 13 2018 10 ...

Страница 2: ...ft 11 12 Lid switch 13 Resistance control and replacing of heating element 14 Fitting of the food temperature sensor 14 Connecting of screened cabel 14 Frequency converter 15 Safety PLC 15 Checking the safety PLC 15 Description of PLC functions for ice cooling boiling pans until 2015 12 16 Description of PLC functions for ice cooling boiling pans from 2016 01 19 Messages and error codes 20 22 Prod...

Страница 3: ...ed ads normal household waste but must be disposed of the correct manner to prevent potential negative impacts on our environment and our health For information on recycling of this product please contact the distributor of the product our customer service or the garbage disposal service in the region Safety instructions Switch off the power before attempting to rectify faults or operating problem...

Страница 4: ...tator Promix agitator 1 On Off 2 Display 3 Menu forwards 4 Menu back 5 Increase value 6 Decrease value 7 Start 8 Stop 9 Agitator start 10 Agitator stop 11 Increase speed 12 Decrease speed 13 Tilting 14 Tip return 15 Emergency stop 16 Main switch 17 Reset emergency stop 1 14 2 3 4 6 8 7 5 13 9 10 11 12 9 10 12 11 16 15 17 ...

Страница 5: ...5 Increase value 6 Decrease value 7 Start 8 Stop 9 Agitator start 10 Agitator stop 11 Increase speed 12 Decrease speed 13 Tilting 14 Tip return 15 Emergency stop 16 Main switch 17 Pushbutton agitation without grid SMARTMIX Smart Smart Promix Smart Promix ICE SmartVariomix SmartVariomix ICE 1 14 2 3 4 6 8 7 5 13 9 10 11 12 9 10 11 12 ...

Страница 6: ...ng or ice water cooling If the pan is equipped with comfort control the water is filled automatically by going into a hidden menu Press Menu forwards and Menu back simultaneously for 5 seconds Enter code 1122 by pressing Increase value or Decrease value for number and Menu forwards or Menu back for location Confirm by pressing Start Select SERVICE with Decrease value and press Menu forwards from R...

Страница 7: ...e value Press Menu forwards AGITATOR Select VARIOMIX PROMIX or WITHOUT AGITATOR Smart pressing Increase value or Decrease value Press Menu forwards FOOD TEMP NO YES Select betweenYES or NO Press Menu forwards FLOW METER NO YES Press Decrease value for YES Press Menu forwards PULSE LITRE Select PULSE LITRE 428 or 495 pulse litre Press Increase value or Decrease value Check the current value on the ...

Страница 8: ...g Increase value or Decrease value Press Menu forwards FOOD TEMP NO YES Select betweenYES or NO Press Menu forwards FLOW METER NO YES Press Decrease value for YES Press Menu forwards PULSE LITRE Select PULSE LITRE 428 or 495 pulse litre Press Increase value or Decrease value Check the current value on the flow meter Press Menu forwards AUTOMATIC COOLING NO YES Press Decrease value for YES Press Me...

Страница 9: ...ce and Press Start The boiling pan s manometer have to show appr 100 110 kPa 1 0 1 1 bar when the display indicates 121 C Calibrate the value by pressing Increase value or Decrease value max 8 C Press Stop End the process by switching off the power pressing ON OFF Radiator filler neck Adjustment of the jacket cooling water Valid to june 2013 1 Start the automatic cooling program vait until a unifo...

Страница 10: ...es into the red field Switch off the pan immediately and call in a trained engineer For a correct pressure reading lift up the green cap on the manometer NOTE The green cap must normally be pressed down as the pan will be tipped fig 3 Warning The steam pressure whitch may not exeed 150 kPa 1 5 bar If the indicator enters the Red field Stopp the operation Pressure kPa Pressure bar Temperature C 0 0...

Страница 11: ...ide bearing upper Slide bearing lower fixed part Holder Upper rubber packing Locking ring Spacer ring Ball bearing Wedge for carrier shaft Wedge for slide bearing Agitator shaft Wedge Ball bearing Spacer ring Locking ring Agitator shaft parts fig 5 ...

Страница 12: ...can be wiped clean with pure acetone and a cotton cloth Lossen the bottom to the bearing Make sure the rubber seal in the bottom is not damaged by the key to the work gears The bearing can be pressed out from inside the pan Dismantle the fixed part of the sliding bearing seal Dismantle the holder and upper rubber packing the holder can be pressed out from underside of the pan Fitting of agitator b...

Страница 13: ...stment see Fig 8 The lid may have to be adjusted when installed The lid can be adjusted vertically laterally and in depth Undo the screw C and adjust the lid vertically Lock the screw C using Loctite type 275 Adjust the lid laterally using the screws D Use the locking ring E to adjust the lid in depth In order to open the lid with a gentler or firmer movement adjust the position of the gas spring ...

Страница 14: ...lements are mounted as shown in the pictures beside See Fig 9A 9C When fitting 200 or 300 litres heating element the screws should be set to a torque of 20 Nm It is important to ensure that the packing does not leak The packing should be compressed by about 30 of its thickness about 1 mm Fitting the food temperature sensor PT1000 The food temperature sensor is fitted towards the inner vessel To ob...

Страница 15: ...e machine Emergency stop lid switch and speed of the agitator Error messages can be read out on the display A error the fault is outside the safety PLC Check the emer gency stop lid switch the speed monitor and cables NB The distance between the magnet and magnetic switch should be a maximum 0 4 mm Check with a feeler gauge F error the fault is in the safety PLC Try to reset the safety PLC by maki...

Страница 16: ...t cooling program after the boiling When the boiling pan is switched ON OFF after boiling When the boiling pan is switched ON and no program is selected the following are enabled Inputs Outputs Valve Valve Activated Activated closed open 5 1 26Y3 26Y5 4 26Y7 5 8 Cooling When the cooling program is selected the following are enabled Inputs Outputs Valve Valve Activated Activated closed open 1 3 26Y...

Страница 17: ...el depending to the volume of the boiling pan takes between 300 600 sec 5 10 min and meanwhile the heating is turned off The following are enabled Inputs Outputs Valve Valve Activated Activated closed open 5 2 6 4 26Y5 8 8 26Y3 26Y7 When the set time 300 600 sec has elapsed the pump stops and the valve 26Y7 closes The following are enabled Inputs Outputs Activated Activated 5 4 8 1 5 8 ...

Страница 18: ...e enabled Inputs Outputs Valve Valve Activated Activated closed open 1 3 4 6 26Y7 26Y5 5 7 27Y3 27Y3 Boiling after cooling When the program for cooking is selected the pump will start and adjusts the correct water level in the jacket NOTE Draining the water to the right level depending to the volume of the boiling pan takes between 300 600 sec 5 10 min and meanwhile the heating is turned off The f...

Страница 19: ... Valve Activated Activated closed open 1 All 8 4 5 8 When the boiling pan is switched ON OFF after boiling When the boiling pan is switched ON and no program is selected the following are enabled Inputs Outputs Valve open Valve closed Activated Activated at cooling at boiling 1 27Y5 27Y5 4 5 8 ...

Страница 20: ...EMENT INTERRUPT PT 1000 ELEMENT SHORT CIRCUIT WATER INTERAPTION SET WATER UNSETTABLE DURING WATER FILLING The Reset button is lit Red LED in the START button is lit Boiling is selected The boiling pan does NOT heat up Press Tilt return Close the grid and press Agitator start Press On Off The display goes out Wait 5 seconds Press On Off Display lights If the warning is still lit Press On Off to clo...

Страница 21: ...pan Manual water filling in progress Attained service intervals The emergency stop is activated SVI SPI during cooling the boiling pan has become de energized Press Tilt return Close the grid and press Agitator start Press On Off The display goes out Wait 5 seconds Press On Off Display lights If the warning is still lit Press On Off to close the pan The display goes out SeeWarning Overheating and ...

Страница 22: ...pan Manual water filling in progress Attained service intervals The emergency stop is activated SVI SPI during cooling the boiling pan has become de energized Press Tilt return Close the grid and press Agitator start Press On Off The display goes out Wait 5 seconds Press On Off Display lights If the warning is still lit Press On Off to close the pan The display goes out SeeWarning Overheating and ...

Страница 23: ... Promix 100 L SMP100 Electrical 9F23220100 Smart Promix 150 L SMP150 Electrical 9F23220200 Smart Promix 200 L SMP200 Electrical 9F23220300 Smart Promix 300 L SMP300 Electrical 9F23220400 Smart 50 L SMB50S Steam 9F23220500 Smart 100 L SMB100S Steam 9F23220600 Smart 150 L SMB150S Steam 9F23220700 Smart 200 L SMB200S Steam 9F23220800 Smart 300 L SMB300S Steam 9F23220900 SmartVariomix 50 L SMV50S Stea...

Страница 24: ...00 Automatic jacket cooling electrically heated 50 L 9F92810400 Automatic jacket cooling electrically heated 100 L 9F92810500 Automatic jacket cooling electrically heated 150 L 9F92810600 Automatic jacket cooling electrically heated 200 L 9F92810700 Automatic jacket cooling electrically heated 300 L 9F92810800 Hand shower 50 300L 9F92809100 Dual electrical connection SMB 300L 9F92809200 Dual elect...

Страница 25: ...L SM6V50 Electrical 9F23222400 SmartVariomix 100 L SM6V100 Electrical 9F23222500 SmartVariomix 150 L SM6V150 Electrical 9F23222600 SmartVariomix 200 L SM6V200 Electrical 9F23222700 SmartVariomix 300 L SM6V300 Electrical 9F23222800 Smart Promix 100 L SM6P100 Electrical 9F23222900 Smart Promix 150 L SM6P150 Electrical 9F23223000 Smart Promix 200 L SM6P200 Electrical 9F23223100 Smart Promix 300 L SM6...

Страница 26: ...2813500 Automatic jacket cooling steam heated 100 L 9F92813600 Automatic jacket cooling steam heated 150 L 9F92813700 Automatic jacket cooling steam heated 200 L 9F92813800 Automatic jacket cooling steam heated 300 L 9F92813900 Level control 50 L 9F92814000 Level control 100 L 9F92814100 Level control 150 L 9F92814200 Level control 200 L 9F92814300 Level control 300 L 9F92814400 Level control with...

Страница 27: ... vessel in the tilted position 6 Make sure the lid is tight against the vessel 7 Check the safety valve and pressure gauge 8 Make sure there is no water on the fixing frames filled to level A 9 Check all seals on the cover plates 10 Check that all water connections are tight 11 Check the flow of the water cooling 12 Check the water level in the inner vessel 13 Check the set speed with the actual s...

Страница 28: ...28 ...

Отзывы: