background image

5

Water drainage

The end of the drain hose can be positioned in three
ways:

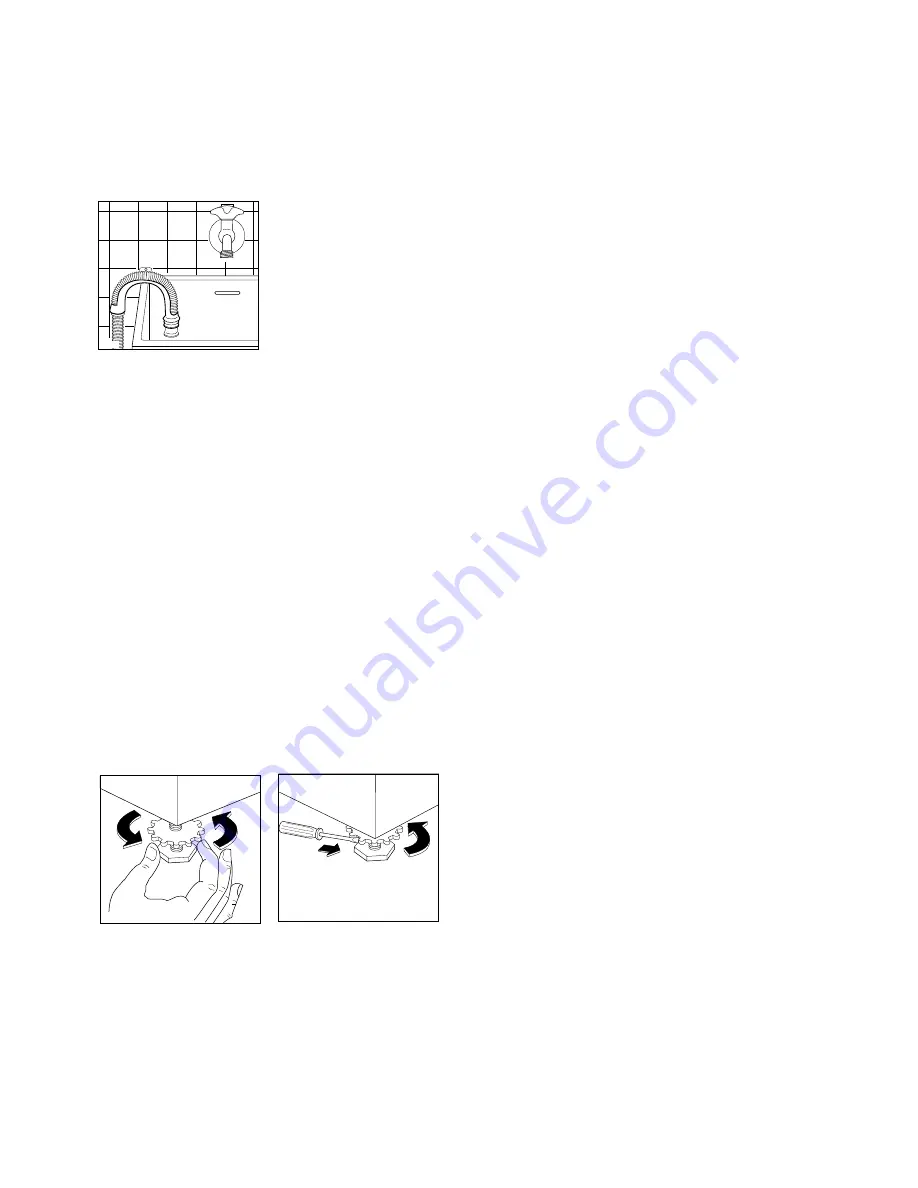
Over the edge of a basin at a height of between 60
and 90 cm.

To keep the drain hose
spout bent, use the
special plastic hose
guide supplied with the
machine. Secure it to the
wall with a hook, for
example, or to the tap by
means of a piece of
string, to prevent the
drain hose moving during

draining cycle thus causing floods.

In a basin drainpipe branch: the branch must be
above the basin siphon so that the end of the hose is
at least 60 cm from ground level.

Directly in a drainpipe: you are advised to use a
vertical 65 cm high pipe; in any case it should never
be shorter than 60 cm or longer than 90 cm.

The end part of the drain hose must always be venti-
lated, i.e. the internal diameter of the pipe must be
wider than the external diameter of the drain hose.

The drain hose can be extended up to a maximum
length of 180 cm. Use an extension with an internal
diameter at least equal to the diameter of the original
hose and a suitable fitting. The hose extension will run
along the floor and only the part near the drainage
point will be raised.

Levelling

Position the appliance and level it by tightening or
loosening one or two of the adjustable feet. Ensure
that the machine is resting securely with all four feet
on the ground. Once the machine has been levelled,
tighten up the lock nuts on all feet with the aid of a
screwdriver.

Electrical connection

Before plugging the appliance into the wall socket,
make sure that:

1. the mains voltage corresponds to the voltage given
in the technical specifications;

2. the meter, fuses, mains power supply and wall
socket can all take the maximum load required.

Make sure that the socket and plug are compatible
without having to use any type of adapter. If
necessary, have the domestic wiring system socket
replaced.

The electric cable must not be extended. If it is too
short and you do not wish to move the socket, replace
it completely with a longer cable.

P0235

P0254

P0509

Safety standards require the appliance to be
earthed.
The Manufacturer accepts no liability for failure to
observe the above safety precautions.

Содержание EW 510 F

Страница 1: ...I N F O I N S T A L L A T I O N A N D I N S T R U C T I O N M A N U A L WASHING MACHINE EW 510 F ...

Страница 2: ...15 Drain filter Page 15 Water inlet filter Page 15 Something not working Page 16 TECHNICAL SPECIFICATIONS DIMENSIONS Height 85 cm Width 60 cm Depth 54 cm POWER SUPPLY VOLTAGE 220 230 V FREQUENCY 50Hz TOTAL POWER ABSORBED 2250 W 10 A WATER PRESSURE Minimum 5 N cm2 Maximum 80 N cm2 MAXIMUM RECOMMENDED Cotton linen 5 kg LOAD Synthetics delicates 2 kg Wool 1 kg SPIN SPEED Maximum 500 rpm This applianc...

Страница 3: ...e sure that all pockets are empty Hard sharp objects such as coins safety pins nails screws or stones can cause extensive damage Use only the recommended quantities of fabric conditioner Do not machine wash fabrics which are saturated with petroleum products If volatile cleaning fluids have been used make sure that they are thorough ly removed from the fabric before it is placed in the appliance L...

Страница 4: ... Slide out the 3 plastic spacers and plug the 3 holes with the 3 plastic plugs which you can find on the back of the machine Positioning Position the machine on a firm level surface The machine must not touch the wall or other furni ture It is assumed that the tap drainage point and socket are within easy reach of the machine hoses and power supply cable If not you are advised to call your fitter ...

Страница 5: ... diameter of the original hose and a suitable fitting The hose extension will run along the floor and only the part near the drainage point will be raised Levelling Position the appliance and level it by tightening or loosening one or two of the adjustable feet Ensure that the machine is resting securely with all four feet on the ground Once the machine has been levelled tighten up the lock nuts o...

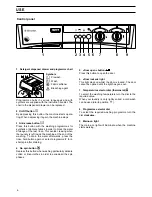
Страница 6: ...ner Bleaching agent Programme charts in various languages and with symbols are supplied with the instruction booklet The chart in the dispenser drawer can be replaced USE Control panel P0909 Cl 1 2 3 4 5 6 7 8 9 2 On Off button By depressing this button the machine starts opera ting When depressing it again the machine stops 3 Anti crease button Press this button with the washing programmes for sy...

Страница 7: ...st coloured garments They usually require a temperature of 60 but if they are not excessively dirty you will have satisfactory results at 40 Garments with non fast colours should not be washed at temperatures above 40 If fast and non fast colours are washed together they should be treated as non fast colours and therefore the temperature should not exceed 40 Resistant white and coloured synthetics...

Страница 8: ...mpartments of the dispenser drawer before starting the programme Special detergents are available for coloured and deli cate fabrics and for wool Concentrated powder detergents Pour the concentrated powder detergent into the com partment for the main wash Avoid selecting programmes including prewash when concentrated detergents are used Degrees of water hardness Liquid detergents A liquid detergen...

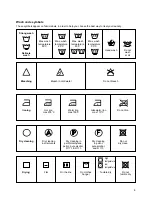
Страница 9: ... wash Do not wash at all Bleaching Bleach in cold water Do not bleach Ironing Hot iron max 200 C Warm iron max 150 C Lukewarm iron max 110 C Do not iron Dry cleaning Dry cleaning in all solvents Dry cleaning in perchlorethylene petrol pure alcohol R 111 R 113 Dry cleaning in petrol pure alcohol and R 113 Do not dry clean Drying Flat On the line On clothes hanger Tumble dry high temperature low tem...

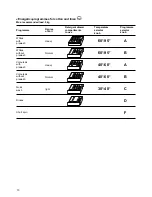
Страница 10: ...f soil Detergent drawer compartments to use Programme selector knob Whites with prewash Heavy A Whites without prewash Normal B Coloureds with prewash Heavy A Coloureds without prewash Normal B Quick wash C Rinses D Short spin F Temperature selector knob 60 95 60 95 40 60 40 60 30 40 light ...

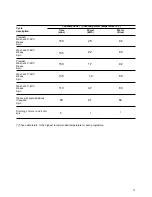
Страница 11: ...Rinses Spin Wash at 30 40 C Rinses Spin Rinses with liquid additives if required Spin Draining of water and short spin 2 5 2 2 1 7 1 4 0 1 92 80 92 80 64 150 135 150 135 50 5 0 7 80 110 Power kWh Time mins Water litres Consumptions incoming water temperature 15 C These data relate to the highest recommended temperature for each programme ...

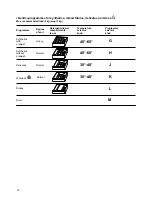
Страница 12: ...nded load 2 kg wool 1 kg Programme Degree of soil Detergent drawer compartments to use Programme selector knob Heavy G Synthetics with prewash Normal H Synthetics without prewash Normal J Delicates K Woollens Rinses L Drain M Temperature selector knob 40 60 40 60 30 40 Normal 30 40 ...

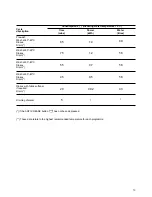
Страница 13: ...ric softener if required Drain Draining of water If the ANTI CREASE button has not been depressed Wash at 30 40 C Rinses Drain Power kWh Time mins Water litres Consumptions incoming water temperature 15 C 1 4 1 2 0 7 0 02 69 58 58 43 85 75 55 20 5 0 5 58 45 These data relate to the highest recommended temperature for each programme ...

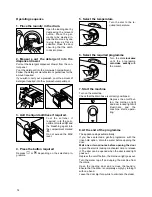
Страница 14: ...lect the temperature Turn the dial to the re quired temperature 6 Select the required programme Turn the dial clockwise until the programme coincides exactly with the marker 7 Start the machine Turn on the water tap Check that the drain hose is correctly positioned Depress the on off but ton the mains on light and door locked light will illuminate and the machine starts opera ting 8 At the end of ...

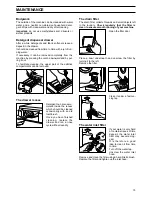
Страница 15: ...e recess which should be cleaned occasionally with an old toothbrush Once you have finished cleaning replace the drawer and run a rinse cycle without laundry The drain filter The drain filter collects threads and small objects left in the laundry Check regularly that the filter is clean to ensure smooth running of your machine Open the filter door Place a bowl underneath and unscrew the filter by ...

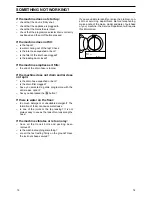
Страница 16: ...p Check is the inlet hose squashed or bent is the filter of the inlet hose clogged is the loading door closed If the machine empties as it fills the end of the drain hose is too low If the machine does not drain and or does not spin is the drain hose squashed or bent is the drain filter clogged have you selected a gentle programme with the anti crease option have you depressed the button If there ...

Страница 17: ...124890710 Z ...

Отзывы: