14 assembling the barbecue / gas specifications / gas bottle safety information
electrolux e:volution barbecue
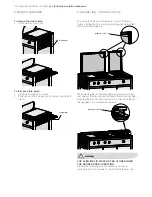
5. Position flame tamers into desired locations (under
where grill sections will be fitted) and fix back edge of
flame tamer into rear of barbecue body.
6. Place hotplate and grill sections into desired positions
ensuring that the flame tamers are under grill sections.
NOTE: ensure that grill assemblies are orientated
correctly so that the surface of the grill is sloping
forward to allow oil to drain into oil reservoirs.
7. Fit warming racks to splashguard at rear (roasting hood
models only).
For 120cm barbecue
model
EQBM120HAS & EQBM120LAS
gas type
universal LPG
natural gas
Maximum gas consumption 50 MJ/h
57.5 MJ/h
Injector orifice diameter (mm)
0.90
1.50
Number of injectors
5
5
Regulator pressure
2.75 kPa
1.00 kPa*
For 75cm barbecue
model
EQBM75HAS & EQBM75LAS
gas type
universal LPG
natural gas
Maximum gas consumption 40 MJ/h
46 MJ/h
Injector orifice diameter (mm)
0.90
1.50
Number of injectors
4
4
Regulator pressure
2.75 kPa
1.00 kPa*
NOTEs
• This appliance MUST be serviced only by a qualified
licensed person.
• This product is intended for outdoor use only.
• Ventilation holes in the unit must not be obscured by
the installation.
* The outlet pressure at the Natual Gas regulator will be
lower when all burners are operating. Burner pressure
should read 1.0kPa with one burner operating and
approximately 0.93kPa with four burners operating.
For conversion to Natural Gas a conversion kit will need to
be purchased from Electrolux Spare Parts.
Assembling the barbecue
(cont.)
Gas specifications
• This appliance is designed to use a Universal LPG 9kg
(20 lbs) gas cylinder.
• The gas cylinder must be made and marked in
accordance with specifications for LPG cylinders
• The isolation valve must be turned off when the
appliance is not in use.
• Gas cylinders must be stored in an approved housing
out of reach of children.
• When disconnecting the gas bottle ensure that all the
control valves are in the ‘OFF’ position.
• Remove the bottle from any housing in which it may be
stored before disconnection.
• When reconnecting the hose to the bottle, ensure that
all connections are tight before replacing in the storage
compartment.
• Carry out a leakage check as detailed below after each
reconnection.
Gas bottle safety information


