background image

Revised November 11, 2015 


LX2056 Owner's Manual 

www.electro-mech.com  ·  800.445.7846 


Page 13 

junction box, in which case the strain relief will not be needed.  The junction box is 
designed to accept 3/4-inch conduit fittings. 

We recommend running data cable in conduit from the junction boxes to the player 
statistics displays 

─ especially where the cable would otherwise be exposed.  

You 

should never run data cable in the same conduit as power cable.

  Having more than one 

run of scoreboard data cable in a single conduit is perfectly fine. 

One more warning about data cable:  

Never split or branch the cable.

  The current loop 

signal we use to transmit data to the player statistics displays will behave unpredictably 
if it is divided between two destinations.  There are other options for getting 
synchronized data to two locations, including daisy-chaining 

─ which will be discussed 

below.  If your facility calls for a more complicated cabling plan, it is best to work out the 
details with your scoreboard sales rep prior to installation. 

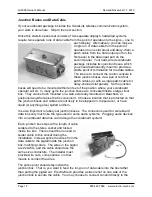
Stereo Plug 

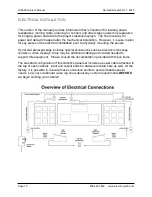
At each player statistics display, data enters the cabinet through a port located along 
the top.  The illustration below is a view of the top of the display, showing the standard 
location of the ports. 


There are two common methods for bringing the last few feet of data cable to one of the 
player statistics displays.  One method involves installing a junction box on the wall or 
other structure near the display.  From here you can run a patch cable to the player stat 
panel's data input port.  The standard scoreboard package does not include extra 

junction boxes and patch cables for this type of 
cable routing.  However, the materials are 
readily available from Electro-Mech. 

The other method requires the right-angle 
stereo plug assembly, which Electro-Mech 
provides with all hard-wired indoor scoreboard 
packages.  In the case of players statistics 
panels, there will be two plug assemblies to 
terminate the two cable runs required.  The 
assembly consists of the main plug body, an 
insulating sleeve, and a cover. 


Содержание LX2056

Страница 1: ...l and maintain the Electro Mech Model LX2056 Indoor Six Player Statistics Panel set Model LX2056 is shipped as a set of two displays Operation of this panel set is covered in the manual that ships with the player statistics control console Original Filename LX2056_Owner Document Version 1 5 Document Date November 11 2015 ...

Страница 2: ...ech com TABLE OF CONTENTS BEST PRACTICES FOR PERSONAL SAFETY AND PRODUCT CARE 3 Product Specifications 5 Planning Your Scoreboard Installation 8 Electrical Installation 10 Mechanical Installation 17 Testing Operation and Ongoing Care 20 Maintenance 21 Limited Warranty Statement 28 ...

Страница 3: ...ping damage We recommend keeping the statistics panel cabinets in their packing materials until the day of installation It is important to keep the packing materials dry while they are on the scoreboard Wet cardboard can adhere to surfaces and damage the finish If your stat panels arrived in wooden crates then pry apart the nailed pieces taking care to avoid scraping the cabinets with tools nails ...

Страница 4: ...istics panels are to be mounted can support the weight of the displays and any ID panels or other accessories Each player statistics display receives power from a standard 120 VAC electrical outlet When the displays are not in use you should disconnect them from power For this reason we recommend installing a dedicated disconnect switch within sight of the statistics panels In the off position the...

Страница 5: ...porting frame constructed from extruded aluminum channel and formed aluminum pieces The face and back sections are made from aluminum sheet material The face is finished with matte black enamel paint All other cabinet surfaces are mill finish Accent striping and other decorative elements are cut from interior grade vinyl Overview of LED Displays Red amber and green LEDs light emitting diodes mount...

Страница 6: ...n internal microprocessor a 32 character LCD display a 37 button sealed membrane keypad and a 6 ft power cord The console enclosure consists of an ABS plastic base and top with a metal back plate Four data output ports can each directly drive a player statistics display through a single cable run and indirectly drive up to ten displays in perfect synchronization via daisy chaining The number of sy...

Страница 7: ...s scoreboard display set is designed for indoor use and each cabinet may be mounted on a wall or suspended from the ceiling To use the standard mounting tabs for installation on a wall the installer must securely attach two lag bolts or similar hardware with a maximum diameter of 3 8 inches The mounting tabs are spaced 40 inches from center to center Each display cabinet may be suspended from the ...

Страница 8: ...o make sure people cannot accidentally or intentionally interfere with the player statistics displays or cables connected to them For example indoor stat panels are sometimes mounted along the front facade of balcony seating This can make it tempting for fans to reach over the balcony and touch the panels snag a cable drop a soda on them or otherwise make a nuisance of themselves One solution woul...

Страница 9: ... the standard configuration of this player statistics scoreboard model Before purchasing materials running cabling etc you should verify with the factory that you have the right documentation for your particular project It is possible that a government agency such as your local city council will require a building permit or other documentation and approval forms related to the installation and ope...

Страница 10: ...electrical installation prior to physically mounting the panels If your stat panel package includes special accessories such as electronic message centers or video displays there may be additional cabling and conduit needed to support this equipment Please consult the documentation provided with these items The standard configuration of this statistics panel set includes a power cable attached to ...

Страница 11: ...gement Minor carpentry work Common tools such as Phillips and flat head screwdrivers a knife etc Electro Mech recommends that you find a reputable sign installer or electrician with the tools and experience to handle the type of work mentioned above If you are unfamiliar with sign installers in your area contact your scoreboard sales rep for recommendations Power Receptacles and Disconnect Switch ...

Страница 12: ...tion boxes are concealed inside a larger floor box They can be flush mounted on a wall externally mounted on bleachers or positioned anywhere else that is convenient Choose a location that is protected so that the junction boxes and cables are not likely to be stepped on tripped over or have liquid or anything else spilled on them It is also important to label your junction boxes The connectors us...

Страница 13: ...ated cabling plan it is best to work out the details with your scoreboard sales rep prior to installation Stereo Plug At each player statistics display data enters the cabinet through a port located along the top The illustration below is a view of the top of the display showing the standard location of the ports There are two common methods for bringing the last few feet of data cable to one of t...

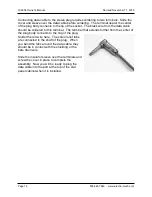
Страница 14: ...ould be soldered to this terminal The terminal that extends further from the center of the plug body connects to the ring of the plug Solder the red wire here The strain relief tabs are connected to the shaft of the plug When you bend the tabs around the data cable they should be in contact with the shielding or the bare drain wire Slide the insulator sleeve over the terminals and screw the cover ...

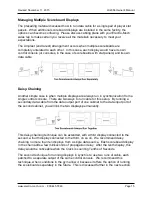
Страница 15: ...n in synchronization from a single control console There are two ways to run cable for this setup By running a secondary data cable from the data output port of one cabinet to the data input port of the second cabinet you will link the two displays permanently This daisy chaining technique can be extended with a third display connected to the second a fourth display connected to the third on so on...

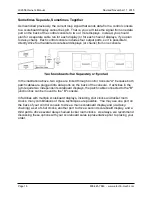
Страница 16: ...ne console In the illustration above two signs are linked through Control Console A because both patch cables are plugged into data ports on the back of the console If activities in the gym require two independent scoreboard displays the patch cable connected to the B junction box can be moved to the B console In facilities with multiple scoreboard displays including shot clocks and locker room cl...

Страница 17: ...e sake of clarity and brevity we will assume a wall We will further assume that the wall is capable of supporting the weight of the display cabinets and any accessories to be mounted with them The wall could be made of cinder blocks framed with wood and covered in drywall or constructed any number of other ways Because different fasteners are appropriate for different walls we cannot specify a par...

Страница 18: ...ole slots are correctly oriented Tighten the bolts to make sure the mounting tabs are secure The illustration below shows the mounting tab spacing when this cabinet is shipped in its standard configuration Customized display cabinets may not conform to these measurements Before you attach lag bolts to your wall please verify the details with the factory Better yet plan to attach the lag bolts afte...

Страница 19: ...u are hard wiring the data cable connect the plugs to the input ports on top of the cabinet The section that follows will discuss how to connect the control console and test the system Connections at the Control Console The standard control console packaged with this scoreboard system is powered through a typical three prong AC power cord At the point of operation the console requires a grounded p...

Страница 20: ...g for the operator to enter information at the control console Make sure buttons on the control console produce responses at the displays You may need to consult documentation that ships with the control console s to test certain features Scheduled Testing and Maintenance Electro Mech scoreboard systems do not require scheduled maintenance procedures However it is important to check for problems p...

Страница 21: ...n search of help with a different scoreboard model for outdoor scoreboards you can find the model number printed on a metal plate attached to the back of the scoreboard cabinet near where the power enters For indoor scoreboards the model number is usually printed on a label at the top center of the cabinet near the attachment point for the power cable If your console cannot display its software ve...

Страница 22: ... less than three business days Electro Mech maintains a supply of common parts for immediate shipment Some customers choose to purchase new parts for immediate use and will later send old parts back to us to be repaired and returned as backup stock In some cases our support plans include the option for shipping replacement parts to the customer once our service staff has identified a problem The c...

Страница 23: ...at panel section has a power supply located behind the Player digit assembly situated second from the top and LX drivers located behind each Points Kills digit assembly If your player statistics panels include ScoreLink RF receiver units they will be accessible just to the right of the center column of digits along the top row ...

Страница 24: ... Support the mask with one hand as you remove the final screw Rotate the mask so that you can see the PCB or PCBs behind it and the cable connections along the back side Unplug the ribbon cables and if present the power cables from the PCBs Set the LED assembly aside and save the screws for later If your purpose in removing the LED assembly was to provide access to the components behind it you may...

Страница 25: ... the second Player Number digit assembly on the stat panel face Next to each power supply module you will find a 5 amp fuse AC line passes through these fuses on the way to each power module All fuses are AG style that should only be replaced with fuses of the same style and rating Power connections are made along a row of screw terminals on one side of each power supply module The Mean Well SP 32...

Страница 26: ... LX49 To LX50 To LX51 To LX52 To LX58 To LX53 J4 Word 1 Low 1 Player Tens 2 Player Tens 3 Player Tens 4 Player Tens 5 Player Tens 6 Player Tens J5 Word 1 High 1 Player Units 2 Player Units 3 Player Units 4 Player Units 5 Player Units 6 Player Units J6 Word 2 Low 1 Fouls Tens 2 Fouls Tens 3 Fouls Tens 4 Fouls Tens 5 Fouls Tens 6 Fouls Tens J7 DC Power In 18 9 VDC 18 9 VDC 18 9 VDC 18 9 VDC 18 9 VDC...

Страница 27: ...3 1 Fouls Units 2 Fouls Units 3 Fouls Units 4 Fouls Units 5 Fouls Units 6 Fouls Units J9 Word 2 High 1 Points Tens 2 Points Tens 3 Points Tens 4 Points Tens 5 Points Tens 6 Points Tens J10 Word 4 1 Points Units 2 Points Units 3 Points Units 4 Points Units 5 Points Units 6 Points Units J15 H5 BLK Data In From Data Input Port From LX53 From LX54 From LX55 From LX56 From LX57 H6 RED Data In From Data...

Страница 28: ...ent Parts or Equipment will be new or serviceably used comparable in function and performance to the original Parts or Equipment and warranted for the remainder of the warranty period Purchasing additional Parts or Equipment from Electro Mech does not extend this warranty period Defects shall be defined as follows With regard to the Equipment excepting LEDs a Defect refers to a material variance f...

Страница 29: ...g but not limited to wireless systems copper wire fiber optic cable conduit or trenching for the purpose of overcoming local site interference Any statements regarding products or services made by salesmen dealers distributors or agents unless such statements are in a written document signed by an officer of Electro Mech Limitation of Liability In no event shall Electro Mech be liable for any spec...

Отзывы: