


ELECTRO FREEZE Soft Serve Model 30T-RMT
30
184952
123456789012345
123456789012345
123456789012345
123456789012345
123456789012345
123456789012345
123456789012345
123456789012345
123456789012345
123456789012345
123456789012345
123456789012345
123456789012345
123456789012345
123456789012345
123456789012345
123456789012345
123456789012345
123456789012345
123456789012345
123456789012345
123456789012345
123456789012345
123456789012345
123456789012345
123456789012345
123456789012345
123456789012345
123456789012345
123456789012345
123456789012345
123456789012345
123456789012345
123456789012345
123456789012345
123456789012345
123456789012345
123456789012345
123456789012345
123456789012345
123456789012345
123456789012345
123456789012345
123456789012345
123456789012345
123456789012345
123456789012345
123456789012345
123456789012345
123456789012345
123456789012345
123456789012345
123456789012345
123456789012345
123456789012345
123456789012345
123456789012345
123456789012345
123456789012345
123456789012345
123456789012345
123456789012345
123456789012345
123456789012345
123456789012345
123456789012345
123456789012345
123456789012345
123456789012345
123456789012345
123456789012345
123456789012345
123456789012345
123456789012345
123456789012345
123456789012345
123456789012345
123456789012345
123456789012345
123456789012345
123456789012345
123456789012345
123456789012345
123456789012345
123456789012345
123456789012345
123456789012345
123456789012345
123456789012345
123456789012345
123456789012345
123456789012345
123456789012345
123456789012345
123456789012345
123456789012345
123456789012345
123456789012345
123456789012345
123456789012345
123456789012345
123456789012345
123456789012345
123456789012345
123456789012345
123456789012345
123456789012345
123456789012345
123456789012345
123456789012345
123456789012345
123456789012345
123456789012345
123456789012345
123456789012345
123456789012345
123456789012345
123456789012345
123456789012345
123456789012345
123456789012345
123456789012345
123456789012345
123456789012345
123456789012345
123456789012345
123456789012345
123456789012345
123456789012345
123456789012345
123456789012345
123456789012345
123456789012345
123456789012345
123456789012345
123456789012345
123456789012345
123456789012345
123456789012345
123456789012345
123456789012345
123456789012345
123456789012345
123456789012345
123456789012345
123456789012345
123456789012345
123456789012345
123456789012345
123456789012345
123456789012345
123456789012345
123456789012345
123456789012345
123456789012345
123456789012345
123456789012345
123456789012345
123456789012345
123456789012345
123456789012345
123456789012345
123456789012345
123456789012345
123456789012345
123456789012345
123456789012345
123456789012345
123456789012345
123456789012345
123456789012345
123456789012345
123456789012345
123456789012345
123456789012345
123456789012345
123456789012345
123456789012345
123456789012345
To remove frozen product from the cylinders:
1. Place the SELECTOR switches in
the “CLEAN” position and the MTS switches
in the “ON” position.
2. Let the beater shafts run for 5
minutes. This will allow the product in the
cylinders to soften. Remove nozzles.
9
Closing Procedures
9.1
Night Switch Operation
1. In areas where health codes will
allow, the freezer may be switched to night
operation that will allow the freezer to cycle
all night and maintain approximately 38°F
(3°C) or lower product in the cylinders and
cabinet.
2. To switch the freezer to the night
mode, leave the SELECTOR switches on
“AUTO” and the cabinet switch “ON”.
3. Turn the MTS switches to the
“OFF” position.
4. Turn the DAY/NIGHT switches to
“NIGHT” and let the machine cycle.
5. Remove serrated nozzles and the
drip tray assembly. Clean all soiled surfaces
with soap and water. Use sanitizing solution
in spray bottle and brush to clean the bottom
of the plunger openings.
6. To start the machine after using the
NIGHT mode, turn the DAY/NIGHT switches
to “DAY” and the MTS switches to “ON”.
Replace drip tray. Before replacing sanitized
nozzles use a small brush and spray bottle
with sanitizing solution to clean the bottom of
the plunger openings.
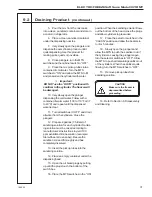
9.2
Draining Product
Figure 9-1
— continued
3. Disconnect the mix probe cords
from the back of the refrigerated cabinet.
See figure 9-1.
4. Remove the mix tanks from the
cabinet while pulling out the stainless steel
pickup tubes from the mix tanks.


