54
55
LAN control
Function : PC controls projector via LAN.
Preparation:
1. Equipments: PC, projector, cables
2. Connection procedures:
Connect the projector to routers or switches of the LAN by direct or cross cable. If it fails to
connect PC and projector by parallel cable, please switch to cross cable as suggested.
3. After the computer is booted and the projector is plugged in, indicator lights of LAN interface
and computer interface will flash continuously.
Operation procedures:
1 Turn on the projector.
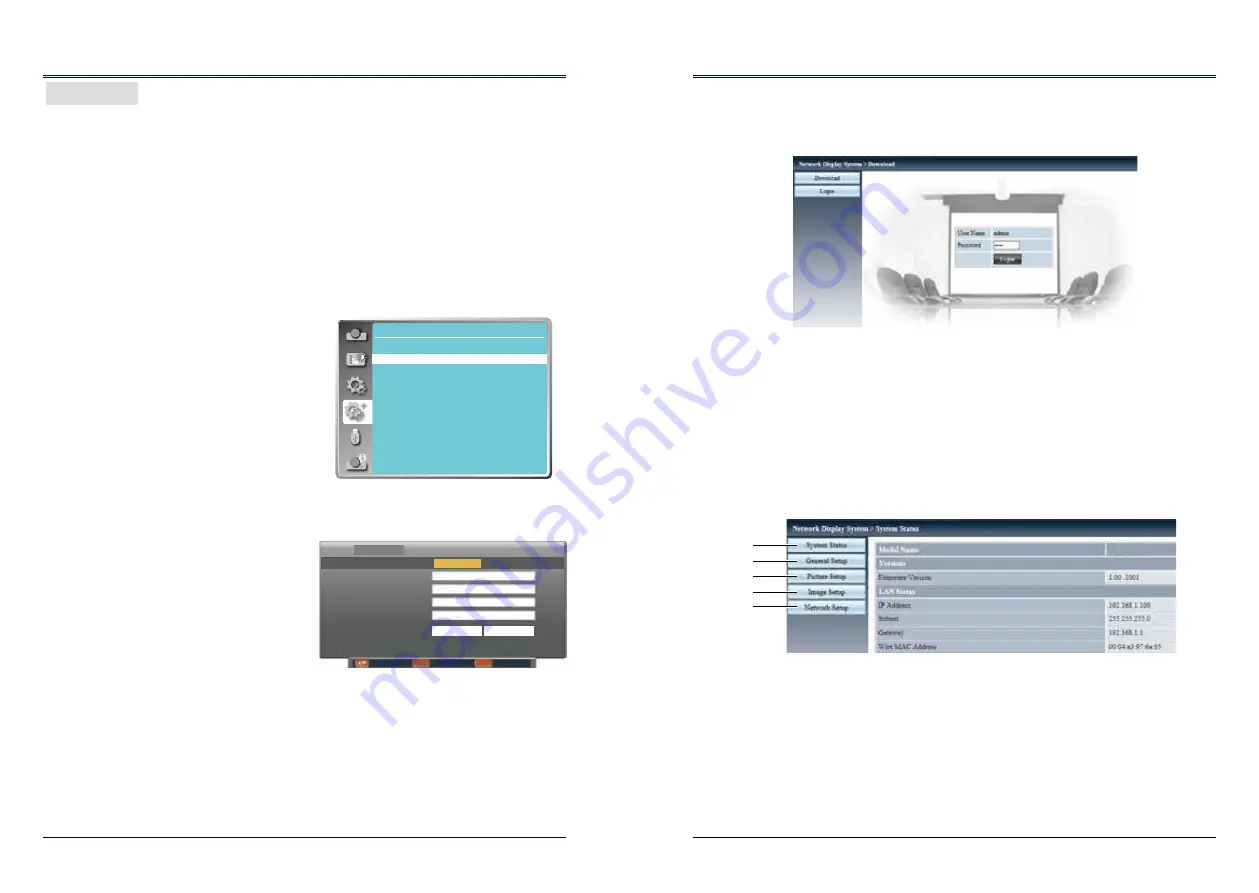
2 Obtain network address. DHCP set is displayed as on and obtain network address
automatically. If familiar with network, you can set DHCP as close and obtain network
address manually.
3 Enter network settings menu.
(1) Press MENU button on top control
or remote control to display screen
menu. Press ▲▼ button to select
"Expand" icon, then press the OK button.
(2) Press ▲▼ button to select "Network"
setting and press the OK button enter
the network setting.
(3) Press ▲▼ button to set DHCP as on.
(4) Press ▲▼ button to "Set" and press
the OK button."Please wait..." appears.
Network Control Instructions
Expend
Network
Network setting
Network information
MAC address
IP address
7C 6F F8 4E 48 A8
192.168.1.100
Network setting
DHCP
On
Set
Cancel
IP address
Subnet
Gateway
DNS
Move Next Back
LAN
MENU
ENTER
Network Control Instructions
6. Select "Login" to login the Network Display System page. (Both the initial name and passwords
are "admin".)
Note:
● You can click the upper right corner of the web browser screen to select the display language.
● Do not perform setting or control simultaneously by starting up multiple web browsers. Do not
set or control the projector from multiple computers.
● Change the password first. (8 half-width characters).
● If the screen for the web control is not displayed, consult the network administrator.
7. Items in Network Display System page including: "System Status", "General Setup", "Picture
Setup", "Image Setup" and "Network Setup".
①
System Status
The "System Status" page is displayed by
clicking this item.
②
General Setup
The "General Setup" page is displayed by
clicking this item.
③
Picture Setup
The "Picture Setup" page is displayed by
clicking this item.
④
Image Setup
The "Image Setup" page is displayed by
clicking this item.
⑤
Network Setup
The "Network Setup" page is displayed by
clicking this item.
①
②
③
④
⑤
5. Enter the IP address set by the projector into the URL input field of the Web browser.
4. Activate the Web browser in the personal computer.
Содержание EK-306U
Страница 1: ...OWNER S MANUAL EK 306U EK 307W Vol 1...


