46
47
Expand
Note:
● Either "H/V Keystone" , "Corner correction" or "Curved correction" setting value is valid. When
the "H/V Keystone" , "Corner correction" or "Curved correction" adjustment is finished, the
adjusted value will be reset when you adjust the other one.
● The "Curved Correction X Offset" and the "Curved Correction Y Offset" can not be adjusted
independently. After adjusting the "Curved Correction X/Y Gain" at the beginning, please adjust
the "Curved Correction X Offset" and "Curved Correction Y Offset".
● Press the KEYSTONE button on the remote control when the keystone screen is displaying
(it
includes: H/V Keystone, Corner correction, Curved correction and Reset value), press
button
switch to the other adjustment screen.
● Correcting up to ±30° for the tilt in the vertical direction and ±15° for the tilt in the horizontal
direction are available for adjustments with "Keystone". However, the image quality will degrade
and it will get harder to focus with more correction. Install the projector so that the correction will
be as small as possible.
● Screen size will also change when "H/V Keystone" is used to perform various adjustments.
● Aspect ratio of the image size may shift depending on the correction.
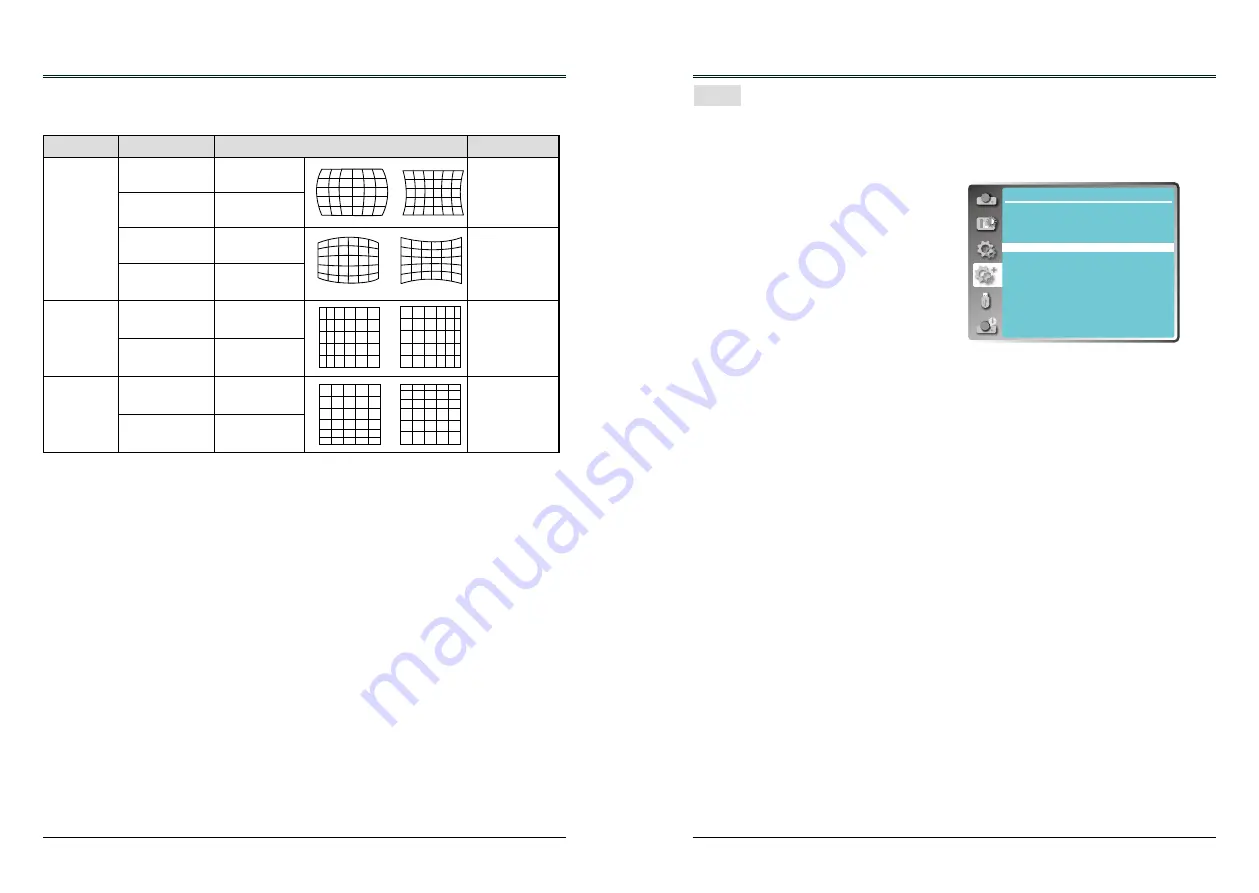
Curved correction (For WXGA model only)
Adjust when the linearity is not uniform or the vertical and horizontal lines are distorted.
Press▲▼◄►to adjust the item.
Reset value
Return the corrected values to the factory default values.
Press▲▼to select "Reset value", then press the OK button, the state of the keystone correction is
released.
Items
Operation
Adjustment
Adjustment range
Barrel
correction X/Y
Gain
Press the►button
Adjust the right of
the width
-40 ~ +40
Press the◄button
Adjust the left of
the width
Press the▲button
Adjust the top of
the width
-40 ~ +40
Press the▼button
Adjust the bottom
of the width
Barrel
correction X
Offset
Press the►button
Adjust the right of
the distortion
0 ~ +1365
Press the◄button
Adjust the left of
the distortion
Barrel
Correction Y
Offset
Press the▲button
Adjust the top of
the distortion
0 ~ +799
Press the▼button
Adjust the bottom
of the distortion
Expand
This function allows you to customize the screen logo with Logo select, Capture, Logo PIN code
lock and Logo PIN code change functions.
Logo Select
This function decides on the starting-up display
from following options.
Default .... Show the factory-set logo.
User..........Show the image captured by user.
Off ........... Show the countdown display only.
* " User" is not available for EK-306U.
Capture
You can capture a projected image as start logo .
Select "Capture" and press the OK button on
remote control or control panel.
Confirmation dialog box appears, select "Yes"
to start capturing.
* " Capture " is not available for EK-306U.
Logo PIN code Lock
This function prevents an unauthorized person from changing the screen logo.
Off
............The screen logo can be changed freely from the Logo menu.
On
............The screen logo cannot be changed without a Logo PIN code.
If you want to change the
Logo PIN code lock setting, press the OK button and the Logo PIN code dialog
box appears. Enter a Logo PIN code by following the steps below.
Press OK button to enter the PIN code. Press ◄► button to select a number, and then press the
OK button to enter this number, the cursor automatically move to next box. If you fixed an incorrect
number, press MENU button to reset it again.
Repeat this step to complete entering a three-digit number.
After entering the three-digit number, the cursor automatically move to "Set", and press the OK
button, then you can start to operate the projector.
If you entered an incorrect PIN code, the number (***) turn red, it will be reset automatically within
one second. Enter the correct PIN code all over again.
Logo PIN code change
You can change the Logo PIN code (three number). Press the OK button to select Logo PIN
code change. Logo Pin code dialog box appears, press
◄►
button to enter the correct PIN code.
The New Logo PIN code input dialog box appears. Set a new Logo PIN code, confirmation box
appears, select Yes to set the new Logo Pin code.
Be sure to note the new Logo PIN code and keep it on hand. If you lost the number, you could no
longer change the Logo PIN code setting.
CAUTION:
WHEN YOU HAVE CHANGED THE LOGO PIN CODE, WRITE DOWN THE NEW PIN CODE
IN COLUMN OF THE LOGO PIN CODE NO. MEMO ON PAGE 82, AND KEEP IT SECURELY.
SHOULD THE LOGO PIN CODE BE LOST OR FORGOTTEN, THE LOGO PIN CODE SETTING
CAN NO LONGER BE CHANGED.
Logo
Logo
Expend
Language
Auto setup
Keystone
Logo
Security
Power management
Filter counter
Test pattern
Network
Factory default
Lamp counter
Содержание EK-306U
Страница 1: ...OWNER S MANUAL EK 306U EK 307W Vol 1...


