background image

2

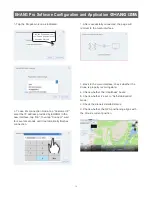
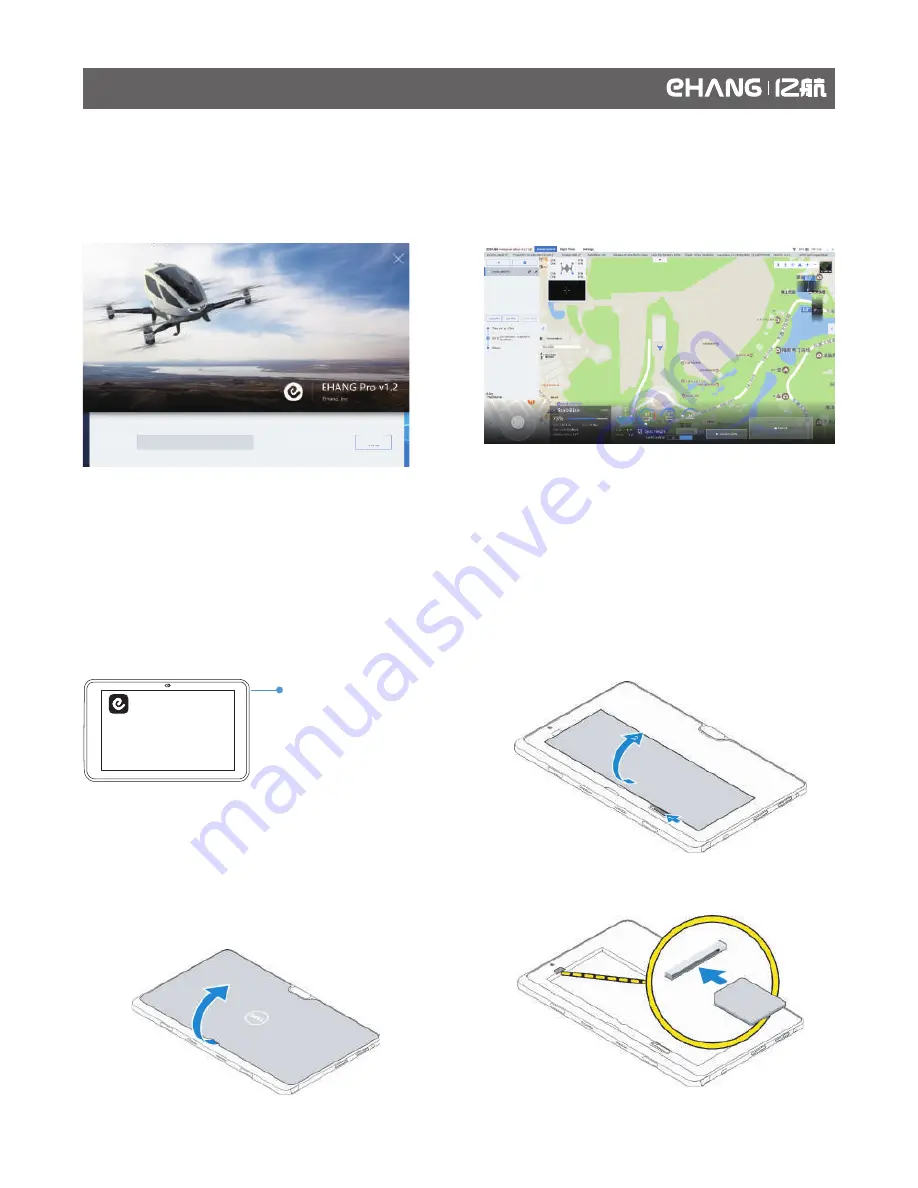
. When running EHANG Pro for the first time, you’ll see a popup window where you can type in the registra-

tion code.  

3

. Type in the registration code and tap “OK”, when successfully verified, the page will automatically redirect 

to the main interface. 

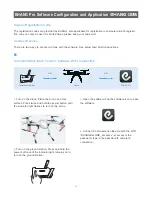
SIM Card Installation

Install Micro-SIM Card

CAUTION: Removing the Micro-SIM card when the tablet is on may cause data loss or damage the card. 
Make sure your tablet is turned off or the network is disconnected when removing the card. 

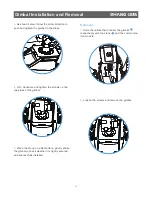
4

. Install the micro-SIM card into its slot.

2

. Pry the base cover in the direction indicated and 

lift it at an upward angle to remove it from the 
tablet.

3

. Slide the release latch to unlock the battery. Lift 

and remove the battery from the tablet.

1

. Press and hold the power button to turn off the 

tablet. 

Power button/ Lock-screen

OK

Registration Code

Tablet

15

Содержание Falcon-B410

Страница 1: ...User Manual Falcon B410 Please read carefully this user guide and keep it well for further reference if necessary ...

Страница 2: ...rvice ehang com Falcon B410 User Manual includes packing list assembly parts and specification information Congratulations on purchasing your new Falcon B410 For customer service and support please e mail service ehang com or contact our customer service hotline 86 020 29028899 www ehang com www twitter com ehang www facebook com theghostdrone www instagram com ehang official forum ehang com Thank...

Страница 3: ...uct List 03 Know before You Fly 01 Warnings 02 Battery Charging and Use Battery Diagram 06 Battery Charging 06 How to Use 07 Landing Gear Unfolding and Folding Unfolding 08 Folding 08 Gimbal Installation and Removal Diagram 09 Installation 09 Removal 10 Communication Box Use and Charging Diagram 11 How to Use 11 Charging 11 Maintenance Propeller Maintenance 12 Battery Storage and Maintenance 12 La...

Страница 4: ...nfrared Thermal Imaging Camera 37 Tablet 38 Tablet Power Adapter 38 Tablet Battery 38 Flight Control Interfaces Interfaces Introduction 20 Flight Settings 22 Acquiring Image Transmission 23 Unlocking to Take off 24 Touch to Go Flight 25 Flight Plan 27 Favorite Waypoints 29 Photos and Videos 30 Renaming Aircraft 32 Calibrating Compass 32 Pre flight Check 35 Flight Tips 35 Pre flight Check and Fligh...

Страница 5: ...ctive monitoring methods be provided ID Card For users who have not accessed the UAV cloud system there should be ID cards pasted onto the UAV surface that clearly show the relevant informa tion including the UAV model serial NO the name and contact info of its owner etc so that the UAV owner and operator can be quickly traced to in the The operator and pilot shall abide by relevant laws administr...

Страница 6: ... away from strong EM sources including signal towers and ground stations EM interference can cause malfunctioning situations such as failure to take off or loss of control 6 DO NOT fly the drone in inclement weather conditions including extreme temperatures heavy snow strong wind above force 6 storm or fog 7 It is recommended to always retain line of sight with the drone during flight Losing sight...

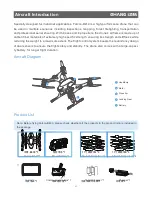
Страница 7: ...ecific strength ensuring its strength and stiffness while reducing the weight to a maximum extent The flight control system boasts the redundancy design of dual sensors to ensure the flight safety and stability The drone also comes with a large capaci ty battery for longer flight duration Falcon B410 1 19 inch Propeller L 4 Tablet 1 Communication Box 1 19 inch Propeller R 4 Tablet Charger 1 Charge...

Страница 8: ...ory Kit 1 实名 登记 指引 Lubricant 1 The accessory kit includes USB cable 1 Hex key 1 2mm screw 10 2 M4 25 screw 4 round gasket 8 The USB cable can be used to charge the ground station 用户手册 天鹰 B400 Each drone comes with one tablet Users can order extra tablets based on your needs Aircraft Introduction 04 ...

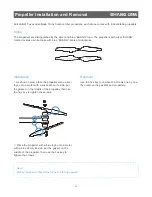
Страница 9: ...ropeller with a silver logo onto a motor with a silver dot on its side put the gasket on the middle of the propeller then use the hex key to tighten the screws Removal Use the hex key to remove the screws one by one then remove the gaskets and propellers 2 Place the propeller with a blue logo onto a motor with a blue dot on its side put the gasket on the middle of the propeller then use the hex ke...

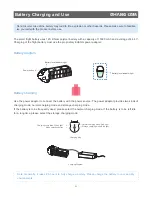
Страница 10: ...harging Use the power adaptor to connect the battery with the power source The power adaptor provides two kinds of charging mode normal charging mode and storage charging mode If the battery is to be frequently used please select the normal charging mode If the battery is to be left idle for a long time please select the storage charging mode Charging plug Normal charging mode Red light Charging c...

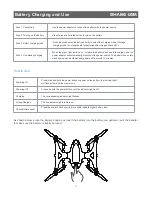
Страница 11: ...mpartment pull the handler to make sure the battery is tightly secured Step 1 Connecting Step 2 Turning on the battery Step 3 Select charging mode Step 4 Completing charging Use the power adaptor to connect the battery with the power source Press twice and hold the button to turn on the battery When the green light remains on it means the battery has been fully charged and the power adaptor will a...

Страница 12: ...en tighten and following the directions of the arrows Unfolding Loosen the two straps and pull the landing gear downward to the maximum extent then lock the clamp Folding 1 Unlock the clamp and pull upward to fold landing gear then tighten the strap Unfolding and Folding the Landing Gear 08 2 2 2 1 1 3 3 ...

Страница 13: ...ing the drone Installation 1 As shown below connect of the communica tion module to of the gimbal with the black cable And connect on the drone bottom to of the gimbal with the colorful flat cable 2 Match the gimbal grooves to the screws as shown below Communication Module Gimbal Gimbal Installation and Removal 09 2 1 4 2 1 4 3 3 ...

Страница 14: ...he gimbal to check whether it is tightly secured and successfully installed Gimbal Installation and Removal 10 4 Turn clockwise and tighten the screws on the two sides of the gimbal Removal 1 Untie the cables that connect the gimbal respectively with the drone and the communica tion module 1 1 2 2 2 Loosen the screws and remove the gimbal ...

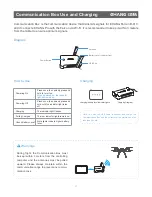
Страница 15: ...mum signals Diagram How to Use Charging During flight the Communication Box must be kept within 3 meters from the controlling computer and the antennas must be pulled upward Please always maintain within the communication range to prevent any commu nication loss Warnings 3m Press once then quickly press and hold until the indicator light turns off The indicator light flashes The four indicator lig...

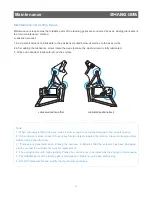
Страница 16: ... the checked baggage 1 The ideal storage temperature of the batteries is 23 5 2 Keep the batteries away from children water fire or metal objects 3 Cement or pottery are ideal materials on which you can store or charge discharge batteries DO NOT charge batteries on combustible objects DO NOT put combustibles such as wooden furniture blankets or oil bottles in battery storage zones Please put a fir...

Страница 17: ...tes that the actuator has been damaged please contact the customer service for replacement 4 The spring comes with high elasticity Please be cautious not to be injured by the spring in maintenance 5 The foldable parts of the landing gears will release a KaDa sound when self locking 6 DO NOT disassemble and modify the mechanical structures Lubrication process 1 Add a small amount of lubricants to t...

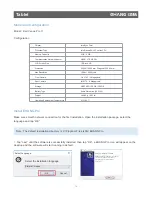
Страница 18: ...uage install EHang Pro EHang Pro installation completed Select the installation language Click Complete to exit the installation EHANG Pro has been installed in your computer you can run the software via its shortcut Running OK 14 Chipset Processor Type Memory Capacity Communication Network Adaptor LCD Screen Size Dimension Max Resolution Front Camera Rear Camera Storage Battery Type Weight Operat...

Страница 19: ... SIM card when the tablet is on may cause data loss or damage the card Make sure your tablet is turned off or the network is disconnected when removing the card 4 Install the micro SIM card into its slot 2 Pry the base cover in the direction indicated and lift it at an upward angle to remove it from the tablet 3 Slide the release latch to unlock the battery Lift and remove the battery from the tab...

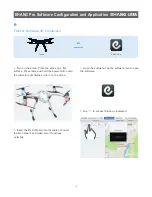
Страница 20: ...FI WIFI Communication Box Falcon EHANG Pro 1 Turn on the drone Place the drone on a flat surface Press twice and hold the power button until the indicator light flashes to turn on the drone 3 Open the software Tap the software icon to open the software 4 Connect Communication Box Search the WIFI EHANGBat GND_xxxxxxxx xxxxxxxx is the password type in the password to complete connection 2 Turn on th...

Страница 21: ...ll redirect to the main interface 9 Back to the main interface check whether the drone is properly receiving data a Check whether the Heartbeat beats b Check whether it s set to Self stabilization mode c Check the drone s detailed status d Check whether the GPS positioning aligns with the drone s current position Click the Dropdown icon you ll see a popup menu of Connection Method EHANG Pro Softwa...

Страница 22: ...on until the indicator light flashes to turn on the drone 2 Insert the 4G SIM card into the tablet connect the 4G network and make sure it functions normally 3 Open the software Tap the software icon to open the software Falcon EHANG Pro EHANG Pro Software Configuration and Application 5 Tap to connect drone as indicated 18 ...

Страница 23: ...nishes connection 8 Back to the main interface check whether the drone is properly receiving data a Check whether the Heartbeat beats b Check whether it s set to Self stabilization mode c Check the drone s detailed status d Check whether the GPS positioning aligns with the drone s current position 5 Tap the Dropdown icon as indicated EHANG Pro Software Configuration and Application Click the Dropd...

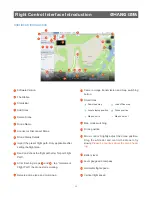
Страница 24: ... Drone 4 Delete Drone 5 Detected drone type and motor load 12 Horizontal flight speed 20 Vertical flight speed 21 Camera image transmission and map switching button 13 Small Icons Map zoom out Download map Load offline map Locate laptop position Map zoom in Drone position 14 Map mode switching 15 Drone position 16 Battery level 18 Level gauge and compass 19 Micro control Slightly adjust the drone ...

Страница 25: ... preset altitude above the takeoff point 30 Hover tap the button the drone will hover 31 32 Land tap the button the drone will vertically and slowly land to the ground Please make sure the landing point is safe enough Altitude adjustment slide bar slide upward the drone will lift vertically slide downward the drone will descend vertically 33 Flight path progress bar The green dot represents the ta...

Страница 26: ... the next command 3 Return Altitude Final The altitude at which the drone hovers after it returns above the takeoff point 4 Return Height The altitude at which the drone flies during its return path to the takeoff point 5 Rising Speed The speed at which the drone ascends Recommended value 1 2 m s 6 Landing Speed The speed at which the drone descends Recommended value 1 2 m s 7 Cruising Speed The s...

Страница 27: ...200 10 live for 4K spherical camera only ehc 10 242 200 10 2 for zoom camera only then click Connect to acquire image transmission WIFI Mode The image transmission IP address of the zoom camera is ehc 192 168 43 11 2 click Connect to acquire image transmission The image transmission IP address of the 4K spherical camera is rtsp 10 242 200 10 live click Connect to acquire image transmission You can...

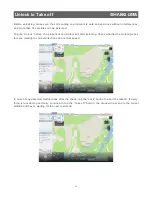
Страница 28: ... propellers and motors will start spinning Check whether the motors propel lers are rotating in correct directions and normal speed In case of any detected malfunctions after the check tap the Lock button to abort the takeoff If every thing is functioning normally continue to tap the Take off button the drone will ascend to the preset altitude and hover waiting for the next command 24 ...

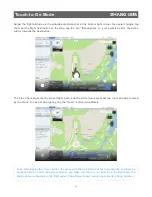
Страница 29: ...preset flight path and the white line represents the route already covered by the drone In case of emergency tap the Hover button immediately Note After tapping the Hover button the drone will glide a bit instead of hovering instantly so please be cautious about the surrounding environment and make sure there is no obstacles in the flight path The gliding distance depends on the flight speed Faste...

Страница 30: ...If you want to modify the flight path during flight tap the Hover button first then tap the new destina tion on the map and tap Go Touch to Go Mode 26 ...

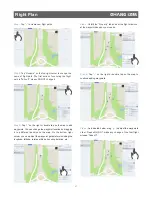
Страница 31: ...he Property tab and set the flight missions at the waypoint based on your needs Step 6 As indicated below drag to adjust the waypoints order Please DO NOT make any change of the first flight mission Take off Step 3 Tap on the right or double tap on the map to add waypoints You can change the waypoint location by dragging it to a different position on the map On the bottom right corner you can adju...

Страница 32: ...ch as Return The final flight path will display three waypoints as shown below Add Favorite Waypoints Select the waypoint to be replaced tap Import Favorite Way point make sure you have added favorite waypoints in advance and select the waypoints from your favorites After setting the flight plan DO NOT forget to tap Save to complete your setting Flight Plan 28 ...

Страница 33: ...d Favorite Waypoints You can save the frequently used waypoints or import the saved waypoints to your flight plan 1 Tap Favorite Waypoints on the flight control interface tap Add after renaming the waypoint 3 Tap or double tap on the map to add new waypoints Flight Plan 29 ...

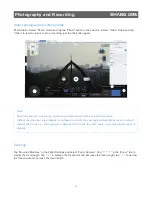
Страница 34: ...m tab to modify the focal length Tap to enlarge the focal point and decrease the focal length tap to narrow the focal point and increase the focal length Photography and Recording Note Slide the slide bar to adjust the gimbal angle when taking photos or recording videos Gimbal yaw slide bar slide leftward or rightward to modify the yaw angle automatically reset to default Gimbal pitch slide bar sl...

Страница 35: ...Check the Album Tap the icon as indicated to enter the Album The photos exported via the Album function will be tagged with relevant information such as GPS positioning and time 31 ...

Страница 36: ...terface edit the name then tap OK Step 1 To ensure safety please remove all the propel lers Renaming the Drone and Compass Calibration drone nose drone nose To ensure the safety of personnel and the aircraft from damage please remove the paddles before calibration 32 ...

Страница 37: ...pin with the drone until the grey circle is filled with blue dots then the interface will automatically proceed to the next step Step 4 You ll see either of the following two results after calibration Result 1 Verify successful with a deviation value less than 10 Just tap Close to exit the calibration inter face Result 2 Validation failed with a deviation value greater than 10 You need to tap Reca...

Страница 38: ...Select On the value will auto reset to 0 0 after the pitch angle is adjusted Select Off the current value remains after the pitch angle is adjusted 3 PTZ slider for yaw auto to middle Select On the value will auto reset to 0 0 after the rotation angle is adjusted Select Off the current value remains after the rotation angle is adjusted 27 26 Legends PTZ slider for yaw auto to middle On PTZ slider ...

Страница 39: ...tem 10 Make contingency plan that includes the predetermined locations for emergency landing Flight Tips 1 The return altitude must be higher than the maximum altitude in the flight path 2 For long range flight set Auto mode to better execute waypoint missions 3 The operation of micro control or roll should be handled mildly 4 When resuming an interrupted waypoint flight between two waypoints with...

Страница 40: ...V Dimensions Battery Weight 4300 g 134 92 34 mm Dimensions Storage Temperature Charging Time 23 5 2 5 h Voltage 44 4 V 15000 mAh Capacity WIFI Communication Protocal Communication Distance Image Transmission Latency 802 11 b g n 50 ms Standard omnidirectional antenna 3km External directional antenna 5km Technical Specifications 60 km h 2 5 m s 17 min 25 km 32 min Vertical 0 5m horizontal 1m 3 5 m ...

Страница 41: ...0 mm W 1000 mm T Frame rate 20fps 1920 1080 25fps 1280 960 Weight Gimbal Type Stability Accuracy Max RPM Controllable Angle Supported Cameras 674 g Mechanical 3 axis gimbal 0 02 Yaw 180 s Roll 180 s Pitch 180 s Yaw 45 Roll 0 Pitch 90 30 Infrared thermal imaging camera Infrared thermal imaging camera Gimbal Infrared thermal imaging camera gimbal 65mk 30 Noise Equivalent Temperature Difference NETD ...

Страница 42: ...4 mm 1920 x 1080 Pixels OV 2722 2 Megapixels IMX 175 8 Megapixels NGFF SSD 128 GB 256 GB 2 chip lithium ion 36 WHr 240 00 g 0 53 lb 0 40 Intel Lynx Point Intel Haswell ULX Y series CPU Tablet Power Adapter Input Voltage Input Current Max 100 VAC 240 VAC 0 60 A Output Power 23 4 W Output Current 30 W 1 2 A 2 0 A Rated Output Voltage 19 5 Vdc Tablet Battery Type Voltage 2 chip lithium ion 36 WHr 7 4...

Страница 43: ... A R D Q E H T 0 0 1 2 0 1 7 G u a n g z h o u E H a n g I n t e l l i g e n t Te c h n o l o g y C o L t d M a i l a d d r e s s B u l i d i n g 3 N o 7 2 2 n d N a n x i a n g R o a d S c i e n c e C i t y H u a n g p u D e v e l o p m e n t Z o n e G u a n g z h o u C h i n a ...

Отзывы: