background image

Installing and removing capsule

Installing:

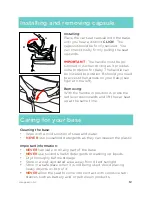
Place the car seat capsule onto the base 

until you hear a distinct 

CLICK!

  The 

capsule should be firmly secured.  You 

can check this by firmly pulling the seat 

upwards.

IMPORTANT 

- The handle must be po-

sitioned in A when driving as it provides 

extra protetion for baby. The handle can 

be lowered to position B should you need 

to access the harness on your baby (see 

figure to the left).

Removing:

With the handle in position A, press the 

red lever downwards and lift the car seat 

up at the same time.

12

designed in NZ

A

B

Caring for your base

Cleaning the base:

•  Wipe with a mild solution of soap and water.

•     

NEVER 

use household detergents as they can weaken the plastic.

Important information:

• 

NEVER

 lubricate or oil any part of the base.

• 

NEVER

 use solvents, harsh detergents or washing up liquids.

• 

Dry thoroughly before storage. 

• 

Store in a well-ventilated area, away from direct sunlight.

• 

Store in a safe place when it is not being used. Avoid placing 

heavy objects on top of it.

• 

NEVER

 allow the seat to come into contact with corrosive sub-

stances such as battery acid or petroleum products.

Содержание PA0100

Страница 1: ...ference To reduce the risk of serious injury or death read this owner s manual prior to installing and using this product The multi fix base and capsule are suitable for infants up to 13 kg Conforms to European ECE R44 04 in Group 0 as approved by Land Transport NZ designed in NZ ...

Страница 2: ...uction manual carefully In particular pay attention to the warnings included as well as the correct installation methods provided Subtle differences can make a huge difference when it comes to safety We believe in long lasting relationships with our customers and we d love you to keep in touch You can sign up for our website newsletter or follow us on Facebook Please remember that if you need anyt...

Страница 3: ...hich this device is intended is Group 0 E ISO R1 When the device is used with a car seat 3 point seat belt it is only suitable for use in the listed vehicles fitted 3 point approved to ECE Regulation No 16 or equivalent standards The multi fix base can only be used with the Ed Co Car Seat Capsule NEVER use this product with another capsule shell NEVER LEAVE YOUR CHILD UNATTENDED IN THE CAR SEAT NE...

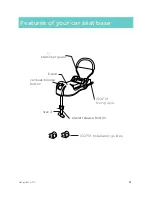
Страница 4: ...Features of your car seat base stabiliser guard base car seat release button stand ISOFIX installation guides stand release button 4 designed in NZ ...

Страница 5: ...PORTANT Only install the seat in a forward facing passenger seat as indicated in Figure 1 above A forward facing seat is one that faces in the direction of the car s movement Do not install into a rear facing or side facing passenger seat as pictured in Figure 2 above IMPORTANT Do not install the car seat in a passenger seat fitted with airbags 5 1 2 designed in NZ ...

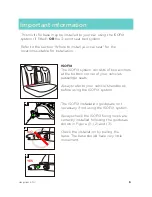
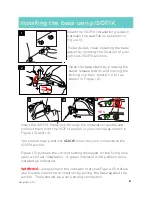
Страница 6: ...stem consists of two anchors at the bottom corner of your vehicle s passenger seats Always refer to your vehicle s handbook before using the ISOFIX system The ISOFIX installation guides are not necessary if not using the ISOFIX system Always check the ISOFIX fixing locks are correctly installed following the guides as shown in Figure 1 2 and 3 Check the installation by pulling the base The base sh...

Страница 7: ...m of the socket Using a Phillips screwdriver fasten the included screws into the stabiliser tubing When using the ISOFIX installation system extend the fixing lock by lifting the latch and turning the lock in the direction of the arrow Using the ISOFIX arms The fixing locks can be stowed when not in use IMPORTANT always stow the ISOFIX fixing lock as pictured in Figure 3 if installing your base us...

Страница 8: ...You should hear a distinct CLICK when the lock connects to the ISOFIX anchor Figure 5 pictures the correct setting displayed on the fixing lock upon a correct installation A green indicator will be shown once installed as indicated WARNING always check the indicator matches Figure 5 before use Double check the connection by pulling the base against the anchor There should be a very strong connecti...

Страница 9: ...ectly installed car seat may cause death or injury If you are unsure please contact us or talk to your local Child Restraint Technician found via the New Zealand Transport Agency website www nzta govt nz 9 Removing the base using ISOFIX Remove the ISOFIX fixing lock by pressing the release button as shown in Figure 1 Retract the stand by pressing the stand release button and pushing it back into i...

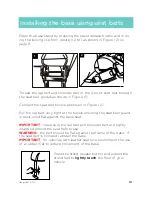
Страница 10: ...he lap belt very tight at the buckle ensuring the stabiliser guard is positioned flat against the back seat IMPORTANT make sure the lap belt and shoulder belt are tightly wrapped around the seat before use WARNING the belt should be flat against the frame of the base If the seat belt is crimped reinstall the base IMPORTANT for vehicles with leather seats we recommend the use of a rubber mat to red...

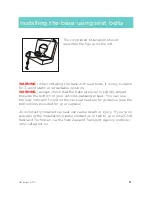
Страница 11: ...sits level or slightly sloped towards the bottom of your vehicle s passenger seat You can use the level indicator found on the car seat capsule for guidance see the instructions provided for your capsule An incorrectly installed car seat can cause death or injury If you re un sure about the installation please contact us or talk to your local Child Restraint Technician via the New Zealand Transpor...

Страница 12: ...on A press the red lever downwards and lift the car seat up at the same time 12 designed in NZ A B Caring for your base Cleaning the base Wipe with a mild solution of soap and water NEVER use household detergents as they can weaken the plastic Important information NEVER lubricate or oil any part of the base NEVER use solvents harsh detergents or washing up liquids Dry thoroughly before storage St...

Страница 13: ... warranty excludes claims resulting from misuse abnormal use overloading general wear and tear child outgrowing the product not following instructions transportation damage including airline or freight damage poorly maintained product dropped goods negligence second hand product modified product colour fading mould damage to inner foam in use or fabric cuts and tears The warranty excludes repairs ...

Страница 14: ...edwardsandcobaby com ...

Отзывы: