EdilKamin Iris Plus Скачать руководство пользователя страница 6

page 6

Pellet Fire Vent System (Iris Plus & Little models)

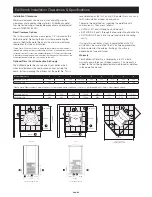
Fire Safety Distances and Location

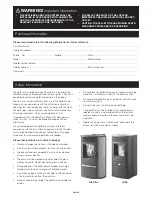
The Pellet Fire must be level for it to work correctly. Check the 
floor’s load-bearing capacity. The Pellet Fire must be installed 
in compliance with the following safety conditions:

-   minimum distance from combustible materials around the 

sides and back of the Pellet Fire (see specifications and 
clearances chart (page 9)

-   flammable materials must not be placed less than 800mm 

from the front of the Pellet Fire

-   if the stove is installed on a combustible floor, a sheet of 

heat-insulating material must be placed between the two, 
extending out by at least 100mm at the sides and 200mm 
at the front.

If the vent pipe is to exit through a wall made of wood or 
other flammable materials it must be suitably insulated using 

a double lined through wall vent system, such as the Metro 
through wall vent kit.

Air Intake

The room where the Pellet Fire is installed must have an air 
intake of at least 80 cm² to ensure a supply of fresh air to 
replace the air consumed by combustion.

Alternatively, the Pellet Fire can be supplied with air drawn 
directly from the outside through a pipe extension, we use 
100mm, which must have a free section of at least 12 cm², 
must be protected by a mesh. The pipe must not exceed 1 
metre in length and should not have any sharp bends.

It must be fitted with a wind guard, as wind gusts will upset 
the air flow sensor.

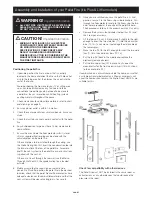
Assembly and Installation of your Pellet Fire (Iris Plus & Little models)
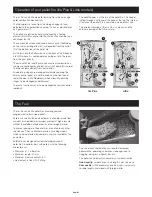
Venting System

Your pellet fire works under negative pressure (vacuum). 
The exhaust fan of your pellet fire pulls air from the air intake, 
through the pellet fire and pushes it out the venting. Air 
passing through the burn pot is used to burn the pellets. 
Proper vent pipe sizing is very important to ensure the pellet 
fire operates properly. A proper size approved vent should 
be used to provide the least resistance for movement of the 
combustion air.

Your pellet fire is certified for 100mm exhaust venting. The 
vent pipes on the exhaust side of the exhaust fan are under 
pressure. Care must be taken to ensure that all the joints are 
completely sealed to prevent any leakage of exhaust fumes 
and smoke into the house. If you smell smoke, the venting 
has not been properly sealed. Use only high temperature 
RTV silicone for sealing. Aluminum tape is not considered an 
adequate sealant. At least 3 screws are needed for securing 
all vent pipe joints.

The venting of this pellet fire is not allowed to pass unshielded 
through any closets, concealed spaces, floors, ceilings or attic 
spaces. If the venting must go through a wall or combustible 
partition, the installation must conform to the Installation Code 
for Solid Fuel Burning Appliance and Equipment AS/NzS 
2918:2001. For more detailed venting information, please refer 
to your venting manufacturer’s instructions.

Exhaust Vent Termination Requirements

The exhaust vent must terminate into an open space. Under 
no circumstances is the vent allowed to terminate into closed 
or semi-closed spaces. Venting into a garage, under a sun 
deck, porch or any other space where the concentration of 
fumes may occur is prohibited.

•   DO NOT USE MAKESHIFT MATERIALS OR MAKE COMPROMISES IN THE INSTALLATION. IT IS A FIRE HAZARD.
•   DO NOT INSTALL A FLUE DAMPER IN THE EXHAUST VENTING SYSTEM OF THIS PELLET FIRE.
•   DO NOT CONNECT THIS PELLET FIRE TO A CHIMNEY FLUE SERVING ANOTHER APPLIANCE.

 WARNING! 

Important Information

Содержание Iris Plus

Страница 1: ...Manual Important information 2 Operation and fuel 3 Technical specifications 4 Assembly installation 5 Pellet fire vent systems 6 Dimensions 8 Installation clearances 9 Control panels weekly timer 10...

Страница 2: ...eded Please take particular note of the following Never put foreign substances in the firebox or hopper Do not use flammable products to clean the smoke duct Firebox and hopper components must only be...

Страница 3: ...filled through a lid found at the back of the top The internal structure of the pellet fire is completely made of cast iron The external covering of the Iris Plus is ceramic and the external covering...

Страница 4: ...optional infrared Electronic circuit board protection 5 x 20 2 A 250 VAC fuse IRIS PLUS TECHNICAL HEATING SPECIFICATIONS Hopper capacity 15kg Efficiency 71 Heat Output 3 4 8kW Burn time min max 7 5 1...

Страница 5: ...the vent system will be clear of ceiling joists trusses etc 9 Once you are satisfied you have the pellet re in its final position secure it to the oor using suitable anchors Drill through the oor prot...

Страница 6: ...he air intake through the pellet fire and pushes it out the venting Air passing through the burn pot is used to burn the pellets Proper vent pipe sizing is very important to ensure the pellet fire ope...

Страница 7: ...We recommend sufficient space be provided minimum 200mm on each side of the pellet fire to service the unit If this is not possible provision must be made available to remove the unit for servicing Pe...

Страница 8: ...PROFILE Little Iris Plus Little FRONT PROFILE Little REAR PROFILE IRIS PLUS side PROFILE IRIS PLUS FRONT PROFILE IRIS PLUS REAR PROFILE 600mm 480mm 600mm 950mm 375mm 320mm 500mm 530mm 215mm 106mm 77...

Страница 9: ...ry hour There are three methods of supplying the pellet fire with combustion air They are as follows DV WALL KIT ducts through an outside wall DV FLOOR KIT ducts through the floor directly behind the...

Страница 10: ...able to pick up Ignition Automatic ignition Hold the 0 1 key down for two seconds with the pellet fire on standby to start the ignition procedure Ac appears on the display for a few minutes the igniti...

Страница 11: ...been enabled If so you can exit thie section by pressing O 1 and proceed to setting program section 4 Press the MENU key until OFF appears 5 Press the or key until PrOn appears 6 Confirm with the MENU...

Страница 12: ...OFF key down for two seconds with the pellet fire on standby to start the ignition procedure Ac will appear on the display for a few minutes The ignition procedure does not have a set duration it is a...

Страница 13: ...isplayed if programming has previously been enabled If so you can exit thie section by pressing O 1 and proceed to setting program section 4 Confirm by pressing the Menu key pass now to on with the or...

Страница 14: ...ion is suspected If the value displayed does not vary when the conditions are changed for example the door is opened then the sensor is faulty The low pressure alarm may also occur during ignition as...

Страница 15: ...ing a vacuum pot connected to your vacuum cleaner which are available from your Metro Dealer The whole process takes only a few minutes a day Vacuum clean the door vacuum clean the hearth and vacuum c...

Страница 16: ...arising from the failure of any part or operation of the appliance A claim under this warranty should be directed to the retailer who supplied the EdilKamin Pellet fire or if this is not possible wri...

Отзывы: