EdilKamin Iris Plus Скачать руководство пользователя страница 5

page 5

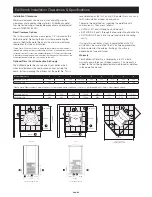
Positioning the pellet fire

1   If possible position the fire in a room that is centrally 

located in the home and direct the fire so that it blows hot 
air into the living area first then forces the air out into the 
rest of the house.


Avoid positioning the fire close to your TV or sitting area 
so as not to be distracted by any fan noise. Unlike a 
conventional wood fire you do not need to be close to 
a pellet fire; they act more like central heating systems 
pushing warm air throughout the house.

2   Check clearances to combustible materials, refer to chart 

and drawings on page 9.

3   Ensure a power outlet is within 1.5 metres.

4   Check the vent pipe will clear structural beams, trusses or 

studs.

5   Check that curtains cannot come in contact with the pellet 

fire.

6   Any unshielded vent pipe must have 75mm clearance to 

combustibles.

7   Ensure the area where the floor protector will sit is level, 

shim as required, final leveling can be done with the 
adjustable feet on the pellet fire.


If the vent pipe is to be installed through the ceiling, use 
the Metro Ceiling Vent Kit. Insert the condensation tee into 
the 80mm outlet at the rear of the pellet fire. Assemble 
and fit the vent system to the pellet fire as per instructions 
supplied with the vent kit.


If the vent is to exit through the rear wall use the Metro 
Through Wall Vent Kit, the condensation tee is located 
outside.

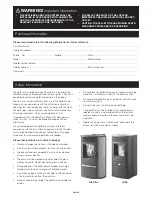
8   Before assembling the soap stone or ceramic side 

panels (Iris Plus only) position the pellet fire in the desired 
location, check that the pellet fire and floor protector have 
adequate clearances to combustible material and that the 
vent system will be clear of ceiling joists, trusses etc.    

9   Once you are satisfied you have the pellet fire in its final 

position, secure it to the floor using suitable anchors. Drill 
through the floor protector and into the floor using the two 
8mm holes provided at the centre of the pellet fire base. 
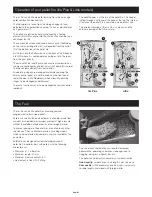
Then proceed as follows in the order shown (Iris Plus only): 

•   Remove the 8 screws found under the top tiles (14) and 

the 2 rear panel screws;

•   Lift the top up 2-3 cm (15) and move it slightly to the right, 

enough to insert the two side tiles (11) into the aluminium 
bars (12-13); Take care not to damage the data cable on 
the rear display;

•   Move the top (15) to the left, enough to insert the two side 

tiles (11) into the aluminium bars (10-13);

•   Put the top (15) back in the middle and replace the 

previously removed screws;

•   Put the two upper tiles (14) in place. Lastly, open the 

door, and fasten the front ceramic insert (75) with silicon 
to the cover plate (74). 

If combustion air is drawn from outside the home, ensure that 
a suitable grill and wind protector is fitted as wind gusts will 
upset the combustion sensors, the Metro Direct Vent Kits are 
suitable for this.

Check for compatibility with other devices

The Pellet Fire must NOT be installed in the same room as 
extractor fans or any other devices that could reduce the 
pressure in the room.

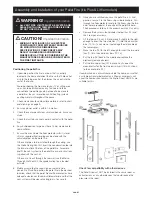
Assembly and Installation of your Pellet Fire (Iris Plus & Little models)

•  ALL VENT PIPE JOINTS MUST BE RIVETED AND 

SEALED WITH HIGH TEMPERATURE SILICONE. 

DO NOT USE FIRE CEMENT!

 WARNING! 

Important Information

•  MIXING OF APPLIANCE OR FLUE SYSTEM 

COMPONENTS FROM DIFFERENT SOURCES 

OR MODIFYING THE DIMENSIONAL 

SPECIFICATION OF COMPONENTS MAY 

RESULT IN HAZARDOUS CONDITIONS. 

WHERE SUCH ACTION IS CONSIDERED, THE 

MANUFACTURER SHOULD BE CONSULTED IN 

THE FIRST INSTANCE.

 CAUTION! 

Important Information

Содержание Iris Plus

Страница 1: ...Manual Important information 2 Operation and fuel 3 Technical specifications 4 Assembly installation 5 Pellet fire vent systems 6 Dimensions 8 Installation clearances 9 Control panels weekly timer 10...

Страница 2: ...eded Please take particular note of the following Never put foreign substances in the firebox or hopper Do not use flammable products to clean the smoke duct Firebox and hopper components must only be...

Страница 3: ...filled through a lid found at the back of the top The internal structure of the pellet fire is completely made of cast iron The external covering of the Iris Plus is ceramic and the external covering...

Страница 4: ...optional infrared Electronic circuit board protection 5 x 20 2 A 250 VAC fuse IRIS PLUS TECHNICAL HEATING SPECIFICATIONS Hopper capacity 15kg Efficiency 71 Heat Output 3 4 8kW Burn time min max 7 5 1...

Страница 5: ...the vent system will be clear of ceiling joists trusses etc 9 Once you are satisfied you have the pellet re in its final position secure it to the oor using suitable anchors Drill through the oor prot...

Страница 6: ...he air intake through the pellet fire and pushes it out the venting Air passing through the burn pot is used to burn the pellets Proper vent pipe sizing is very important to ensure the pellet fire ope...

Страница 7: ...We recommend sufficient space be provided minimum 200mm on each side of the pellet fire to service the unit If this is not possible provision must be made available to remove the unit for servicing Pe...

Страница 8: ...PROFILE Little Iris Plus Little FRONT PROFILE Little REAR PROFILE IRIS PLUS side PROFILE IRIS PLUS FRONT PROFILE IRIS PLUS REAR PROFILE 600mm 480mm 600mm 950mm 375mm 320mm 500mm 530mm 215mm 106mm 77...

Страница 9: ...ry hour There are three methods of supplying the pellet fire with combustion air They are as follows DV WALL KIT ducts through an outside wall DV FLOOR KIT ducts through the floor directly behind the...

Страница 10: ...able to pick up Ignition Automatic ignition Hold the 0 1 key down for two seconds with the pellet fire on standby to start the ignition procedure Ac appears on the display for a few minutes the igniti...

Страница 11: ...been enabled If so you can exit thie section by pressing O 1 and proceed to setting program section 4 Press the MENU key until OFF appears 5 Press the or key until PrOn appears 6 Confirm with the MENU...

Страница 12: ...OFF key down for two seconds with the pellet fire on standby to start the ignition procedure Ac will appear on the display for a few minutes The ignition procedure does not have a set duration it is a...

Страница 13: ...isplayed if programming has previously been enabled If so you can exit thie section by pressing O 1 and proceed to setting program section 4 Confirm by pressing the Menu key pass now to on with the or...

Страница 14: ...ion is suspected If the value displayed does not vary when the conditions are changed for example the door is opened then the sensor is faulty The low pressure alarm may also occur during ignition as...

Страница 15: ...ing a vacuum pot connected to your vacuum cleaner which are available from your Metro Dealer The whole process takes only a few minutes a day Vacuum clean the door vacuum clean the hearth and vacuum c...

Страница 16: ...arising from the failure of any part or operation of the appliance A claim under this warranty should be directed to the retailer who supplied the EdilKamin Pellet fire or if this is not possible wri...

Отзывы: