background image

17

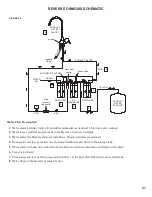
CARE OF YOUR REVERSE OSMOSIS SYSTEM

PREFILTER AND POST FILTER CARTRIDGES

You must replace the prefilter cartridge often to protect

the RO membrane from being destroyed by chlorine,

and/or from plugging with sediments in your water sup-

ply. If the water supply contains both chlorine and sedi-

ments, replace the prefilter cartridge at least every 6

months of product water use. Replace more often than 6

months if it begins to plug with sediments.

If the water has sediments only, with no chlorine, you

may notice a slower making of product water as the pre-

filter collects the sediments. When this occurs, replace

the prefilter cartridge. Also replace the post filter car-

tridge.

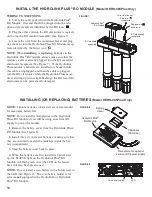
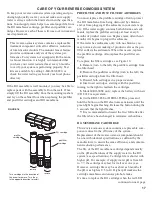
To replace the filter cartridges, see Figure 16:


1.

Remove (turn to the left) the prefilter cartridge from

the filter head.

   2.

Remove the postfilter cartridge (turn to the left) the

postfilter cartridge from the filter head.

   3.

Discard both cartridges in a proper manner.


4.

Insert new cartridges, starting with the post filter,

turning to the right to reattach the cartridges.


5.

Model ERO-385E only: replace the battery with new

(CR 2032 or equivalent).
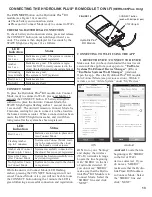
   

6.

On the ERO-385E or HERO-385Plus, press and

hold the button on the RO electronics enclosure until the

green light begins flashing. Release the button during the

3 seconds that the light flashes.

   7.

It is recommended to discard the first full tank after

the filters have been changed to minimize carbon fines.

RO MEMBRANE CARTRIDGE

This reverse osmosis system contains a replaceable com-

ponent critical to the efficiency of the system.

Replacement of the reverse osmosis component should

be one with identical specifications, as defined by the

manufacturer, to assure the same efficiency and contami-

nant reduction performance.

The life of the RO membrane cartridge depends mostly

on the pH and hardness of the supply water to the RO

system (see specifications). Cartridge life is shorter with

higher pH. For example, if supply water pH is from 6.8

to 7.7, the cartridge may last for well over one year.

However, cartridge life may be as short as 6 months if

the pH is as high as 8.5 to 10. Higher pH weakens the

cartridge membrane and causes pin-hole leaks.

It's time to replace the RO cartridge when the red LED

To keep your reverse osmosis system operating and pro-

ducing high quality water, you must make sure supply

water is always within the limits shown in the specifica-

tions. Good supply water helps to assure longer life from

the RO membrane cartridge, prefilter and postfilter car-

tridges. However, each of these will wear out in time and

need replacement.

This reverse osmosis system contains a replaceable

treatment component critical for effective reduction

of total dissolved solids. The monitor faucet feature

provides continuous analysis of the systems per-

formance. For systems not equipped with the moni-

tor faucet function, it is highly recommended that

you have your water tested at least every 6 months

to verify your system is performing properly. Test

kits are available by calling 1-800-949-8220, or

check the water testing section of your local phone

directory.

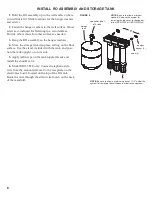
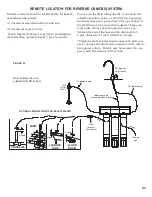
If the RO assembly is wall mounted, you may be able to

replace parts with the assembly left on the wall. If not,

simply lift the RO assembly from the mounting washers

and lay on the cabinet floor when replacing the prefilter

and post filter cartridges and RO membrane.

FIGURE 16

prefilter

cartridge

RO cartridge

postfilter

cartridge

Turn cartridges in the direction of

the arrow to remove. Turn them

in the opposite direction to install.

remove

remove

continued on next page

Содержание ERO-385

Страница 1: ...85E HERO 385Plus Designed Engineered Assembled in the U S A Systems tested and certified by NSF International against NSF ANSI Standards 58 and 42 for the reduction of claims as specified in the perfo...

Страница 2: ...eriod of five 5 years from defects in material and workmanship The faucet will be guaranteed for a period of three 3 years from defects in material and workmanship The reverse osmosis membrane will be...

Страница 3: ...data sheet and Arsenic Facts section for an explanation of reduction performance u NOTE This equipment has been tested and found to comply with the limits for a Class B digital device pursuant to Part...

Страница 4: ...ature and total dissolved solids Efficiency rating means the percentage of the influent water to the system that is available to the user as revers osmosis treated water under operating conditions tha...

Страница 5: ...quired or a special drain adapter are avail able from EcoWater to use where codes permit Refer to Pages 22 and 25 These options install on the sink drain pipe tailpiece above the p trap RO FAUCET The...

Страница 6: ...g to the fitting until Step 2 top of Page 10 Running the RO drain tubing directly to a floor drain laundry tub sump standpipe etc is preferred If that is not possible or practical check and comply wit...

Страница 7: ...rough the sink or countertop hole and through the spacer if used Figure 3 NOTE If you will route the RO drain tubing directly to the drain point disregard Steps 4 and 6 and do Step 1 on top of Page 10...

Страница 8: ...si tion the tank upright or on its side 5 Apply teflon tape on the tank nipple threads and install the shutoff valve 6 Model ERO 385E only Connect telephone style wire from the monitored faucet to the...

Страница 9: ...e o ring Continue pushing until the tube bottoms out against the back of the fitting A common mistake is to stop pushing when the tube engages the o ring This will lead to future leaks When a 1 4 tube...

Страница 10: ...ring as required pages 6 and 22 Or connect RO drain tubing if using floor drain or other approved drain point Route the 1 4 red tubing from the RO to the floor drain sump etc Be sure to pro vide an ai...

Страница 11: ...ure 6 6 Sanitizing the system will be completed during the pressure test and purging steps below NOTE The bleach must be removed from the system before drinking the water See purging instructions belo...

Страница 12: ...manifold assembly RO electronics receptacle FIGURE 7 Plug into receptacle Wire from faucet Plugged into receptacle INSTALLING OR REPLACING BATTERIES Model HERO 385Plus Only 3 Batteries AAA size Batter...

Страница 13: ...t will then turn green after the system has been registered LED Indication Status Red 3 sec Batteries are too low to place unit into Connect Mode Flashing Amber up to 2 minutes System is in Connect Mo...

Страница 14: ...nd that alert to EMAIL or TEXT When finished setting up alerts click NEXT 6 DASHBOARD Following successful completion of the connec tion procedure the new RO system s dashboard will be displayed with...

Страница 15: ...display data items from the RO system DATA ITEMS updated daily between 2 00 2 59 AM TDS Removal Percentage Total dissolved solids reduction from inlet to outlet as a percentage Filter Life Re maining...

Страница 16: ...d filters are good Amber Warning filters need replacing Filters need replacing when water has been drawn after 6 months time or 650 gallons 2 460 L have been used Red RO membrane needs to be replaced...

Страница 17: ...the same efficiency and contami nant reduction performance The life of the RO membrane cartridge depends mostly on the pH and hardness of the supply water to the RO system see specifications Cartridg...

Страница 18: ...order post filter Reverse Osmosis and then prefilter Turn cartridges to the right to re attach to the filter heads 6 Model ERO 385E only replace the battery with new CR 2032 or equivalent 7 On the ERO...

Страница 19: ...go on steady then flick er then go off for 6 seconds See chart at right When the LED begins to blink after button has been held down for about 12 seconds immediately release the but ton 3 Once the but...

Страница 20: ...lace the prefilter postfilter and RO membrane cartridges flow control and screen Water leaking from faucet airgap hole Drain side of faucet airgap 3 8 tubing plugged restricted or incorrectly connecte...

Страница 21: ...flows to the storage tank 5 Waste water with dissolved solids leave the Reverse Osmosis membrane and flows to the drain 6 Faucet is activated 7 Processed water leaves the storage tank and flows to th...

Страница 22: ...drain pipe The adapter installs directly onto the sink tailpiece as typically shown in Figure 21 Locate so drain tubing from the faucet makes a straight run to the adapter without dips loops low spots...

Страница 23: ...rap drain adapter Check your local codes Always be sure to provide an air gap between the end of the hose and the drain point of 2 pipe diameters or 1 inch whichever is larger Telephone cable extensio...

Страница 24: ...24 REPAIR PARTS 12 10 11 14 15 17 18 5 3 2 1 30 29 4 19 20 24 26 25 28 27 9 8 7 13 16 22 23 21 23 31 6 1 4 red drain tubing...

Страница 25: ...scription 7333137 Check Valve Kit includes Key No 20 2 of Key No 19 19 O Ring Auto Shutoff Cover 2 req d 20 Check Assembly 7333179 Diaphragm Kit includes Key Nos 21 22 2 of Key No 23 21 Spacer Ring 22...

Страница 26: ...pper 3 0 mg L 10 1 3 mg L 98 8 Pass Cysts 50 000 particles mL 99 95 99 99 Pass Lead 0 15 mg L 10 0 010 mg L 99 1 Pass Fluoride 8 0 mg L 10 1 5 mg L 96 5 Pass Nitrate plus Nitrite as N 30 mg L 10 10 0...

Страница 27: ...98 Dibromoacetonitrile NA 24 g L 0 6 g L 98 Dichloroacetonitrile NA 9 6 g L 0 2 g L 98 Trichloroacetonitrile NA 15 g L 0 3 g L 98 Haloketones HK 1 1 dichloro 2 propanone NA 7 2 g L 0 1 g L 99 1 1 1 t...

Страница 28: ...upplies that have been demonstrated to contain only pentavalent arsenic Treatment with chloramine combined chlorine is not sufficient to ensure complete conversion of trivalent arsenic to pentavalent...

Страница 29: ...water These models will not convert trivalent arsenic to pentavalent arsenic If you have free chlorine residual in contact with your water supply for at least one minute any trivalent arsenic will be...

Отзывы: