


Ε
NGLISH
Instruction manual
ELEKTRONIKA II PROFI
23
5 FIRST USE
5.1 First use
Read the instruction manual carefully before operating the machine.
Before starting the machine, check if:
•
the steam and hot water valves are closed.
•
the machine is switched off. (Power switch in lower position.)
•
the power cord is disconnected.
•
the drip tray is inserted accurately.
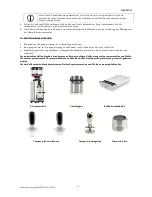
Water tank machine or machine in use with water tank
1
Open the lid of the cup warmeing tray.
2
Take out the water tank and rinse it thoroughly.
3
Fill the water tank with fresh water deficient in lime, place it back into the water tank guides and close the lid.
4
Insert the plug into the wall socket. Turn the power switch to “1”. The machine is now on.
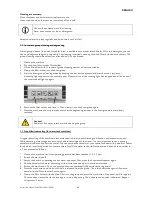
5
The green control lamp lights up.
6
The pump will fill the boiler of the machine with fresh water.
7
As soon as the boiler is filled, there will be no more pump noise; the control panel lights up. As soon as the fresh
water sinks down to a certain level in the fresh water tank, the machine is switched off and the buttons of the
control panel flash. Now refill fresh water. The machine heats up automatically.
8
Because a large amount of water is required for the first filling of the boiler, the water tank has to be refilled with
fresh water.
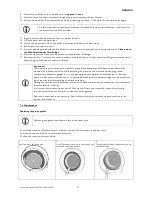
9
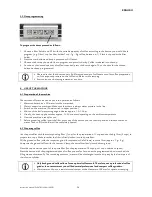
Wait until the boiler pressure gauge indicates approx. 1.0-1.25 bar.
10
A manual “boiler ventilation” is not necessary because the ELEKTRONIKA II PROFI is equipped with a
professional depression valve that ventilates the boiler during the heat-up phase.
11
Press the star button and dispense approx. 250 ml of water. This way, the heat exchanger will be filled with water
and the circulation of the water in the thermosyphon system begins.
12
Press the star button again and refill the water tank.
13
The machine is now ready for use. Put the cups on the cup warming tray in order to preheat them and enjoy your
coffee.
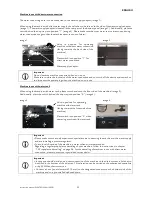
Machine in use with direct water connection
1
Insert the plug into the wall socket. Turn the power switch to “1”. The machine is now on.
2
The green control lamp lights up.
3
The pump begins to fill the boiler of the machine with fresh water.
4
As soon as the boiler has filled, no more pump noise will be heard; the control panel lights up.
5
Wait until the boiler pressure gauge indicates approx. 1.0-1.25 bar.
6
A manual “boiler ventilation” is not necessary because the ELEKTRONIKA II PROFI is equipped with a
professional depression valve that ventilates the boiler during the heat-up phase.
7
Press the star button and dispense approx. 250 ml of water. This way, the heat exchanger will be filled with water
and the circulation of the water in the thermosyphon system begins.
8
Press the star button again.
9
The machine is now ready for use. Put the cups on the cup warming tray in order to preheat them and enjoy your
coffee.
The ELEKTRONIKA II PROFI has a fuse to prevent the machine from overfilling.
It is possible that the machine does not heat up when using it for the first time or when dispensing
large quantities of water through the hot water valve. In this case, please switch the machine off and
on again.
Содержание Elektronika II Prof
Страница 1: ......


