2
2.0 Specifications
JIB burners are complete assemblies ideal for use in ovens, furnaces, kilns, or incinerators requiring simple burner
operation and easy maintenance.
1.0 Applications
Specifications
7
4.0 Start-Up & Adjustment
JIB Burners are factory-adjusted on natural gas and
tagged with the correct pressure settings. If factory
settings have been tampered with, or if the burner
will be operated on propane vapor instead of natu-
ral gas, field adjustment will be necessary. Follow
the procedure below. These general instructions
apply regardless of the type of flame monitoring
relay installed. See the appropriate data sheets for
specific information on the operation and sequenc-
ing of the particular relay installed on the burner.
CAUTION
4.1
Close the main manual gas cocks and the pilot gas
cock and turn the burner On-Off switch “Off.”
4.2
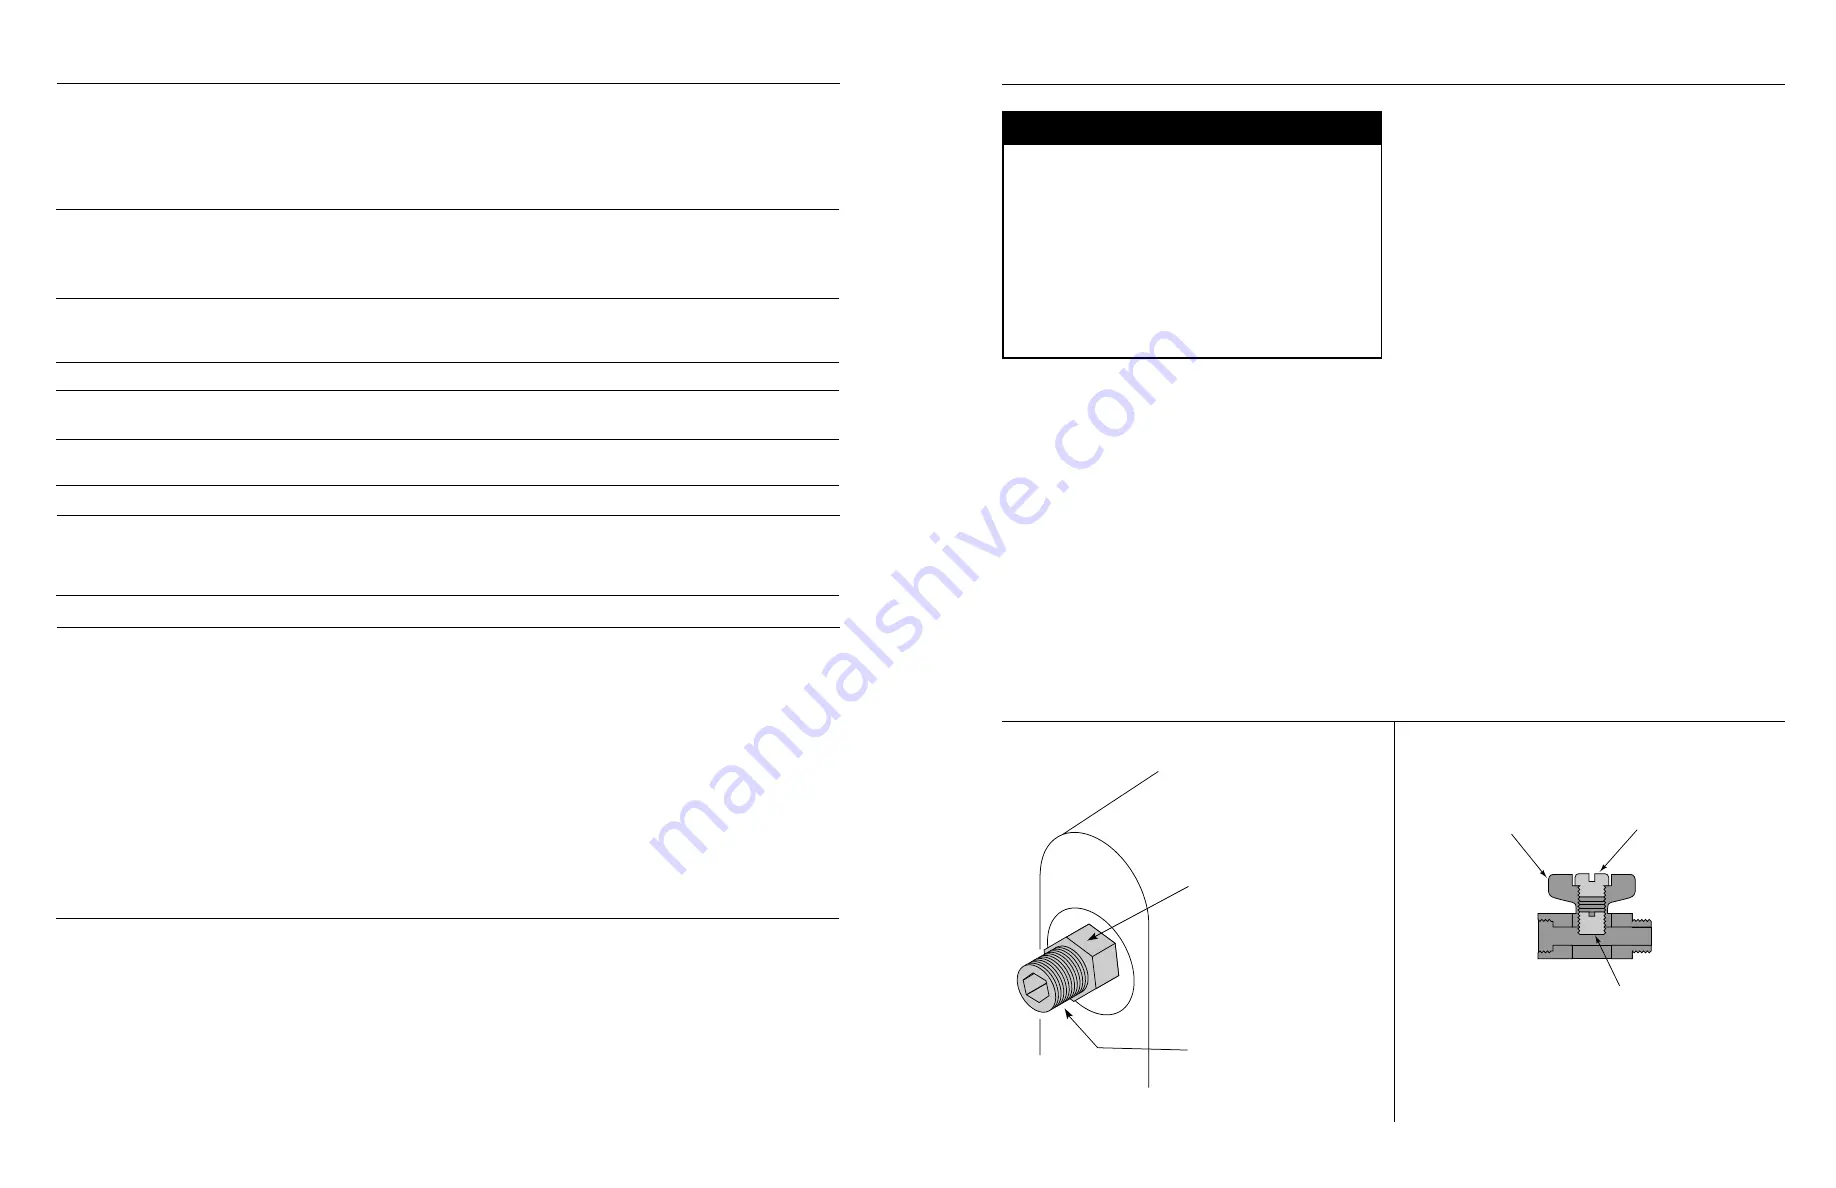
Loosen the lock nut on the gas adjusting screw (Fig-
ure 5). Using an allen wrench, turn the adjusting
screw clockwise until it seats within the burner
body. Referring to the graph in Figure 4, open the
screw the number of turns required for the desired
burner capacity.
4.3
Open the air shutter approximately 1/2" for the 210
JIB-F, and 3/4" for the 236 JIB-G.
4.4
Turn the handle of the adjustable pilot cock to the
open position, Figure 6.
4.5
Turn the burner On-Off switch “On” to start the
blower.
4.6
Once the air flow switch has proven blower opera-
tion, the flame monitoring control will be energized.
The pilot solenoid valve will open and there will be
a 15 second trial for ignition (TFI).
4.7
After the pilot ignites, adjust the pilot gas cock by re-
moving the top screw, Figure 6. Turn the adjusting
screw clockwise to reduce gas flow, and counter-
clockwise to increase gas flow. When the desired
setting is reached, replace the top screw.
Pilot gas should be adjusted to the minimum flow
which holds the flame monitoring device and
posi-
tively
ignites the burner. If the pilot gas input is too
low, nuisance shutdowns will occur; if the input is
too rich, aldehydes form.
Eclipse Controls flame monitoring relays have a
front panel pilot test button that will hold the burner
on pilot, giving you as much time as you need to
adjust the pilot. See I-610 Information Guide for de-
tails on this feature.
4.8
The flame monitor will prove pilot operation and
energize both main gas solenoid valves.
4.9
Open the main manual gas cocks. After the main
flame is lit, adjust the air shutter if necessary to
achieve the desired flame characteristics.
4.10
When the burner is fully adjusted, lock the air shut-
ter and gas adjusting screw in place.
4.11
If necessary, re-adjust the pilot setting to compen-
sate for changes in the air shutter opening.
4.12
The burner can now be operated without further
adjustment, using only the on-off switch.
Figure 5—Main Gas Adjusting Screw
Figure 6—Pilot Cock
Top Screw
Handle—
Shown in
Open Position
Adjusting Screw—
Clockwise for less pilot gas;
Counter-Clockwise for more pilot gas.
Locknut—Loosen before
adjustments; tighten
afterwards.
Adjusting Screw—Clockwise (in)
for less gas;
counterclockwise (out)
for more gas.
See Figure 1 for adjusting screw location.
Inputs
Burner
Btu/hr.
kW
Natural gas or propane vapor
210 JIB-F
750,000
219.8
236 JIB-G
1,000,000
293.0
Gas Inlet Pressures
Burner
Minimum
Maximum
At valve train inlet
210 JIB-F
5.0" w.c.
12.5 mbar
14.0" w.c.
34.8 mbar
236 JIB-G
8.3" w.c.
20.7 mbar
14.0" w.c.
34.8 mbar
Electrical Supply
120 VAC, 1 cycle, 60 hz.
Motor Type
210 JIB-F:
1/25 hp, 1550 rpm, open, with built-in overload protection.
236 JIB-G:
1/6 hp, 3600 rpm, TEFC, with built-in overload protection.
Firing Chamber Limits
Draft required: 0.05" w.c. (0.1 mbar) to 1.5" w.c. (3.7 mbar).
JIB burners will not operate against any backpressure.
Ambient Temperature Limits
-40
°
to +104
°
F (-40
°
to +40
°
C)
Materials
Burner Body:
Cast iron
Blower Housing:
Cast iron.
Impeller:
Steel.
Flame tube:
Cast iron.
Net Weight
72.5 pounds
32.9 kilograms
Models
Burner
Assembly
Flame Monitor
Sensor
Sensor #
210 JIB-F
109789-00
None
1
None
---
210 JIB-F
109789-33
Eclipse 5605-33
Flame rod
13093-3
2
210 JIB-F
109789-01
Honeywell RA-890F
Flame rod
13093-3
2
210 JIB-F
109789-04
PCI 7256 BE
Flame rod
13093-3
2
210 JIB-F
109789-32
Eclipse 5605-32
UV scanner
10939
210 JIB-F
109789-02
Honeywell RA-890G
UV scanner
16281
210 JIB-F
109789-05
PCI 7256 BE
UV scanner
17265
236 JIB-G
109749-00
None
1
None
---
236 JIB-G
109749-33
Eclipse 5605-33
Flame rod
13093-3
2
236 JIB-G
109749-01
Honeywell RA-890F
Flame rod
13093-3
2
236 JIB-G
109749-04
PCI 7256 BE
Flame rod
13093-3
2
236 JIB-G
109749-32
Eclipse 5605-32
UV scanner
10939
236 JIB-G
109749-02
Honeywell RA-890G
UV scanner
16281
236 JIB-G
109749-05
PCI 7256 BE
UV Scanner 17265
1
Burners ordered less relay include an ignition plug, ignition transformer, and ignition cable. The customer must
supply a suitable flame monitoring relay, base, and flame sensor meeting local and/or insurance requirements. To
mount a UV scanner on the burner, order scanner adaptor #19748.
2
Flame rod #13093-3 is furnished 3-1/4" long; it must be cut to 2-1/2" long to be used in the burner.
Flame monitoring equipment supplied with these burners by Eclipse may or may not meet local safety and/
or insurance requirements. The owner/user and/or his insurance underwriter must assume responsibility for
the acceptance, use, and proper maintenance of flame supervision, limit controls, and other safety devices.


