Ecler EVO4 Скачать руководство пользователя страница 8


4. QUICK START 

 
For the following procedure you will need a CD player and headphones. 
 

1. Set the controllers to their initial position 

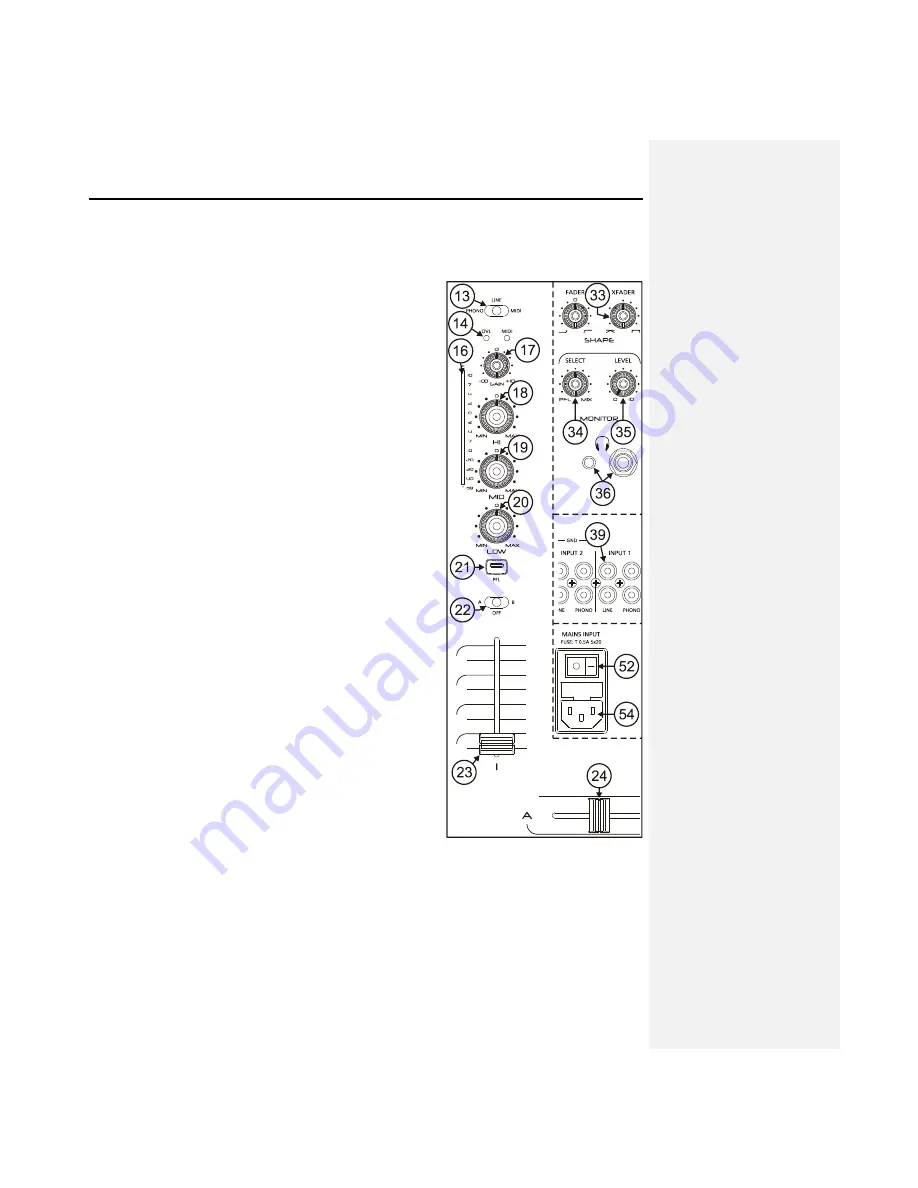
Set the rotary controllers GAIN, HI, MID and LOW from channel 1 (17, 18, 19, 20) to the  central snap-in position. 
Put the channel fader (23) down and move the A/OFF/B switch (22) to position A (this channel is now assigned to 
the crossfaders' A side). 
 

2. Connect the headphones 

Connect  your  headphones  to  one  of  the  outputs  on  the  mixer's  front 
panel  (36).  Set  the  MONITOR  LEVEL  (35)  to  minimum  and  move  the 
MONITOR SELECT control (34) to the PFL position. 
 

3. Connect a CD player 

Connect a CD player to LINE input on channel 1 (39), insert a CD and 
play the CD. 
 

4. Connect the mixer's power cable 

Connect the power cable to power source input (54) on the mixer's back 
side and turn the mixer on by pressing the MAINS INPUT switch (52). 
 

5. Select the input source 

Make  sure  that  the  input  source  selector  on  channel  1  (13)  is  in  LINE 
position  and  that  the  channel's  VU-meter  (16)  lightens  up.  If  this  does 
not  happen  make  sure  that  CD  player  is  correctly  connected  and  that 
there is an audio track being played back. 
 

6. Adjust the input level 

Turn  the  GAIN  control  (17)  until  the  VU-meter  shows  0dB.  Each 
channel's  red  overload  LED  OVL  (14),  lightens  up  if  the  input  level  for 
this channel is to high and has to be diminished with the channel's GAIN 
controller. 
 

7. Send the signal to the main output 

Set  the  fader  on  channel  1  (23)  to  maximum  and  place  the  crossfader 
(24) on side A. 
 

8. Listen to the signal with your headphones 

Press  the  PFL  button  (21)  on  channel  1.  Adjust  the  MONITOR  LEVEL 
controller  (35)  to  obtain  a  comfortable  monitoring  volume.  Now  you 
should hear music with your headphones. Turn the MONITOR SELECT 
controller  (34)  to  the  right  to  crossfade  the  PFL  signal  and  the  MIX 
signal.  When  this  controller  is  completely  turned  to  the  right,  only  the 
MIX signal will be monitored. 
 

9. Try the operation of the tone controllers 

Experiment  with this powerful 3-way  stereo  equaliser (18,  19, 20). This 
tone  control  has  been  designed  for  a  creative  sound  edition: each way 
can  be  individually  isolated  using  the  big  and  ergonomic  rotary 
controllers. 
 

10. Check the adjustment of the crossfader 

Each channel can be assigned to the crossfader using the A/OFF/B selector switch. The crossfader allows you to 
melt the signals that are assigned to both of its sides. With this selector in position A or B, you assign the channel 
to one of both sides of the crossfader. The OFF position disables the crossfader's function on this channel. 
 

11. Adjust the crossfader curve 

The XFADER SHAPE controller (33) allows a fine adjustment of the crossfader curve's slope. Setting this controller 
all  left, the signal  is  diminished when the  crossfader  reaches  the  central  position, which allows mixing two  songs 
with  a  soft  melting.  The  crossfader  curve's  slope  increases  if  the  controller  is  turned  to  the  right.  When  is  gets 
completely  turned  to  the  right,  the  signal  enters  very  fast  with  hardly  a  movement  of  the  crossfader.  This  is  very 
useful for scratching. 

Содержание EVO4

Страница 1: ...USER MANUAL ...

Страница 2: ...2 ...

Страница 3: ...MIDI CONTROLLERS 19 9 SETTINGS MENU 21 10 FURTHER CONSIDERATIONS 23 11 TECHNICAL CHARACTERISTICS 24 12 CONFIGURATION DIAGRAM 25 13 FUNCTION LIST 26 14 FUNCTION DIAGRAM 27 15 BLOCK DIAGRAM 28 All numbers subject to variation due to production tolerances ECLER S A reserves the right to make changes or improvements in manufacturing or design which may affect specifications ...

Страница 4: ...ved ECLER S A guarantees the EVO4 mixer against material defects and manufacturing faults for the period of one year starting from the original purchase date ECLER S A will repair the defective equipment within the aforementioned period with no charge for parts and labour To ensure the validity of the Guarantee it is essential that the attached Guarantee Registration Card is filled out correctly a...

Страница 5: ...top part of the mixer also has four encoder knobs push buttons that work exclusively as MIDI controllers The fact that the EVO4 lets you work with two separate effect boards and use MIDI to control your favourite software application makes it the ideal mixer for today s professional DJs 3 INSTALLATION The first thing to take into consideration when placing your EVO4 is your comfort and an easy acc...

Страница 6: ... inputs are supplied with a nominal input sensitivity of 40dBV 10mV Line Inputs The sensitivity of the inputs marked as LINE 39 is 0dBV 1V You can connect sound sources such as CD DAT or MP3 players as well as keyboards and other instruments Microphone Input The MICRO input 40 are prepared for a nominal input level of 40dBV The connector combine both JACK and XLR3 formats With the TRIM controller ...

Страница 7: ...0 Recording output There is a REC output 44 which uses RCA connectors on the back panel The nominal output level for REC is 0 dBV 1 V FX Send Return effects loop The RCA connectors on the FX SEND output 42 and the FX RETURN input 43 allow creating a signal loop for external effects processors samplers or sequencers The nominal level for the SEND output as well as for the RETURN input is 0dBV 1V He...

Страница 8: ... channel 1 23 to maximum and place the crossfader 24 on side A 8 Listen to the signal with your headphones Press the PFL button 21 on channel 1 Adjust the MONITOR LEVEL controller 35 to obtain a comfortable monitoring volume Now you should hear music with your headphones Turn the MONITOR SELECT controller 34 to the right to crossfade the PFL signal and the MIX signal When this controller is comple...

Страница 9: ... If you would like to monitor the effects signal press FX PFL 10 14 Adjust an effect EFFECTS 1 Move the PARAM 1 8 and PARAM 9 controllers to adjust the sound of the effect The parameters you are adjusting will appear on the screen 15 Select an effect EFFECTS 2 The EFFECTS 2 processor is located to the right of channel 4 on the mixer To assign the EFFECTS 2 processor to channel 1 turn the INPUT enc...

Страница 10: ...r a microphone MICRO respectively This same selector can also be used to put the channel in MIDI mode 5 2 2 Channel GAIN All the EVO4 input channels have an accessible input sensitivity GAIN control 17 The GAIN controls adjust the input level of each channel in order to compensate the different sources connected to the mixer The gain adjustments have to be executed with extreme care using the VU m...

Страница 11: ...essively and proportionally to the fader s position Turning the controller completely to the right the signal enters at full level with hardly a movement of the crossfader Turning the controller completely to the left the signal enters at full level when the fader is about to reach the opposite side 5 2 6 Crossfader All of the channels can be assigned to the EVO4 s crossfader using the A OFF B swi...

Страница 12: ...ws XP tells you that the new device is ready to use click Accept to proceed with installation 5 If XP Logo testing warning windows appears indicating that the driver you re going to install is not certified click Continue anyway to proceed with installation 6 Once the process completed the EVO4 is identified as Ecler USB Midi by the operating system and is ready to use ATTENTION If you connect the...

Страница 13: ...lers Linking the EFFECTS 1 and EFFECTS 2 processors To do so turn the INPUT encoder to EFFECTS 2 and select the LINK TO FX 1 option This links the effects of both processors as in the prior example but uses just one DRY WET controller the one for EFFECTS 2 to make it easier to run both effects simultaneously 7 2 Effects controllers Each of the processors includes the effects controllers described ...

Страница 14: ...ronize the BPM counter You must enter at least 3 beats to validate a rhythm sequence PARAM 2 potentiometer The PARAM 2 potentiometer 9 controls the second of the selected effect s parameters The value of PARAM 2 can be seen its respective processor screen FX PFL button The FX PFL button 10 allows you to monitor the signal from the effects processor The FX PFL signal is affected by the DRY WET cros...

Страница 15: ...the filter s resonance RESO and PARAM 2 controls its DEPTH With the TIME UP DOWN buttons you can adjust the oscillation cycle from 1 4 to 32 1 LFO LOW PASS FILTER This is a low pass filter LPF that introduces oscillating modulations to the beat creating a frequency sweep effect and attenuating the parts of the signal that are higher in frequency PARAM 1 regulates the filter s resonance RESO and PA...

Страница 16: ...ulated with a low frequency oscillator LFO controlled by the music s BPM rhythm to create a frequency sweep Phaser sound PARAM 1 regulates the FEEDBACK and PARAM 2 controls the DEPTH With the TIME UP DOWN buttons you can adjust the oscillation cycle from 1 1 to 32 1 FLANGER This is a delay modulated by a low sine frequency oscillator LFO that is controlled by the music s BPM rhythm This produces a...

Страница 17: ...u change effects however they are deleted when you turn off the mixer To record a sample 1 Select the LOOP SAMPLER effect 2 Use the INPUT encoder to select the input signal you would like to record the sample from 3 Make sure that there is no previously recorded sound sample the LCD screen should say EMPTY If there is already a sample recorded you must first delete it 4 Press the record button Aut...

Страница 18: ...cts 7 4 BPM counters Each of the effects processors EFFECTS 1 and EFFECTS 2 includes a precise BPM counter that synchronizes the effects in time with the music The BPM counters use the signal flowing into the effects module to base its calculations Both are always active as the default option unless you activate the manual mode by pressing the TAP encoder 3 times To return to AUTO mode hold down t...

Страница 19: ...en enabled The mixer includes a USB MIDI interface that allows you to send MIDI signals from the mixer to a computer via USB 8 2 MIDI controllers The EVO4 includes 29 controllers that can send MIDI data 16 potentiometers 4 buttons 4 dedicated encoder knobs push buttons 4 60 mm faders 1 45 mm crossfader The controllers for channels 1 2 3 and 4 may operate independently as AUDIO controllers if PHONO...

Страница 20: ...ounter CW 127 121 Encoder 3 Clock wise 00 61 01 07 Counter CW 127 121 Encoder 4 Clock wise 00 62 01 07 Counter CW 127 121 Encoder push 1 On 00 55 127 Off 00 Encoder push 2 On 00 56 127 Off 00 Encoder push 3 On 00 57 127 Off 00 Encoder push 4 On 00 58 127 Off 00 8 4 Assigning the functions of an external device to the MIDI controllers Every device has its own MIDI configuration procedure It is wort...

Страница 21: ... EVO4 sends the MIDI CLOCK signal from the EFFECTS 1 BPM counter FX2 the EVO4 sends the MIDI CLOCK signal from the EFFECTS 2 BPM counter Once you have selected the desired option again press the EFFECTS 2 INPUT encoder and hold it for two seconds When the EVO4 is transmitting the MIDI CLOCK signal a symbol will appear in the LCD of the respective effects processor When the mixer is set to send the...

Страница 22: ...e latest version of the software To update the firmware connect the EVO4 to your computer with the USB cable Then run the update program and follow the instructions on the screen 9 2 Output limiter To use this function go to the settings menu When you select LIMITER you will be asked for a password The default password is ECLER The settings menu also includes an option to change it After you have ...

Страница 23: ...an select if the effects pre listening will be affected by the DRY WET control or not If you select the PRE DRY WET option the FX PFL signal will be the same that you would have when the DRY WET control is in the WET position ...

Страница 24: ... the chassis are never connected with each other 10 2 Audio connections As a general rule of thumb make the signal connections as short as possible and use the best connectors and cable available Cables and connectors are frequently held cheap forgetting that a bad connection can result in a poor sound quality 10 3 Cleaning The front panel should not be cleaned with dissolvent or abrasive substanc...

Страница 25: ...º THD N Line 0 008 Phono 0 01 Micro 0 02 Signal N Ratio Line 97dB Phono 94dB Micro 92dB CMRR Micro 70dB 1kHz Shape adjustable on Xfader Faders BPM automatic from 60 to 220 bpm in 6 ranges internal or MIDI clock reference Tones BASS 30 10dB 200Hz MID 25 10dB 200 6 5kHz TREBLE 30 10dB 6 5kHz Built in squelch on unused channels Two independent loop sampler 8 8 sec max Phantom voltage 17 5VDC 5mA max ...

Страница 26: ...26 12 CONFIGURATION DIAGRAM ...

Страница 27: ...ht signal sum L R 26 Balance control BAL 27 VU meter display switch OUT1 MIX OUT2 28 Overload indicator OVL 29 LED VU Meter 30 Volume control OUT 2 31 Volume control OUT 1 32 Fader Shape adjustment FADER SHAPE 33 Crossfader Shape adjuster XFADER 34 PFL MIX monitoring crossfade SELECT 35 Headphones volume control LEVEL 36 Stereo jack headphones 37 Ground pin GND 38 Phono input PHONO 39 Line input L...

Страница 28: ...28 14 FUNCTION DIAGRAM ...

Страница 29: ...29 15 BLOCK DIAGRAM ECLER Laboratorio de electro acústica S A Motors 166 168 08038 Barcelona Spain INTERNET http www ecler com e mail info ecler es 50 0159 01 00 ...

Отзывы: