41
ARM ROBOT
MANUAL
INTRODUCTION
Arm Robot is an electronic and programming kit for intermediate and advanced users. You can
build an Arm Robot with 4° of free movement which is able to lift light objects that weight up
to 9 g. It includes 2 joystick modules to build the gamepad to control it. Its structure is made of
black methacrylate pieces and you can assemble it in a few hours without the need of welding.
Build&Code Uno is a programmable board based on Arduino technology, it has the same
ATmega328P microcontroller as Arduino UNO.
The board power input can be via USB Type A-USB Type B cable (the standard printer USB
cable) or via battery. The recommended power input range is 7-12V. It has a built-in LED which
allows you to have visual communication with the board.
Because the Build & Code Kit is based on Arduino technology it is also open source, which
means that its electronic schemes and its programming software are available for free. There
are many Internet communities where you can ask questions, download projects to replicate,
modify or adapt them to your needs. You can also participate in projects with other users or
even be an active member and help other people.
BUILD & CODE UNO BOARD TECHNICAL SPECIFICATIONS
• Build & Code UNO R3 (Microcontroller ATmega328P)
• Operating Voltage: 5V
• Input Voltage (recommended): 7-12V
• Input Voltage (limit): 6-20V
• 14 Digital I/O Pins (6 of them provide PWM output)
• 6 PWM Digital I/O Pins
• 6 Analog Input Pins
• DC Current per I/O Pin: 20 mA
• DC Current for 3.3V Pin: 50 mA
• Clock Speed: 16 MHz
• Size: 68 x 53 mm
• Weight: 25 g
• Programmable with Arduino IDE and the visual programming software by blocks
compatible (Scratch 2.0)
• Compatible with Mac OS, Windows and Linux
Содержание Arm Robot
Страница 2: ...LANGUAGE INDEX Choose the language SPANISH FRENCH ITALIAN ENGLISH DEUTSCHLAND...
Страница 3: ...ndice Interactivo 3 ARM ROBOT MANUAL...
Страница 5: ...5 ARM ROBOT MANUAL M3 25 M3 10 M3 8 M3 6 M2 5 TUERCA M3 X4 X18 X18 X7 X5 X26...
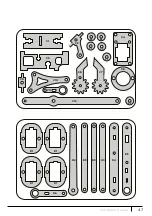
Страница 10: ...10 ARM ROBOT MANUAL C1 C2 C3 C3 C3 C3 C3 C4 C5 C6 C7 C8 C9 C10 C11 C12 D1 D1 D1 D1 D2 D3 D3 D3 D4 D5 D6 C3...
Страница 38: ...38 ARM ROBOT MANUAL...
Страница 39: ...39 ARM ROBOT MANUAL...
Страница 40: ...Interactive index 40 ARM ROBOT MANUAL ENG...
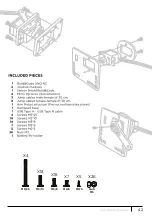
Страница 42: ...42 ARM ROBOT MANUAL M3 25 M3 10 M3 8 M3 6 M2 5 Nuts M3 X4 X18 X18 X7 X5 X26...
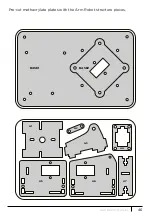
Страница 47: ...47 ARM ROBOT MANUAL C1 C2 C3 C3 C3 C3 C3 C4 C5 C6 C7 C8 C9 C10 C11 C12 D1 D1 D1 D1 D2 D3 D3 D3 D4 D5 D6 C3...
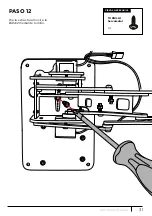
Страница 68: ...68 ARM ROBOT MANUAL STEP 12 Attach the Arm Robot to BASE2 with the screw Servomotor SCREW X1 REQUIRED PIECES...
Страница 75: ...75 ARM ROBOT MANUAL...
Страница 76: ...76 ARM ROBOT MANUAL...
Страница 77: ...Interactif sommaire 77 ARM ROBOT MANUAL FR...
Страница 79: ...79 ARM ROBOT MANUAL M3 25 M3 10 M3 8 M3 6 M2 5 crous M3 X4 X18 X18 X7 X5 X26...
Страница 84: ...84 ARM ROBOT MANUAL C1 C2 C3 C3 C3 C3 C3 C4 C5 C6 C7 C8 C9 C10 C11 C12 D1 D1 D1 D1 D2 D3 D3 D3 D4 D5 D6 C3...
Страница 105: ...105 ARM ROBOT MANUAL TAPE 12 Attachez l Arm Robot la BASE2 avec une vis VIS Servomoteur X1 PIECES REQUISES...
Страница 112: ...112 ARM ROBOT MANUAL...
Страница 113: ...113 ARM ROBOT MANUAL...
Страница 114: ...Indice Interattivo 114 ARM ROBOT MANUAL IT...
Страница 116: ...116 ARM ROBOT MANUAL M3 25 M3 10 M3 8 M3 6 M2 5 DADO M3 X4 X18 X18 X7 X5 X26...
Страница 121: ...121 ARM ROBOT MANUAL C1 C2 C3 C3 C3 C3 C3 C4 C5 C6 C7 C8 C9 C10 C11 C12 D1 D1 D1 D1 D2 D3 D3 D3 D4 D5 D6 C3...
Страница 142: ...142 ARM ROBOT MANUAL PASSO 12 Fissa la struttura mobile alla BASE2 mediante la vite VITE Servomotore X1 PARTI NECESSARIE...
Страница 149: ...149 ARM ROBOT MANUAL...
Страница 150: ...150 ARM ROBOT MANUAL...
Страница 151: ...Interaktive Index 151 ARM ROBOT MANUAL DE...
Страница 158: ...158 ARM ROBOT MANUAL C1 C2 C3 C3 C3 C3 C3 C4 C5 C6 C7 C8 C9 C10 C11 C12 D1 D1 D1 D1 D2 D3 D3 D3 D4 D5 D6 C3...
Страница 188: ...Arm Robot Electronic and programming kit Arm Robot and double joystick gamepad ebotics com...

