background image

UPS SYSTEM INSTALLATION

EATON 

Powerware

®

 9395 UPS (1000–1100 kVA) Installation and Operation Manual  

S

  164201764 Rev 1

 www.powerware.com

4−9

NOTE  

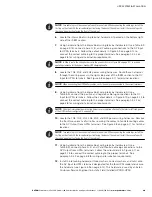
Two cable lugs will be connected to each terminal stud. When connecting the cable lugs, install the

first lug on the stud with the raised barrel portion facing the back of the cabinet. Install the second lug with
the raised barrel portion facing the front of the cabinet.

6.

Locate the intercabinet wiring terminal hardware kit packed on the bottom right
side of the ISBM section.

7.

Using hardware from the intercabinet wiring terminal hardware kit (see Table 3-9
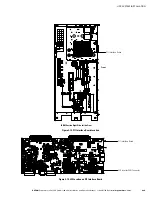
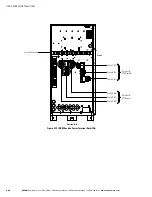
on page 3−13), connect phase A, B, and C cable lug connections to the AC Input
to UPMs terminals. Follow the callout details in Figure 4-9 on page 4−12 to
connect the correct cable lug to the proper terminals. See paragraph 3.2.2 on
page 3−8 for wiring and termination requirements.

NOTE  

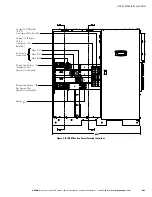
In Step 8, route the wiring harnesses in the area as shown in Figure 4-8 on page 4−11 to provide

operating clearance for the bypass breaker CB4 charging handle.

8.

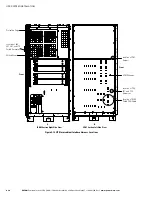
Locate the 1G3, 2G3, and 3G3 power wiring harnesses. Route these harnesses
through the wiring access in the right side panel of the ISBM section to the DC
Input to UPMs terminals. See Figure 4-8 on page 4−11 for terminal locations.

NOTE  

When connecting the UPM battery cables, verify the cables are connected to the correct terminals .

9.

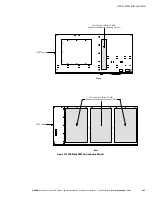
Using hardware from the intercabinet wiring terminal hardware kit (see
Table 3-9), connect the positive and negative cable lug connections to the DC
Input to UPMs terminals. Follow the callout details in Figure 4-10 on page 4−13 to
connect the correct cable lug to the proper terminals. See paragraph 3.2.2 on
page 3−8 for wiring and termination requirements.

NOTE  

AC output intercabinet power wiring harnesses are supplied attached to the interior left side panel

of the UPM section (see Figure 4-5 on page 4−6).

10.

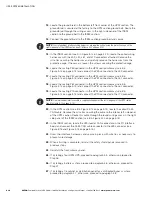
Locate the 1G4, 1G5, 2G4, 2G5, 3G4, and 3G5 power wiring harnesses. Remove
the front two columns of wire ties securing the cables to facilitate routing cables
to the AC Output from UPMs terminals. See Figure 4-8 on page 4−11 for terminal
locations.

NOTE  

Two cable lugs will be connected to each terminal stud. When connecting the cable lugs, install the

first lug on the stud with the raised barrel portion facing the back of the cabinet. Install the second lug with
the raised barrel portion facing the front of the cabinet.

11.

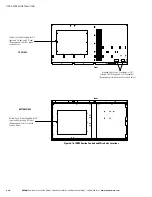
Using hardware from the intercabinet wiring terminal hardware kit (see
Table 3-9), connect phase A, B, and C and Neutral cable lug connections to the
AC Output from UPMs terminals. Follow the callout details in Figure 4-11 on
page 4−13 to connect the correct cable lug to the proper terminals. See
paragraph 3.2.2 on page 3−8 for wiring and termination requirements.

12.

Install the remaining hardware (three washers, conical washers, and nuts) onto
the AC Input to UPMs terminals designated for the four UPM model and secure
the hardware (see Figure 4-9 on page 4−12). This hardware is used by an Eaton
Customer Service Engineer to install a Field Installed UPM (FI−UPM).

Содержание 9395 UPS 10001100 kVA

Страница 1: ...Powerware 9395 UPS 1000 1100 kVA Installation and Operation Manual For use with Three UPM 650 825 kVA and Four UPM 1000 1100 kVA UPS Models...

Страница 2: ...ARNING This is a product for restricted sales distribution to informed partners EN IEC 62040 2 Installation restrictions or additional measures may be needed to prevent electromagnetic disturbances Ea...

Страница 3: ...1 7 1 9 Getting Help 1 8 2 Safety Warnings 2 1 Section I Installation 3 UPS Installation Plan and Unpacking 3 1 3 1 Creating an Installation Plan 3 1 3 2 Preparing the Site 3 1 3 2 1 Environmental and...

Страница 4: ...Optional Supervisory Contact Module II 5 13 5 6 Accessory Mounting Dimensions 5 15 Section II Operation 6 Understanding UPS Operation 6 1 6 1 UPS System Overview 6 1 6 2 Single UPS 6 2 6 2 1 Modes 6...

Страница 5: ...s to Normal Mode 7 23 7 4 6 Transfer from Normal to Bypass Mode and Shut Down all UPSs 7 24 7 4 7 Single UPM Shutdown 7 24 7 4 8 UPS and Critical Load Shutdown 7 25 7 4 9 Charger Control 7 25 7 4 10 U...

Страница 6: ...100 kVA Installation and Operation Manual S 164201764 Rev 1 www powerware com iv 10 Product Specifications 10 1 10 1 Model Numbers 10 1 10 2 Specifications 10 1 10 2 1 UPS Input 10 1 10 2 2 UPS Output...

Страница 7: ...ure 4 8 ISBM Section Intercabinet Power Terminal Locations 4 11 Figure 4 9 ISBM Section Input Power Terminal Detail 4 12 Figure 4 10 ISBM Section Battery Input Power Terminal Detail 4 13 Figure 4 11 I...

Страница 8: ...S System Dual Feed Common Battery System 6 7 Figure 6 6 Four UPM UPS System Output Dual Feed Separate Battery System 6 8 Figure 6 7 Three UPM UPS System Dual Feed Common Battery System 6 9 Figure 6 8...

Страница 9: ...re 9395 online power protection system is used to prevent loss of valuable electronic information minimize equipment downtime and minimize the adverse effect on production equipment due to unexpected...

Страница 10: ...on is shipped separately The sections are mechanically and electrically joined at the installation site Sections can be permanently bolted to the floor Power wiring can be routed through the top or bo...

Страница 11: ...for connection to equipment at the facility such as a light an audible alarm or a computer terminal The equipment connected to this contact alerts you to a UPS alarm See Chapter 8 Communication for a...

Страница 12: ...liability the Powerware 9395 UPS can be configured by an authorized Eaton Customer Service Engineer for inherent redundancy When configured the UPS automatically becomes redundant if the load is at or...

Страница 13: ...e the UPS operating status and alarm condition S Supervisory Contact Module II SCM II An optional SCM II establishes an interface between the UPS system equipment and the customer s monitor S X Slot C...

Страница 14: ...0 1100 kVA UPS Read and understand the procedures described in this manual to ensure trouble free installation and operation In particular be thoroughly familiar with the REPO procedure see paragraph...

Страница 15: ...E in the trash For proper disposal contact your local recycling reuse or hazardous waste center 1 8 For More Information Refer to the Powerware 9390 and 9395 Sync Control Installation and Operation Ma...

Страница 16: ...e following S Scheduling initial startup S Regional locations and telephone numbers S A question about any of the information in this manual S A question this manual does not answer Please call the Ea...

Страница 17: ...utions should be observed 1 Remove watches rings or other metal objects 2 Use tools with insulated handles 3 Do not lay tools or metal parts on top of batteries 4 Wear rubber gloves and boots S ELECTR...

Страница 18: ...sert forks partially into the base to move the cabinet S Forks may be partially inserted into the front or rear forklift slots for minor positioning if the forks are kept in a horizontal position with...

Страница 19: ...EATON Powerware 9395 UPS 1000 1100 kVA Installation and Operation Manual S 164201764 Rev 1 www powerware com 2 1 Section I Installation...

Страница 20: ...EATON Powerware 9395 UPS 1000 1100 kVA Installation and Operation Manual S 164201764 Rev 1 www powerware com 2 2...

Страница 21: ...n Before installing the UPS system read and understand how this manual applies to the system being installed Use the procedures and illustrations in paragraph 3 2 and Chapter 4 to create a logical pla...

Страница 22: ...ed From Right Side of Cabinet 152 4 mm 6 working space From Left Side of Cabinet None Required The basic environmental requirements for operation of the UPS are S Ambient Temperature Range 0 40 C 32 1...

Страница 23: ...S 1000 1100 kVA Installation and Operation Manual S 164201764 Rev 1 www powerware com 3 3 Dimensions are in millimeters inches Figure 3 1 UPS Cabinet Dimensions Front View Dimensions are in millimeter...

Страница 24: ...N AND UNPACKING EATON Powerware 9395 UPS 1000 1100 kVA Installation and Operation Manual S 164201764 Rev 1 www powerware com 3 4 Figure 3 3 ISBM Section Dimensions Front View Figure 3 4 UPM Section Di...

Страница 25: ...al S 164201764 Rev 1 www powerware com 3 5 Front Dimensions are in millimeters inches Figure 3 5 ISBM Section Dimensions Top View Front Dimensions are in millimeters inches Figure 3 6 ISBM Section Dim...

Страница 26: ...S 1000 1100 kVA Installation and Operation Manual S 164201764 Rev 1 www powerware com 3 6 Dimensions are in millimeters inches CG CG Figure 3 8 ISBM Section Center of Gravity Dimensions are in millime...

Страница 27: ...ation and Operation Manual S 164201764 Rev 1 www powerware com 3 7 Dimensions are in millimeters inches 115 8 4 56 114 3 4 50 0 87 0 22 88 9 3 50 Front View 1 57 0 40 Needed to remove key 95 3 3 57 Sq...

Страница 28: ...or rectifier input breaker RIB if installed and one for the maintenance bypass input DO NOT use a single feed or a single feeder breaker to supply both the UPS or RIB and the maintenance bypass If a b...

Страница 29: ...00 909 1100 1000 Input and Output Voltage Volts 480 480 480 480 AC Input to UPS Rectifier 0 98 Minimum pF Full load current plus battery recharge current 3 Phases 1 Ground A Amps 1280 1500 Minimum Con...

Страница 30: ...Conductor Size Number per Phase AWG or kcmil each 500 4 500 5 AC Input to UPS Bypass Five Wire Full Load Current 3 Phases 1 Neutral 1 Ground B Amps 1203 1323 Minimum Conductor Size Number per Phase AW...

Страница 31: ...ound B Amps 782 902 992 Minimum Conductor Size Number per Phase AWG or kcmil each 500 4 AC Input to UPS Bypass Five Wire Full Load Current 3 Phases 1 Neutral 1 Ground B Amps 782 902 992 Minimum Conduc...

Страница 32: ...Amps 782 902 992 Minimum Conductor Size Number per Phase AWG or kcmil each 500 4 AC Input to UPS Bypass Five Wire Full Load Current 3 Phases 1 Neutral 1 Ground B Amps 782 902 992 Minimum Conductor Si...

Страница 33: ...e C 3 stud mounting 12 8 3 M8 AC Output from UPM Section E9A UPM 1 E9A UPM 2 E9A UPM 3 Phase A 3 stud mounting 12 8 3 M8 E10A UPM 1 E10A UPM 2 E10A UPM 3 Phase B 3 stud mounting 12 8 3 M8 E11A UPM 1 E...

Страница 34: ...e A 6 2 bolt mounting 76 56 M12 E7 Phase B 6 2 bolt mounting 76 56 M12 E8 Phase C 6 2 bolt mounting 76 56 M12 AC Output to Critical Load E9 Phase A 6 2 bolt mounting 76 56 M12 E10 Phase B 6 2 bolt mou...

Страница 35: ...180500036 120 Conical Washer M10 15 Ground 180500037 100 Conical Washer M12 98 Rectifier Input Bypass Input Battery Input Output and Neutral 180500037 120 Nut M12 98 Rectifier Input Bypass Input Batte...

Страница 36: ...r A B C Ground 4 3 5 AC Input to Bypass and Output Four Wire A B C Ground 4 3 4 AC Input to Bypass and Output Five Wire A B C Neutral Ground 5 3 5 DC Battery Positive Negative Ground See Note Powerwar...

Страница 37: ...e the risk of fire connect only to a circuit provided with maximum input circuit breaker current ratings from Table 3 14 in accordance with the NEC ANSI NFPA 70 The line to line unbalanced output capa...

Страница 38: ...load discharge time less than 3 hours For longer discharge times a larger disconnect may be required Table 3 16 Recommended DC Input Battery Disconnect Ratings Common Battery UPS Model Input Rating 4...

Страница 39: ...ce wiring in separate conduit from the power wiring S When installing internal interface wiring to X Slot terminals route the wiring through the internal opening in the X Slot communication bay S All...

Страница 40: ...n Table 3 4 Table 3 5 Table 3 6 or Table 3 7 starting on page 3 9 S If the load requires a neutral a bypass source neutral must be provided If the load does not require a neutral and there is no neutr...

Страница 41: ...ing if the forks are kept in a horizontal position with no upward angling If these instructions are not followed damage to the wiring channel and wiring will occur 1 Carefully inspect the outer packag...

Страница 42: ...for any evidence of physical damage and compare each item with the Bill of Lading If damage has occurred or shortages are evident contact an Eaton service representative immediately to determine the e...

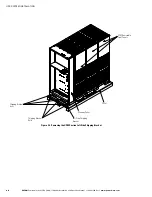
Страница 43: ...INSTALLATION PLAN AND UNPACKING EATON Powerware 9395 UPS 1000 1100 kVA Installation and Operation Manual S 164201764 Rev 1 www powerware com 3 23 Figure 3 12 UPS Cabinet as Shipped on Pallet UPM Sect...

Страница 44: ...UPS INSTALLATION PLAN AND UNPACKING EATON Powerware 9395 UPS 1000 1100 kVA Installation and Operation Manual S 164201764 Rev 1 www powerware com 3 24 This page intentionally left blank...

Страница 45: ...unloading instructions are not closely followed the cabinets may tip and cause serious injury CAUTION S Do not tilt cabinets more than 10 from vertical S Lift the cabinets only with a forklift or dam...

Страница 46: ...ports on the bottom of the pallet see Figure 3 8 and Figure 3 9 on page 3 6 for the ISBM and UPM section center of gravity measurements If the sections must be moved using the cabinet front or rear fo...

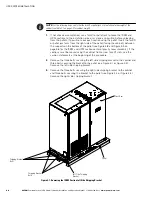
Страница 47: ...M Section Right Side Shipping Bracket 4 Using a forklift see the caution statement at the beginning of this procedure raise the cabinet until the cabinet bottom clears the pallet by approximately 3 mm...

Страница 48: ...VA Installation and Operation Manual S 164201764 Rev 1 www powerware com 4 4 Shipping Bracket Bolts Shipping Bracket Bolts Pallet Left Side Shipping Bracket UPM Removable Front Panels Wireway Panel Fi...

Страница 49: ...OTE For the following steps verify that the forklift or pallet jack is rated to handle the weight of the section see Table 3 1 on page 3 2 for cabinet weight 1 Using a forklift move the UPM section to...

Страница 50: ...ect components mounted on the right side of the ISBM section and the intercabinet wiring harnesses attached to the left side UPM section from damage NOTE Clearance between the ISBM and the UPM section...

Страница 51: ...ront top rear and front base see Steps 11 and 12 11 Locate the hardware kit packed inside a drawstring bag tied to the left middle panel of the UPM section Locate two flat brackets and screws from the...

Страница 52: ...ocated inside the door at the bottom hinge pivot point then lift the door off Retain the hardware for later use 3 Remove the screws securing the ISBM section right bottom internal safety shield panel...

Страница 53: ...ardware kit see Table 3 9 connect the positive and negative cable lug connections to the DC Input to UPMs terminals Follow the callout details in Figure 4 10 on page 4 13 to connect the correct cable...

Страница 54: ...the mating P61 connector in the UPM section wireway see B in Figure 4 12 on page 4 14 and connect the P61 connector to the J61 connector 19 Locate the mating P70 connector in the UPM section wireway s...

Страница 55: ...from UPMs See Figure 4 11 for detail See Figure 4 11 for detail Phase A Phase C Phase B See Figure 4 10 for detail AC Input Breaker CB1 DC Input to UPMs E5 See Figure 4 10 for detail DC Input to UPMs...

Страница 56: ...nstall the second lug with the raised barrel portion facing the front of the cabinet UPM 2 Cable 2G1 2G2 Brown UPM 3 Cable 3G1 3G2 Brown Phase B E2A UPM 1 Cable 1G1 1G2 Brown Phase B E2A UPM 4 FI UPM...

Страница 57: ...M 1 Cable 1G4 1G5 Orange Phase A E9A UPM 2 Cable 2G4 2G5 Orange UPM 3 Cable 3G4 3G5 Orange UPM 1 Cable 1G4 1G5 Brown UPM 2 Cable 2G4 2G5 Brown UPM 3 Cable 3G4 3G5 Brown UPM 1 Cable 1G4 1G5 Yellow UPM...

Страница 58: ...e com 4 14 Wiring Access Location of J50 J51 J61 and J70 Coiled Harnesses Location of RJ 45 Coiled CAN Cable UPM Wireway Location of P61 Harness Location of P50 P51 and P70 Harnesses UPM Section Left...

Страница 59: ...llation and Operation Manual S 164201764 Rev 1 www powerware com 4 15 ISBM Section Right Side Inside View Pl1 Interface Board Front Figure 4 13 Pl1 Interface Board Location Pl1 Interface Board J39 Inv...

Страница 60: ...ie cabinet is installed proceed to paragraph 4 8 to complete the wiring of the UPS 4 8 Installing UPS External and Battery Power Wiring NOTE The ISBM and UPM sections are shipped with debris shields c...

Страница 61: ...eration Manual S 164201764 Rev 1 www powerware com 4 17 Ventilation Grill Debris Shield Remove shield before operating system ISBM Section Front Ventilation Grill Debris Shields Remove shields before...

Страница 62: ...and DC Input Remove panel to drill or punch conduit holes TOP VIEW Interface Entry Conduit Landings for TB1 through TB3 Wiring and X Slot Connections Remove panels to drill or punch conduit holes Bott...

Страница 63: ...page 3 15 connect phase A B and C rectifier input power wiring from the utility source to the rectifier input terminals in the ISBM section See paragraph 3 2 2 on page 3 8 for wiring and termination r...

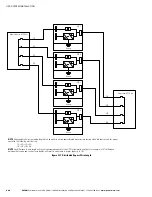
Страница 64: ...proper operation the following must be true 1A 2A 3A 4A 1B 2B 3B 4B NOTE Any difference in wire length will result in decreased capacity of the UPS system while on bypass For example a 10 difference b...

Страница 65: ...DC Input from Battery E4 E5 DC Input from Battery AC Input to UPS Rectifier A B C AC Input to UPS Bypass A B C See Figure 4 19 for Detail AA ISBM See Figure 4 20 or Figure 4 21 for Detail BB See Figur...

Страница 66: ...lation and Operation Manual S 164201764 Rev 1 www powerware com 4 22 Phase A E6 Phase C E8 Phase B E7 AC Input to UPS Rectifier Phase A E1 Phase C E3 Phase B E2 AC Input to UPS Bypass Front Section A...

Страница 67: ...m or disconnect to the ISBM section battery and ground terminals Use both sets of terminals shown in Figure 4 20 as needed See paragraph 3 2 2 on page 3 8 for wiring and termination requirements 4 Pro...

Страница 68: ...ware 9395 UPS 1000 1100 kVA Installation and Operation Manual S 164201764 Rev 1 www powerware com 4 24 DC Input from Battery E4 E5 DC Input from Battery Section B B Front Figure 4 20 ISBM Section Powe...

Страница 69: ...nput from Battery E4 E5 DC Input from Battery DC Input from Battery E4 UPM 1 UPM 3 E5 DC Input from Battery UPM 2 Section B B Front E5 DC Input from Battery E5 DC Input from Battery UPM 1 DC Input fro...

Страница 70: ...he retaining screw located inside the door at the bottom hinge pivot point then lift the door off Retain the hardware for later use 4 Terminal block TB3 is accessible on the left side of the X Slot co...

Страница 71: ...Reinstall the front door removed in Step 3 and secure with the retained hardware 12 Close the door and secure the latch X Slot Communication Bays TB3 TB1 and TB2 See Figure 4 23 for detail See Figure...

Страница 72: ...l purpose normally closed NC relay contact 4 Alarm Relay Common 5 Alarm Relay NO Output General purpose normally open NO relay contact 6 Alarm Relay Common 7 Not Used 8 Not Used 9 Not Used 10 Not Used...

Страница 73: ...rating of 5A and a switched voltage rating of 30 Vac and 28 Vdc NOTE Alarm relay normally open and normally closed return terminals are separated on the terminal board but are electrically in common N...

Страница 74: ...normally closed contacts All control wiring and relay and switch contacts are customer supplied NOTE The building alarms can be programmed to display the alarm functional name NOTE A jumper wire must...

Страница 75: ...ate the appropriate terminals and review the wiring and termination requirements see paragraph 3 2 2 on page 3 8 Table 4 1 on page 4 28 and Figure 4 22 through Figure 4 27 NOTE When installing shunt t...

Страница 76: ...nt trip wiring should be a minimum of 18 AWG 48 Vdc Figure 4 26 Typical Battery Interface Connection Common Battery System UPM 1 Battery Disconnect TB1 UPS ST UPM 2 Battery Disconnect ST UPM 4 Battery...

Страница 77: ...install wiring to connections 1 If not already installed install the LAN and telephone drops 2 Unfasten the front door latch and swing the door open see Figure 4 1 on page 4 2 3 Remove the right inter...

Страница 78: ...rmally closed latching type switch not tied into any other circuits NOTE This procedure is intended to be used for the installation of the Eaton Corporation supplied REPO switch If installing another...

Страница 79: ...g on page 4 30 9 Route and connect the wiring as shown in Table 4 2 and Figure 4 30 10 If the normally closed REPO TB1 connection in the UPS is not used connect a jumper wire between pins 1 and 2 on T...

Страница 80: ...hardware 14 Reinstall the front door removed in Step 4 and secure with the retained hardware 15 Close the door and secure the latch Figure 4 31 shows the wiring connections if the normally closed REPO...

Страница 81: ...ice is offered as part of the sales contract for the UPS Contact an Eaton service representative in advance usually a two week notice is required to reserve a preferred startup date 4 13 Completing th...

Страница 82: ...LAN and telephone drops are installed All telephone and LAN connections have been completed A ground conductor is properly installed Air conditioning equipment is installed and operating correctly The...

Страница 83: ...o the tie cabinet or distribution panel All power cables are properly sized and terminated Neutral conductors are installed or bonded to ground as per requirements A ground conductor is properly insta...

Страница 84: ..._______________________ _________________________________________________________________________ _________________________________________________________________________ ____________________________...

Страница 85: ...odule II or a Supervisory Contact Module II to the UPS Plug in Terminal Block J3 Figure 5 1 Powerware Hot Sync CAN Bridge Card NOTE Only one Powerware Hot Sync CAN Bridge Card can be installed in the...

Страница 86: ...the NEC for interface and power wiring up to 30V The wire should be rated at 24V 1A minimum S Use Class 2 wiring methods as defined by the NEC for interface and power wiring from 30 to 600V S Signal w...

Страница 87: ...CAN Bridge Card Connections Table 5 1 Powerware Hot Sync CAN Bridge Card Interface Connections J3 Terminal Name Description 1 Alarm Programmable UPS alarm Activated by a remote dry contact closure 2...

Страница 88: ...ove the interface entry conduit landing plates to drill or punch holes see Figure 4 16 on page 4 18 5 Reinstall the interface entry plates and install the conduit 6 To locate the appropriate terminals...

Страница 89: ...iring Shielded Twisted Pair Shielded Twisted Pair Shielded Twisted Pair UPS 1 CAN Bridge Card J3 UPS 2 CAN Bridge Card J3 UPS 3 CAN Bridge Card J3 If Installed UPS 4 CAN Bridge Card J3 If Installed NO...

Страница 90: ...UPS 3 If Installed 1 2 3 4 5 7 8 6 9 10 1 2 3 4 5 7 8 6 9 10 1 2 3 4 5 7 8 6 9 10 Twisted Pair UPS 4 If Installed TB1 TB1 TB1 TB1 TB2 TB2 TB2 TB2 NOTE Use twisted pair wiring between the UPS and MOB...

Страница 91: ...E Always confirm contact operation prior to wiring 1 2 3 4 5 6 7 8 9 10 UPS 1 UPS 2 TB2 TB2 TB2 TB2 TB1 TB1 TB1 UPS 3 If Installed UPS 4 If Installed 1 2 3 4 5 6 7 8 9 10 1 2 3 4 5 6 7 8 9 10 1 2 3 4...

Страница 92: ...larm UPS 2 CAN Bridge Card J3 2 Alarm Return MOB 2 Aux 1 Com UPS 2 TB2 1 Pull Chain MOB 2 Aux 2 NO Pull Chain UPS 2 TB2 2 Pull Chain Common UPS 3 TB2 2 Pull Chain Common Pull Chain Common UPS 3 CAN Br...

Страница 93: ...device and the UPS cabinet 4 Remove the ISBM cabinet top right interface conduit landing plate to drill or punch conduit holes see Figure 4 16 on page 4 18 5 Reinstall the conduit landing plate 6 Inst...

Страница 94: ...Terminal Locations UPS Can Card J3 120 Vac from Critical Bus Line Neutral Twisted Pair Ground Terminal RMP II RIM II or SCM II Figure 5 8 Remote Monitor Panel II Relay Interface Module II or Superviso...

Страница 95: ...Optional Relay Interface Module II To install RIM II wiring 1 Verify the UPS system is turned off and all power sources are removed See Chapter 7 UPS Operating Instructions for shutdown instructions...

Страница 96: ...h J1 through J4 see Table 5 6 and Figure 5 9 You can order interface cables separately for connecting to the 15 Pin D Sub Connectors Table 5 6 J1 through J4 Interface Connectors Status J1 through J4 D...

Страница 97: ...4 Remove the ISBM cabinet top right interface conduit landing plate to drill or punch conduit holes see Figure 4 16 on page 4 18 5 Reinstall the conduit landing plate 6 Install conduit between the UPS...

Страница 98: ...itoring equipment See Figure 5 10 for terminal block location and Figure 5 11 for terminal assignments 10 Close the front door and secure the latch 11 Restart the UPS See Chapter 7 UPS Operating Instr...

Страница 99: ...imensions Figure 5 12 through Figure 5 14 show the dimensions of the RMP II the RIM II and the SCM II Flush Mount using 10 Pan Head Screws Mount with vent holes facing up Surface Mount using 10 Pan He...

Страница 100: ...64201764 Rev 1 www powerware com 5 16 Knockouts Provided on Five Surfaces Surface Mount using 10 Pan Head Screws for Hanging Mount with vent holes facing up Flush Mount using 10 Pan Head Screws Mount...

Страница 101: ...201764 Rev 1 www powerware com 5 17 Knockouts Provided on Five Surfaces Surface Mount using 10 Pan Head Screws for Hanging Mount with vent holes facing up Flush Mount using 10 Pan Head Screws Mount wi...

Страница 102: ...INSTALLING OPTIONS AND ACCESSORIES EATON Powerware 9395 UPS 1000 1100 kVA Installation and Operation Manual S 164201764 Rev 1 www powerware com 5 18 This page intentionally left blank...

Страница 103: ...EATON Powerware 9395 UPS 1000 1100 kVA Installation and Operation Manual S 164201764 Rev 1 www powerware com 5 19 Section II Operation...

Страница 104: ...EATON Powerware 9395 UPS 1000 1100 kVA Installation and Operation Manual S 164201764 Rev 1 www powerware com 5 20...

Страница 105: ...tch AC Output to Critical Load UPS Cabinet Battery Contactor K2 Battery System Input Breaker CB1 optional Bypass Breaker CB4 Figure 6 1 Main Elements of the UPS System If utility power is interrupted...

Страница 106: ...wer flow during each mode of operation 6 2 2 Normal Mode Figure 6 2 shows the path of electrical power through the UPS system when the UPS is operating in Normal mode During normal UPS operation power...

Страница 107: ...an internal failure it switches automatically to Bypass mode and remains in that mode until the failure is corrected and the UPS is back in service 6 2 3 Bypass Mode The UPS automatically switches to...

Страница 108: ...ng The backfeed protection contactor is normally always closed ready to support the static switch unless the bypass input source becomes unavailable If the UPS transfers to Bypass mode from Normal mod...

Страница 109: ...reakers Contactors K2 Bypass Breaker CB4 Bypass Input Rectifier Input Output Input Breaker CB1 Figure 6 4 Path of Current Through the UPS in Battery Mode If the input power fails to return or is not w...

Страница 110: ...ngle Unit Four UPM Reverse Transfer Dual Feed Common Battery System Figure 6 6 on page 6 8 9395 1100 1000 9395 1100 1100 480 480 Single Unit Four UPM Reverse Transfer Dual Feed Separate Battery System...

Страница 111: ...Static Switch AC Input to UPS Rectifier 3 Wire A B C Rotation AC Input to Bypass 3 or 4 Wire A B C Rotation Interface Board Battery Aux Remote EPO Building Alarms Alarm Relays Fuse Service Connector B...

Страница 112: ...Contactor K3 Fuse Rectifier Input Contactor K1 Battery Contactor K2 Fuse Fuse Fuse UPM 2 Battery Breaker E4 E5 Battery Converter Inverter Output Contactor K3 Fuse Rectifier Input Contactor K1 Battery...

Страница 113: ...INET Backfeed Contactor K5 AC Output to Critical Load E9 E10 E11 E12 Static Switch AC Input to UPS Rectifier 3 Wire A B C Rotation AC Input to Bypass 3 or 4 Wire A B C Rotation Interface Board Battery...

Страница 114: ...E12 Static Switch AC Input to UPS Rectifier 3 Wire A B C Rotation AC Input to Bypass 3 or 4 Wire A B C Rotation Interface Board Battery Aux Remote EPO Building Alarms Alarm Relays Fuse Service Connect...

Страница 115: ...two separate feeds with upstream feeder breakers or a single feed with two upstream feeder breakers must be provided one for the UPS or rectifier input breaker RIB if installed and one for the mainten...

Страница 116: ...Ms transfer the load to bypass using the UPS static switches Communication is required between the UPSs for system metering and mode control System level communication and control are accomplished usi...

Страница 117: ...tion S A notice is a minor system event that may or may not require attention S An alarm is a system event that requires immediate intervention The following paragraphs describe the differences in the...

Страница 118: ...ypass input While in this mode the output of the system is not protected from fluctuations spikes or power outages from the source No battery support is available to the output of the system in the By...

Страница 119: ...ach UPS operates to support the applied loads on bypass If the UPSs are in NORMAL and one UPS trips offline the remaining UPSs do not go to bypass as long as they have the capacity to support the load...

Страница 120: ...ode Distributed Bypass If at any time during the battery discharge the input power becomes available again the rectifier begins to supply DC current to the inverter At this point the UPS returns to No...

Страница 121: ...distributed bypass system The internal structure of each UPS is shown in Figure 6 5 through Figure 6 8 starting on page 6 7 Oneline Drawing UPS Model Voltage System Type Input Output Figure 6 13 on pa...

Страница 122: ...STEM Not supplied with the UPS C E9 E10 E11 E12 D NOTE This oneline does not show each UPM in the UPSs but represents each UPS in the distributed bypass system The internal structure of each UPS is sh...

Страница 123: ...ier K1 K2 Fuse Fuse Fuse E6 E7 E8 E12 K5 Static Switch Fuse CB4 E1 E2 E3 CB1 optional UPS 3 A B E4 E5 BATTERY SYSTEM Not supplied with the UPS C E9 E10 E11 E12 D NOTE This oneline does not show each U...

Страница 124: ...ERY SYSTEM Not supplied with the UPS C E9 E10 E11 E12 D Battery Breaker Battery Converter Inverter K3 Fuse Rectifier K1 K2 Fuse Fuse Fuse E6 E7 E8 E12 K5 Static Switch Fuse CB4 E1 E2 E3 CB1 optional U...

Страница 125: ...tem operates properly NOTE Read this section of the manual and have thorough knowledge of UPS operation before attempting to operate any of the controls NOTE The UPS displays two minutes of battery ru...

Страница 126: ...ker on the bottom internal safety shield panel when not in use Remove the backing from each strip and attach one strip to the handle and the other strip to any smooth surface 7 2 Using the Control Pan...

Страница 127: ...panel pushbutton once 7 2 2 System Events When the UPS system is running in Normal mode it continually monitors itself and the incoming utility power In Battery or Bypass modes the UPS may issue alar...

Страница 128: ...ed by an audible horn To silence the horn press any control panel pushbutton once Shown is a typical alarm message For more information about alarms and notices see paragraph 7 2 2 B The information a...

Страница 129: ...numbers LOAD OFF De energizes the critical load and powers down the UPS ESC Returns to Main Menu and Mimic screen from the Events Meters Controls or Setup screens Returns to the main System Setup Lev...

Страница 130: ...dings for the unit The default voltage displayed on these screens is phase to neutral However an authorized Eaton Customer Service Engineer can change the screens to display the voltage phase to phase...

Страница 131: ...rd to be changed Select CHANGE PASSWORD from the System Setup Level 1 menu to display the Change Password screen Use the left or right arrow pushbutton to select the password character position Use th...

Страница 132: ...ing to make the change Press SAVE or ABORT Once the action is completed the COM Port Setup screen is displayed Control See paragraph 7 2 7 for details 7 2 7 System Status Screen and Controls Press the...

Страница 133: ...ormal mode Load Off Displays the Load Off screen see paragraph 7 2 8 Bypass Commands Use the up or down arrow pushbutton to highlight the command function desired then press the SELECT pushbutton to e...

Страница 134: ...splayed when the LOAD OFF pushbutton is selected from the main menu bar the UPS Control Command screen or the Bypass Control Command screen This screen allows the LOAD OFF process to be aborted if the...

Страница 135: ...tatus menu bar The UPS Control Command screen is displayed 11 On the UPS Control Command screen select GO TO NORMAL 12 Press the SELECT pushbutton on the UPS Command menu bar If Auto Bypass is enabled...

Страница 136: ...ress the CONTROLS pushbutton on the System Status menu bar The Bypass Control Command screen is displayed 10 On the Bypass Control Command screen select GO TO BYPASS 11 Press the SELECT pushbutton on...

Страница 137: ...PM status line DC STARTING CHARGER OFF INVERTER STARTING INVERTER SYNCING READY The UPM 2 rectifier and inverter turn on 16 Repeat Steps 8 through 12 selecting UPM 3 to start UPM 3 17 Verify the follo...

Страница 138: ...source If the bypass source is not available the power module remains on and an alarm sounds The BYPASS status indicator is illuminated The Bypass status indicates ON The UPM status indicates READY Th...

Страница 139: ...nd the power module is turned off The bypass source supplies the critical load 8 Repeat Steps 2 through 7 selecting UPM 2 to shut down UPM 2 9 Repeat Steps 2 through 7 selecting UPM 3 to shut down UPM...

Страница 140: ...nd bypass feeder circuit breakers 7 3 9 Charger Control To turn the battery charger on 1 Press the CONTROLS pushbutton on the main menu bar The System Status screen is displayed 2 On the System Status...

Страница 141: ...om the Load Off menu bar and hold for three seconds To abort the shutdown press CANCEL When LOAD OFF is selected and held for three seconds the input output battery and bypass backfeed contactors open...

Страница 142: ...he upstream input feeder circuit breaker is opened 7 3 11 Using the Remote Emergency Power off Switch A UPS emergency power off is initiated by the REPO pushbutton switch In an emergency you can use t...

Страница 143: ...reparation for restarting the UPS insert the supplied key and rotate clockwise until the red pushbutton releases see Figure 7 7 To remove the key rotate the key back to the vertical position 3 Restart...

Страница 144: ...on the System Status menu bar The UPS Control Command screen is displayed 12 On the UPS Control Command screen select GO TO NORMAL 13 Press the SELECT pushbutton on the UPS Command menu bar If Auto By...

Страница 145: ...ll input breakers 9 On the System Status screen select the BYPASS command 10 Press the CONTROLS pushbutton on the System Status menu bar The Bypass Control Command screen is displayed 11 On the Bypass...

Страница 146: ...rough 12 selecting UPM 2 to start UPM 2 15 Observe the following messages are displayed sequentially on the UPM status line DC STARTING CHARGER OFF INVERTER STARTING INVERTER SYNCING READY The UPM 2 r...

Страница 147: ...ansfer to Bypass mode and the critical load is immediately supplied by the bypass source from all UPSs If the bypass source is not available the power module remains on and an alarm sounds The BYPASS...

Страница 148: ...1 Command menu bar The UPM status indicates SHUTDOWN The input output and battery contactors open and the power module is turned off The bypass source supplies the critical load 8 Repeat Steps 2 throu...

Страница 149: ...upstream input feeder circuit breaker is opened 3 If the UPSs contain input breakers CB1 open all UPS input breakers 4 Open all of the UPSs input and bypass feeder circuit breakers 7 4 9 Charger Cont...

Страница 150: ...cal load 2 To shut down the UPS press LOAD OFF from the Load Off menu bar and hold for three seconds To abort the shutdown press CANCEL When LOAD OFF is selected and held for three seconds the input o...

Страница 151: ...esent inside the UPS cabinet sections until the upstream input feeder circuit breaker is opened 7 4 11 Using the Remote Emergency Power off Switch A UPS emergency power off is initiated by the REPO pu...

Страница 152: ...ied and cleared 2 To deactivate the REPO switch in preparation for restarting the UPS insert the supplied key and rotate clockwise until the red pushbutton releases see Figure 7 7 To remove the key ro...

Страница 153: ...t of band remote notification and monitoring using modem communication directly to cell phones and pagers S Relay Interface Card AS 400 has isolated dry contact Form C relay outputs for UPS status Uti...

Страница 154: ...tatus of the Powerware 9395 UPS on a daily basis All data gathered from the unit current and historical is analyzed at the Customer Reliability Center CRC for trending issues A set of factors or rules...

Страница 155: ...flow a complete record of critical power events and notification of important UPS or power information With custom views for monitoring status and metering information various user groups can select...

Страница 156: ...e UPS and modem 8 5 Terminal Mode In Terminal mode the user can request the following functions NOTE The brackets in the following bullets indicate standard keyboard characters To use a key combinatio...

Страница 157: ...through the serial port to the device connected to the port The printed log entries contain a time and date stamp and the alarm text message Terminal mode uses this format for printing alarm entries...

Страница 158: ...2099 21 25 20 515 N011 OUTPUT UNDER OR OVER FREQ PM1 03 16 2099 21 25 20 675 S302 EEPS CONFIGURING PM1 03 16 2099 21 25 23 475 N267 POWER MODULE CABLE FAIL 15 PM1 03 16 2099 21 25 25 180 N271 DC HW AM...

Страница 159: ...use a normally closed or normally open contact If the state of the contact changes from the state you specify as normal a signal is issued You can connect this contact to equipment at your facility su...

Страница 160: ...N BYPASS The bypass source is supplying the critical load Usually this means that the UPS is not energized The load is not protected in Bypass mode and a horn sounds after 30 seconds UPS ALARM The UPS...

Страница 161: ...ectors labeled J1 through J4 Figure 8 4 Relay Interface Module II Customer Interface Connectors J1 through J4 The RIM II can provide the status and alarm signals shown in Table 8 2 Table 8 2 Customer...

Страница 162: ...CM II can be flush mounted or surface mounted on a desktop or secured to a wall Figure 8 5 shows the SCM II Figure 8 5 Supervisory Contact Module II Enclosure The SCM II provides signals for the indic...

Страница 163: ...PRESENT This unit should not be operated with the cabinet doors open or protective panels removed Do not make any assumptions about the electrical state of any cabinet in the UPS system Because each b...

Страница 164: ...3 1 and Chapter 10 Product Specifications 4 Ensure the UPS is in Normal mode Normal status indicator is illuminated If an alarm lamp is illuminated or the Normal status indicator is not illuminated c...

Страница 165: ...ons CAUTION Verify washed filters are thoroughly dry before reinstalling d Push the washed or new foam filters over the screw heads on the cabinet mounted studs until seated against the cabinet e Rein...

Страница 166: ...e top screw and two bottom screws securing the FI UPM front panel refer to the Powerware 9395 Field Installed UPM Mechanical Installation Manual Lift the panel straight up to remove it from the panel...

Страница 167: ...be retorqued to values listed in this manual 9 2 4 ANNUAL Maintenance Annual preventive maintenance should be performed only by authorized service personnel familiar with maintenance and servicing of...

Страница 168: ...ectrique de brulure ou d incendie Suivre les pr cautions qui s imposent S Pour le remplacement utiliser le m me nombre et mod le des batteries S L limination des batteries est r glement e Consulter le...

Страница 169: ...z Powerware 9395 1100 825 three UPM 825 kVA 50 60 Hz The following sections detail the input output environmental and battery specifications for the UPS 10 2 Specifications 10 2 1 UPS Input Operating...

Страница 170: ...0 to 100 load Frequency Regulation 0 1 Hz free running Synchronous to Bypass 10 to 10 3 Frequency Slew Rate 1 Hz per second maximum Load Compatibility 0 9 pF Leading 0 8 pF Lagging Overload Capability...

Страница 171: ...startup and commissioning of the Product b if the Product is moved to a new location by someone other than an authorized Eaton Customer Service Engineer in the USA or Agent outside of the USA or c if...

Страница 172: ...WARRANTY EATON Powerware 9395 UPS 1000 1100 kVA Installation and Operation Manual S 164201764 Rev 1 www powerware com W 2 This page intentionally left blank...

Страница 173: ......

Страница 174: ...1642017641 164201764 1...

Отзывы: