background image

To order parts and supplies: 800.345.1178  >>  eastwood.com  

18


OVERLOAD PROTECTION 

Your Eastwood Flux Core 90 Welder is equipped with an overload breaker 

– this device will 

protect your welder if the duty cycle is  exceeded. If the output is exceeded, the internal breaker 
will trip and stop power supply to the drive motor although the fan will still  run to cool the unit. If 
the breaker tripped resulting from an overload, the circuit breaker button under the side door of the 
welder will  extend out. This circuit breaker must be reset manually. Before resetting the circuit 
breaker button allow the welder to cool for a  minimum of 15 minutes.  

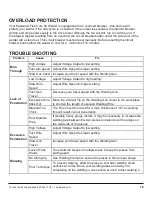
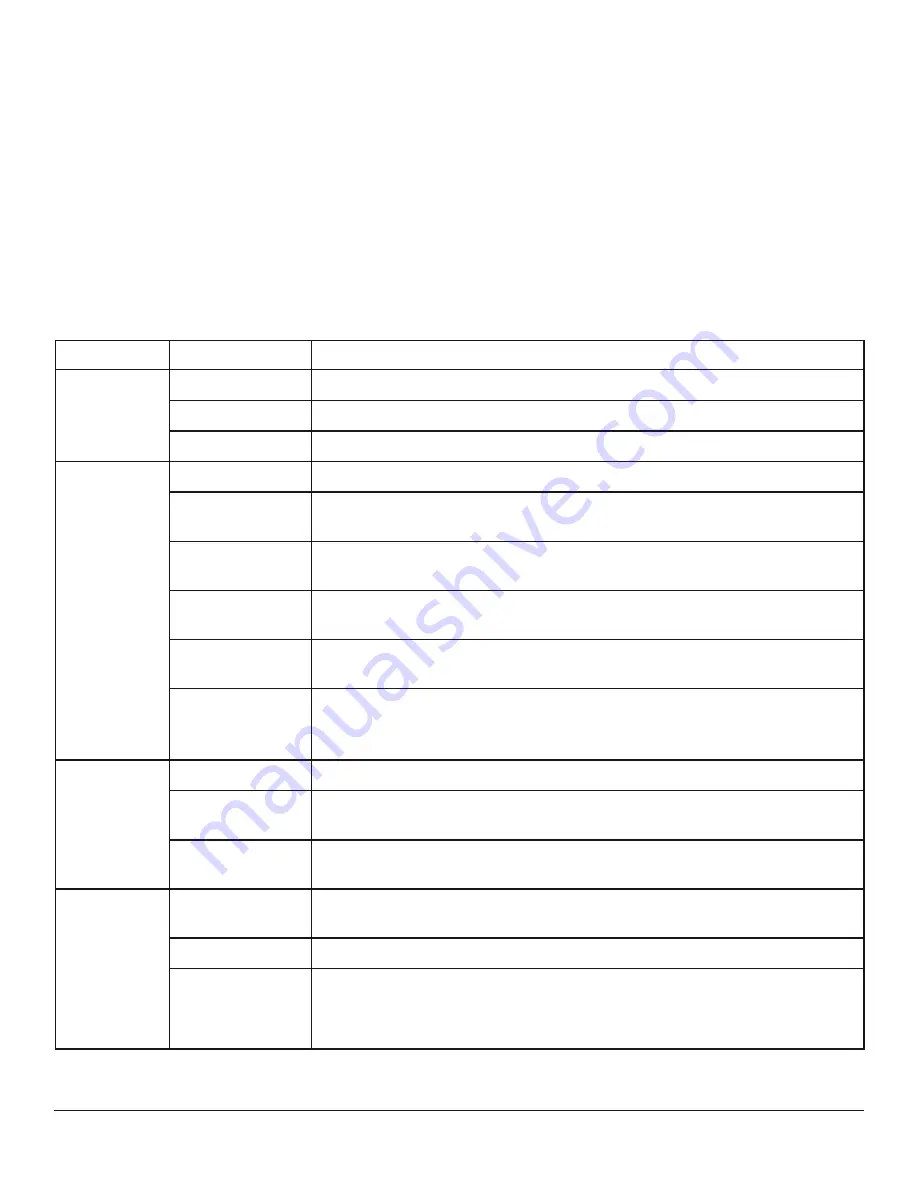
TROUBLESHOOTING 

Problem


Cause


Fix


Burn 
Through


High voltage 

Adjust Voltage Output to low setting. 

Fast wire speed  Adjust Wire Speed to slower setting. 

Slow Gun travel  Increase your travel speed with the Welding Gun. 

Lack of  


Penetration


Low Voltage 

Adjust Voltage Output to high setting. 

Slow Wire 
Speed 

Adjust Wire Speed to higher setting. 

Fast Gun 
Travel 

Decrease your travel speed with the Welding Gun. 

Excessive Wire  
Stick Out 

Move the Contact Tip on the Welding Gun closer to the work piece 
to shorten the length of exposed Welding Wire. 

Material Too 
Thick 

The Flux Core 90 is rated for a max. thickness of 1/8"; exceeding 
this will result in poor penetration. 

Poor Material 
Prep 

If welding heavy gauge metals, it may be necessary to increase the 
welding gap between the two pieces and also bevel the edges on 
the weld side of the pieces. 

Excessive  
Penetration


High Voltage 

Adjust Voltage Output to low setting. 

Fast Wire 
Speed 

Adjust Wire Speed to slower setting. 

Slow Gun 
Travel 

Increase your travel speed with the Welding Gun. 

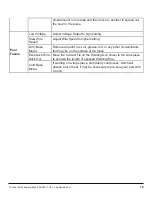
Warping


Lack of Tack 
Welds 

Tack weld the pieces in multiple areas to keep the pieces from 
pulling apart. 

No Clamping 

Use Welding Clamps to secure the pieces in their proper shape. 

Poor Technique 

To prevent warping, allow the piece to cool after welding small 
sections at a time. Move your welding areas around by not 
completing all the welding in one section at once, rather welding a 

Содержание flux core 90

Страница 1: ...Part 20280 FLUX CORE 90 WELDER ASSEMBLY OPERATING INSTRUCTIONS...

Страница 2: ......

Страница 3: ...rchaser must return to Eastwood any products claimed defective under Eastwood s warranty FREIGHT COSTS The purchaser is responsible for shipment to and from Eastwood WARRANTY LIMITATIONS EASTWOOD WILL...

Страница 4: ...ce to be welded and as close to the weld area as possible This will give the least resistance and best weld FUMES AND WELDING GASES CAN BE DANGEROUS Do not breathe fumes that are produced by the weldi...

Страница 5: ...ding blankets to protect painted surfaces dash boards engines etc Ensure power supply has properly rated wiring to handle power usage Do not use on or near combustible surfaces Remove all flammable it...

Страница 6: ...that all persons in the welding area are protected from heat sparks and ultraviolet rays Use additional face shields and flame resistant barriers as needed Never touch work piece until it has complet...

Страница 7: ...AGNETIC FIELDS CAN AFFECT PACEMAKERS Any user with a pacemaker should consult their doctor before use Anyone with a pacemaker should stay away from any welding without consultant from a doctor NOTICE...

Страница 8: ...es 800 345 1178 eastwood com 8 UNPACKING When unpacking your Eastwood Flux Core 90 check to make sure all of the parts listed below are included Flux Core 90 Welder with Welding Gun and Ground Cable C...

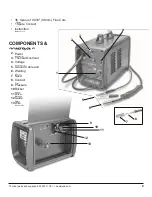
Страница 9: ...tact Tip 1 Instruction Manual COMPONENTS CONTROLS 1 Wire Speed Control 2 Power Switch 3 Thermal Overload Indicator 4 Voltage Control 5 Ground Cable and Clamp 6 Welding Gun 7 Nozzl e 8 Contact Tip 9 Pr...

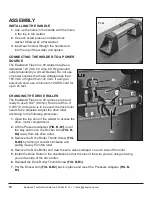
Страница 10: ...od Flux Core 90 comes set up and ready to use 0 030 0 8mm Flux Core Wire If 0 035 0 9mm wire is to be used the drive roller needs to be adjusted Adjust the drive roller according to the following proc...

Страница 11: ...re spool only To install the wire spool follow the procedure listed below 1 Open the door of the welder and remove the wing nut FIG C C1 and spacer from the Wire Spool Spindle 2 Slide the 4 inch Wire...

Страница 12: ...speed to about 5 10 With the gun pointed away from you and others depress the trigger to begin feeding wire NOTE Watch the drive roller to see if any slipping is occurring between the roller and wire...

Страница 13: ...will form this puddle is the weld bead and will follow the motion of the Welding Gun Watching the size of the puddle dictates how fast you should be moving with the torch If you burn through the mate...

Страница 14: ...aying in the same direction 3 Edge Weld is a joint between two pieces where the edges are being joined 5 Tee Weld is a joint between two pieces where one is perpendicular to the other 2 Corner Weld is...

Страница 15: ...To order parts and supplies 800 345 1178 eastwood com 15 6 Plug Weld is a joint which joins two overlapping pieces by filling in a hole punched in the top piece...

Страница 16: ...l to cool If necessary follow up with a flap disc to grind the weld bead flush Heavy Gauge Metal Welding Techniques When welding heavy gauge metal a different approach is usually taken to account for...

Страница 17: ...17 Eastwood Technical Assistance 800 544 5118 techelp eastwood com...

Страница 18: ...low Wire Speed Adjust Wire Speed to higher setting Fast Gun Travel Decrease your travel speed with the Welding Gun Excessive Wire Stick Out Move the Contact Tip on the Welding Gun closer to the work p...

Страница 19: ...eed to higher setting Dirty Base Metal Remove all paint rust oil grease dirt or any other contaminants that may be on the surface of the piece Excessive Wire Stick Out Move the Contact Tip on the Weld...

Страница 20: ...12224 0 030 0 8mm Contact Tips 5 Pack 12210 Nozzle 12225 0 030 Flux Cored Wire 2lb 4 Spool See our complete line of consumables and parts at www eastwood com If you have any questions about the use of...

Страница 21: ...com PDF version of this manual is available online eastwood com 20280manual The Eastwood Company 263 Shoemaker Road Pottstown PA 19464 USA US and Canada 800 345 1178 Outside US 610 718 8335 Fax 610 3...

Отзывы: