


14
Eastwood Technical Assistance: 800.343.9353 >> [email protected]
FIG. 31
FIG. 31
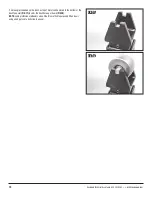
• Loosen the Anvil Yoke screws and rotate 90°. Check the alignment of Anvil to the
Anvil Tube with a straight edge
(FIG 31)
. If necessary, loosen the Anvil Yoke set
screws and rotate into alignment.
• Raise the Anvil by turning the Jackscrew until it just touches the Wheel.
• As described previously, lay the straight edge at a diagonal across the Wheel and
the Anvil
(FIG 15)
in both directions
(FIG 16)
.
• The straight edge, ideally, should lay flush with both Wheel and Anvil faces. How-
ever, a 1/8” [3mm] gap will not affect wheeling. If adjustment is necessary:
- Turn the Anvil Tube set screws in or out from opposite directions as needed to
move the Anvil and Wheel into alignment.
- With the alignment verified, the Anvil Tube set screws can be lightly
tightened.
DO NOT over tighten the Anvil Tube Screws as the Anvil Tube
needs to able to move up and down smoothly. If more angle is
needed on the Anvil, a strip of metal can be placed in the bottom
of the Anvil Yoke slot (FIG 17) to shim the Anvil Axle up or down
(FIG 18). NOTE: some professional wheelers also utilize this
method to purposely tilt an Anvil, using an edge to set a body
line in a panel.
MAINTENANCE
• Clean dirt and debris from Wheel and Anvil surfaces.
• Check tightness of all hardware.
• Check operation of Jackscrew for binding. Lubricate threads periodically with
medium bodied chassis grease.
• When storing the English Wheel for an extended period of time, it is recommend-
ed to coat the wheel and anvils with a corrosion inhibitor to prevent surface rust.
Mineral oil and motor oil are two good options for this task.


