background image


1

Notice

Notice

!

1

Safety Precautionary Measures

Warning

Warning

!

l

The installation work must be done by the distributor or a professional worker.
The installation worker must be equipped with all related knowledge as a wrong operation may 
cause fire risk, electric shock, injury or water leakage, etc.

l

Parts purchased locally should be appointed products of our company.


Retailed parts like humidifier should be appointed products of our company, the violation of 
which may cause fire, electric shock or water leakage, etc. The installation work of retailed 
products must be installed by professionals.

l

If the unit has to be installed in a small room, suitable measures shall be done to make sure any 
refrigerant leakage concentration if happened in the room will not exceed the critical level.

l

For detailed measures, place consult with the distributor.


l

Connection of power supply must be complying with rules speci ied by the local electrical 
authority.

l

Required by law, must be reliable ground works. If the ground is not perfect, it may result in 
electric shock.

l

If the air conditioner need to be moved or reinstalled, please let the distributor or a professional 
worker operate

.

l

Incorrect installation will cause fire risk, electric shock, injury or water leakage, etc.

l

The user is not permitted to rebuild or repair the unit by themselves.


Incorrect repairing will cause fire risk, electric shock, injury or water leakage, etc, so repairing 
must be performed by the distributor or a professional worker.

f

V.2

Содержание ECIN Series

Страница 1: ...Gama ECIN SISTEMAS VRV CENTR FUGOS Unidades interiores cassette CENTRIFUGAL VRF SYSTEMS Cassette type indoor units MANUAL DE INSTRUCCIONES INSTRUCTION MANUAL V 2...

Страница 2: ...ci n de la tuber a de desag e 11 5 Instalaci n de tuber as de conexi n y acelerador electr nico 13 6 Conexi n de la electricidad 16 7 Suministro y control 18 8 Tabla de c digos de error 21 9 Garant a...

Страница 3: ...etar el tubo de desag e Tubo de desag e 1 Se utiliza para drenar el agua 4 Se utiliza para colocar el aire acondicionado Bolsa con v lvula 4 Se usa para guardar accesorios Piezas que puede adquirir lo...

Страница 4: ...lesiones o fugas de agua etc El usuario no debe reconstruir o reparar la unidad por su cuenta Una reparaci n incorrecta causa riesgo de incendio descarga el ctrica lesiones fugas de agua etc por lo qu...

Страница 5: ...la unidad interior 3 La ventilaci n debe estar accesible y el sitio debe sufrir el m nimo impacto de aire extra o 4 El flujo de aire debe poder propagarse a cualquier parte de la habitaci n 5 La tuber...

Страница 6: ...ealice las aberturas necesarias para la instalaci n en el techo para el techo existente 2 En cuanto al tama o de la abertura en el techo consulte el esquema de instalaci n 3 Antes de la instalaci n in...

Страница 7: ...s o carpinteros 3 Ajuste la unidad a una posici n de instalaci n correcta 4 Compruebe si la unidad est horizontal o no La unidad interior est equipada con un desag e incorporado y un interruptor de bo...

Страница 8: ...los filtros a unos 45 y ret rela de los paneles decorativos v ase la figura 2 Quite la cubierta que cierra las esquina y extraiga la cubierta hacia afuera v ase la figura 3 Figura 1 Figura 2 Figura 3...

Страница 9: ...temporalmente los dos anclajes restantes sobre los colgadores de la unidad interior Atenci n No envuelva el cable del motor el ctrico del panel con ning n material aislante 3 Atornille 4 pernos hexag...

Страница 10: ...ste la altura de colgado de la unidad interior Consulte la siguiente imagen Diagrama de la altura de colgado de la unidad de cassette 2 Si hay un hueco entre la unidad interior y el panel pueden darse...

Страница 11: ...rta 1 Instalaci n de la rejilla de ventilaci n Realice la instalaci n seg n los procedimientos inversos del apartado Preparaci n del panel decorativo Gire la tapa de los filtros e instale en cuatro di...

Страница 12: ...dad mm Dimensiones panel A B C D E F G H I 5 6kW 8 0kW 900 833 232 776 684 91 950 950 50 9 0kW 16 0kW 900 833 286 776 684 150 950 950 50 B Dimensiones de la unidad y de salida de aire de la unidad de...

Страница 13: ...te 3 G G G A B C D E F G H I 5 6kW 8 0kW 900 833 232 776 684 91 950 950 80 9 0kW 16 0kW 900 833 286 776 684 150 950 950 80 10 Caja de la v lvula de expansi n electr nica A A A D D J B F C E H Modelo d...

Страница 14: ...ombeo no se afloje y se salga Establezca un punto de apoyo cada 0 8 a 1 0 m de modo que el tubo de drenaje no se doble V ase la figura 4 1b 6 Si es necesario instalar un tubo de bobinado use la parte...

Страница 15: ...rpo principal se utiliza para drenar el agua de la bandeja cuando el aire acondicionado est en mal estado o al hacer mantenimiento Durante el uso del aparato se debe cerrar bien este tap n de drenaje...

Страница 16: ...detalles ver la columna Conexi n de tubos 1 Conecte la unidad interior antes de conectar la unidad exterior a Preste atenci n a la configuraci n del tubo de bobinado para no da ar la tuber a y su capa...

Страница 17: ...ugas de aire Aseg rese de que el par de torsi n se ha atornillado de acuerdo con la Tabla 5 3 Tabla 5 3 Figura 5 5 14 Par de apriete N m 1 4 10 12 3 8 15 18 1 2 20 23 5 8 28 32 3 4 35 40 1 4 A mm Max...

Страница 18: ...ma homog nea las partes de conexi n de las uniones individuales de la unidad interior con la tuber a aislante Cuerpo principal Incisi n hacia arriba Extremo de la tuber a Tuber a de goma y pl stico pa...

Страница 19: ...exi n Fuente de alimentaci n Fusible Por debajo de 20 m Por debajo de 50 m N mero Di metro del cable 2 2 16 0kW Monof sico 15A 15A 2 5mm 2 4mm 2 1 Cable apantallado de dos n cleos 0 75mm Un solo cable...

Страница 20: ...e P Q E Cable de se al entre la unidad interior y la exterior Control en grupo Figura 6 1 Energ a monof sica Tierra 6 5 Manejo de la interfaz de cableado La superficie de cableado debe sellarse con ma...

Страница 21: ...lo pueden servir de referencia 7 1 1 Switch SW1 Usando el switch SW1 con 16 n meros en su disco de marcado de la placa interior puede regular los caballos de potencia de la unidad interior predetermi...

Страница 22: ...tte de cuatro v as ON OFF 3 4 2 ON OFF 1 2 Unidad de cassette de 360 ON OFF 3 4 4 ON OFF 1 2 Unidad de suelo techo ON OFF 3 4 8 Selector de temperatura para apagar el motor ventilador en antifr o Sele...

Страница 23: ...placa de LED por defecto SW3 4 ON OFF 4 Modo autom tico de env o de direcciones por defecto ON OFF 3 Con la placa de tubos digitales ON OFF 4 Modo de prueba para permitir una direcci n clara 7 1 4 Swi...

Страница 24: ...spera mientras se enciende est n iluminados Cuando est en modo antifr o o descongelaci n la luz de precalentamiento o anticongelaci n est encendida Si encuentra un fallo se muestra el siguiente conten...

Страница 25: ...as producidas por causas fortuitas o siniestros de fuerza mayor o como consecuencia de un uso anormal negligente o inadecuado del aparato 7 Responsabilidades civiles de cualquier naturaleza 8 P rdidas...

Страница 26: ...nimales que puedan tener acceso al interior de la m quina o sus puntos de conexi n 17 Da os derivados de terrorismo mot n alboroto o tumulto popular manifestaciones y huelgas legales o ilegales hechos...

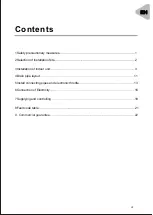
Страница 27: ...tion of Installation Site 2 3Installation of indoor unit 3 4Drain pipe layout 11 5Install connecting pipes and electronic throttle 13 6Connection of Electricity 16 7Supplying and controlling 18 8Fault...

Страница 28: ...pansion valve Connecting pipe of electronic expansion valve Connect electronic expansion valve and liquid side of indoor unit Different models may have different sizes and calibers Please install acco...

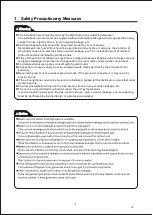
Страница 29: ...able measures shall be done to make sure any refrigerant leakage concentration if happened in the room will not exceed the critical level lFor detailed measures place consult with the distributor lCon...

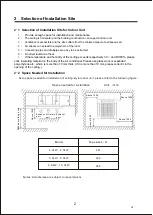
Страница 30: ...ir 4 Air stream can spread to everywhere of the room 5 Connecting pipe and drainpipe are easy to be extracted 6 No direct radiation of heat 7 If the temperature and humidity of the ceiling exceeds res...

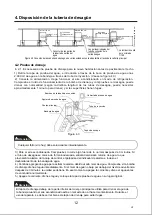
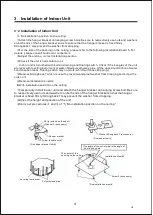
Страница 31: ...erator pipe drain pipe and wires indoor and outdoor unit cables connected with the indoor unit so that they can be connected immediately with the indoor unit after installation 4 Strike out openings w...

Страница 32: ...densation leans floating switch may not work which will cause dripping Remove Strongback 7 which is used to prevent waterproof washer from dropping and screw the nuts on it Remove installation boards...

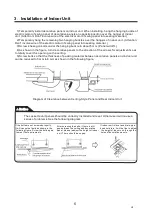
Страница 33: ...ult Take down the wind grill from decorative panels 1 Press down the button of wind grill and then lift one end of the button Refer to Figure 1 2 Lift up the grill to about 45 and take off the wind gr...

Страница 34: ...n decorative panels to the direction of the arrows for adjustment so as to totally cover the opening on the ceiling 5 Screw bolts so that the thickness of packing material between decorative panels an...

Страница 35: ...of indoor unit please adjust hanging height of indoor unit See the following figure Diagram of Hanging height of the cassette unit 3 4 2 If there is gap between indoor unit and panel the following unf...

Страница 36: ...f the panel before installation 1 Installation of wind grill Install according to reverse procedures of Preparation of Decorative Panel Turn around the wind grill and install in four directions If it...

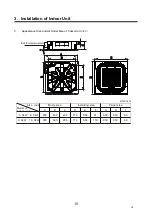
Страница 37: ...alling size Panel size Unit mm G G H H C C F F I I Electronic expansion valve box A Cassette Unit 1 Appearance Size and Air Outlet Size of G G H H B Cassette Unit 2 Appearance Size and Air Outlet Size...

Страница 38: ...tlet Size of G G H H B B D D A A E E C C F F J J Electronic expansion valve box 5 6kW 8 0kW 900 900 A B C D E F G H I 833 833 232 286 776 776 684 684 91 150 950 950 950 950 80 80 9 0kW 16 0kW Size cod...

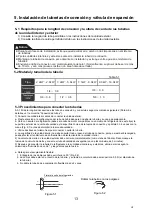
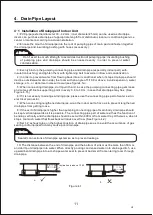
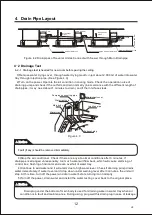
Страница 39: ...use the connecting pipe part of water exit in electrical connector 7 When connecting lengthened drainpipe wrap the indoor part of it so as to prevent lengthened drainpipe from getting loose 8 If the e...

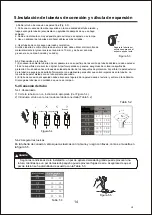
Страница 40: ...outfall can drain normally in accordance with the different length of drainpipes it may need about 1 minutes to drain and if the interfaces leak Pumping connecting pipe Notice Notice Notice Notice Dra...

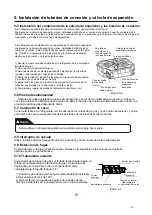
Страница 41: ...il it must be engine oil which is compatible with the cooling medium of this type on the outside surface of flared joint and the conical surface of connecting nut and screw it 3 or 4 rounds with your...

Страница 42: ...ker in closed humid area Remove coil methods make pipe end straight Figure 5 4 1 It is necessary to bend pipe or drill holes on the wall The section surface of bending pipe should not exceed 1 3 of or...

Страница 43: ...ipe of indoor unit Set screws Electronic expansion valve box This side connects with liquid pipe of outdoor unit Never use refrigerant sealed in outdoor unit to vacuumize 5 8 Valve Switch Use 5 mm hex...

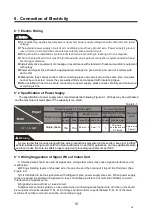
Страница 44: ...ood order and can not interfere with each other Meanwhile they cannot connect with connecting pipes and valve body At the same time two wires cannot be connected unless they are welded firmly and wrap...

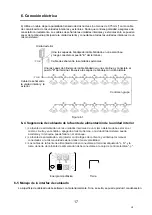
Страница 45: ...rs of shielded wire into one into one line and then connect it to port E of terminal Signal wire between indoor and outdoor unit Control in group 1 The indoor unit power supply in the same system must...

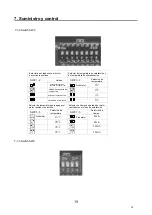
Страница 46: ...ore leaving factory The indoor unit includes the following horse power HP HP 1 1 25 26 28 1 2 2 32 35 36 1 2 3 3 40 45 46 1 7 4 4 50 51 56 2 5 5 60 63 66 71 2 5 6 6 80 3 7 7 88 90 3 2 8 8 100 110 112...

Страница 47: ...nit Temperature selection Temperature selection SW2 1th 2th SW2 5th 6th SW2 7th 8th Factory Default Factory Default 4min 8min 12min 16min 7 1 3 Dial up SW3 1 2 ON OFF 1 2 ON OFF 1 2 ON OFF 1 2 ON OFF...

Страница 48: ...actory Means dialing to ON Setting up power off memory according to agreement Selector of windshield SW3 1th SW3 2th Power down memory Factory default No power down memory High windshield Ultrahigh wi...

Страница 49: ...it is on standby while starting up they will light up When it is anti cold or defrost the preheating light defrost light will turn on If timing function is turned on timing light will light up When it...

Страница 50: ...erased 6 Faults caused by fortuitous causes or accidents of force majeure or as a result of abnormal negligent or inappropriate use of the device 7 Civil liabilities of any nature 8 Loss or damage to...

Страница 51: ...rived from normal wear and tear due to the operation of the equipment 16 Faults that have their origin or are a direct or indirect consequence of contact with liquids chemicals and other substances as...

Страница 52: ...Vis tanos en www easelectric es V 2...

Отзывы: