


14
CHARGING
THE
BATTERY
PACK
BATTERY METER
Since the battery is shipped in a low charge condition, the
battery must be charged before use.
The battery has 3 LED
lights to indicate battery capacity. These lights will only
illuminate when the light indicator button is pushed.
If three GREEN lights illuminate, the battery is charged and
ready for use. Two green lights are equal to 25%
-
80% charge,
while one green light is equal to 5%
-
25% charge.
It is recommended to charge battery pack when one light is
illuminated.
CHARGING THE BATTERY PACK
The pole/chain saw comes with maintenance free, sealed, 40
volt, 2Ah storage batteries.
•
Charge the battery pack only with the charger provided.
•
Allow at least 70 minutes of charge time before initial use
of the chain saw.
•
Make sure the power supply is normal household voltage,
120 volts, 60Hz, AC only.
•
The battery should be charged in a cool, dry place.
•
To improve battery life, store battery indoors in a
controlled climate.
Fully charge battery pack every 3
months.
•
Since the battery will not develop a memory, it does not
have to be fully discharged before recharging.
•
2 to 3 initial charging/discharging cycles may be required
to achieve maximum run time/capacity.
•
When fully charged, the battery can be safely stored in
temperatures down to –4
˚
F(
-
20
˚
C) for a period of up to
one month before requiring charging.
Fully charge
battery pack every 3 months.
•
The battery charger should be operated in temperatures
between 32
˚
F and 100
˚
F(0
˚
C and 37.8
˚
C).
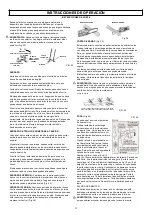
TO CHARGE
Insert the 120 volt plug of the charger into the wall receptacle.
Light A will illuminate and stay green. (Fig. 27)
Fig. 27
•
Place the battery pack into the charger by sliding the pack
as shown in Fig. 28 to lock it into position. Light B will
illuminate red to indicate that the battery is charging and
the three lights on the battery pack will cycle in green.
•
When the battery pack is fully charged, light B will turn
green and the lights on the battery pack will shut off. (Fig
28)
NOTE: Typical time required to reach a full charge is 1 1/4
hours.
NOTE:
If light A remains green while light B alternately flashes
red and green, this indicates a temperature abnormality (i.e. that
the battery pack is either too hot or too cold). If there is only a
red blinking light, this indicates that something is wrong with the
battery. Contact Earthwise customer service center at
1
-
800
-
313
-
5111 for assistance.
If the charging light indicator Light B alternately blinks red and
green or it does not come on at all, check that the battery pack
is fully seated into the bay. Remove the pack and reinsert. If the
problem persists, contact the Earthwise customer service center
at 1
-
800
-
313
-
5111 for assistance.
Fig. 28
SLEEP MODE:
If the light indicator button is continuously pressed for more than
30 seconds, the lights will go into sleep mode. When light
indicator button is pushed, no lights illuminate (This can
occasionally occur during transportation).
To re
-
activate battery LED lights, place the battery on the
charger and charge for one to two minutes. Battery
indicator will function normally.


