background image


If you drop the product, carefully inspect it for damage. If the blade is 

bent or cracked, handles broken or if you see any other condition that 

may affect the product

s operation, it must be repaired before putting 

it back into use.  Call our customer service help line at 1

-

800

-

633

-

1501 for assistance.


CAUTION: 

Do not at any time let brake fluids, gasoline, petroleum 

based products, penetrating oils, etc., come in contact with plastic 

parts. They contain chemicals that can damage, weaken or destroy 

plastic.  


Make sure the unit is detached from the power supply, then use only 

mild soap and a damp cloth to clean the tool. Never let any liquid get 

inside the tool; never immerse any part of the tool into a liquid. 


IMPORTANT

: To assure product SAFETY and RELIABILITY,      

repairs, maintenance and adjustment should be performed by a   
qualified individual using identical replacement parts only.


The cutting blades are made from high quality, hardened steel and 
with normal usage, they will not require re

-

sharpening.


you accidentally hit a wire fence, stones, glass or other hard objects, 

you may put a nick in the blade. There is no need to remove this nick 

as long as it doesn

t interfere with the movement of the blade.  If it 

does interfere, make sure the unit is detached from the power supply 

and use a fine toothed file or sharpening stone to remove the nick. 


Fertilizers and other garden chemicals contain agents which  greatly 

accelerate the corrosion of metals. Do not store the tool on or       

adjacent to fertilizers or chemicals. 


LUBRICATE BLADES 

-

 Stop the unit 

and disconnect the power cord. Then 

remove any debris on blades. Apply a 

light machine oil along the edge of the 

top and bottom blade supports. Make 

sure handles remain clean and dry. 


MAINTENANCE


SIDE

-

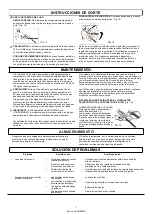
TRIMMING HEDGES—

Begin at the bottom and sweep up. 

(Fig. 15)


Do not force the trimmer 

through dense growth. A slight back and forth sawing action may 

ease the cutting of larger, more dense growth. If the trimmer begins 

to slow down, reduce the rate of speed at which you are trying to cut. 

If the trimmer becomes jammed,      immediately turn trimmer off. 

Disconnect trimmer from the power supply and remove the jammed 

debris from the cutting blades.


TRIMMING INSTRUCTIONS


LEVEL HEDGES 

-


To obtain exceptionally level hedges, a piece of 

string can be stretched along the length of the hedge as a guide. (Fig. 

14) 


CAUTION: 

Do not use the 18 inch trimmer for cutting stems greater 

than 

.7”.  

Use the trimmer only for cutting normal shrubbery found 

around houses and buildings. 


TRIMMING NEW GROWTH—

A wide, sweeping motion, feeding the 

blade teeth through the twigs is most effective. A slight downward tilt 

of the blade in the direction of the motion gives the best cutting.


USING


THE


HEDGE


TRIMMER


LUBRICATION SYSTEM FOR


POLE


HEDGE TRIMMER/HEDGE 

TRIMMER 

(Fig. 16)


FIG

.

14


FIG

.

15


FIG

.

16


STORAGE


Store the tool in a dry, clean area out of reach of children.  


During extended periods of storage, ensure that the tool is protected 
against corrosion and rust.  


At the end of the season, or if the tool is not being used for longer than 
a month, wipe over all metal surfaces with an oil impregnated cloth to 
protect them from corrosion or spray with a fine coat of oil.  


TROUBLE SHOOTING


Problem


Possible Cause


Possible Solution


− 

Unit does not run


− 

Extension cord not connected to 
the plug


− 

Check extension cord is fully connected to tool


− 

Cord not connected to power 
source


− 

Check extension cord is fully connected to a live receptacle


− 

Trigger switch not fully engaged


− 

Check that safety lock of button is fully depressed prior to    
moving trigger


− 

Slow running, noisy or hot blades


− 

Dry, corroded blades


− 

Lubricate blades


− 

Blades or blade support bent


− 

Straighten blade or blade support


− 

Bent or damaged teeth


− 

Straighten teeth


− 

Loose blade bolts


− 

Tighten blade bolts


7


Model CVPH43018


Содержание CVPH43018

Страница 1: ...y cared for it will give you years of rugged trouble free performance WARNING To reduce the risk of injury the user must read and understand the owner s manual before using this product SAVE THIS MANU...

Страница 2: ...rrying power tools with your finger on the switch or energising power tools that have the switch on invites accidents Remove any adjusting key or wrench before turning the power tool on A wrench or a...

Страница 3: ...extension cord and power cord in a knot to prevent them from becoming disconnected during use Make the knot as shown then connect the plug end of the power cord into the receptacle end of the extensi...

Страница 4: ...A AC Only Speed 3200 Strokes per Min Bar Length 18 in Extended Length 8 8 ft Max Cut 0 7 in Weight 9 7 lbs Quick Release Button Guard Front Handle Double Switch Cutter Blade Shoulder Strap Quick Relea...

Страница 5: ...Press down the quick release button Ensure the release button snapsfirmly into position to lock the handle securely FIG 1 Quick Release Button Rear handle Quick Release Button Pole FIG 2 FIG 3 Rear Ha...

Страница 6: ...epairing the cord You may also place the extension cord in the cord retainer Form a loop in extension cord and push the loop through the hole in the rear handle Position the loop over the cord retaine...

Страница 7: ...eep up Fig 15 Do not force the trimmer through dense growth A slight back and forth sawing action may ease the cutting of larger more dense growth If the trimmer begins to slow down reduce the rate of...

Страница 8: ...al number in the space provided below MODEL NUMBER CVPH43018 ___ SERIAL NUMBER________________ Always mention the model number when ordering kits items for this tool CALL US FIRST Call us first with q...

Страница 9: ...____________________________________________________________ __________________________________________________________________ __________________________________________________________________ _____...

Страница 10: ...returning the product or replacement parts to the owner is not covered by the warranty The warranty does not cover normal deterioration of the exterior finish including but not limited to scratches d...

Страница 11: ...y seguridad para el operario Si se lo trata con cuidado le otorgar a os de ptimo rendimiento y resistencia ADVERTENCIA Para reducir el riesgo de sufrir alguna lesi n el usuario debe leer y comprender...

Страница 12: ...r as Transportar herramientas el ctricas con el dedo en el interruptor o enchufar herramientas el ctricas que tienen el interruptor encendido puede ocasionar accidentes Retire toda llave o herramienta...

Страница 13: ...neaci n y las uniones de las piezas m viles el montaje las aver as y otros factores que puedan afectar el funcionamiento Un protector o cualquier otra pieza da ada deben ser reemplazados o reparados e...

Страница 14: ...CIONES DEL PRODUCTO Soporte de cuchillas de acero Cuchillas de acero endurecido Mango telescopic Protector de la cuchilla Guardia Bot n de liberaci n r pida Cuchilla de la cortadora Mango delantero In...

Страница 15: ...ante el env o No deseche el material de embalaje hasta haber inspeccionado exhaustivamente el producto y comprobado que funciona en forma satisfactoria LISTA DE EMBALAJE Cabezal de corte del cortaseto...

Страница 16: ...EL NGULO DEL CABEZAL DEL CORTASETOS TELESC PICO Fig 8 1 Para ajustar el ngulo de corte presione el bot n de ajuste de ngulos 2 Gire la sierra hacia el ngulo deseado 3 El ngulo puede oscilar entre 20 y...

Страница 17: ...ta El cable no est conectado a la fuente de alimentaci n Aseg rese de que el cable de extensi n est bien conectado a un recept culo activo El interruptor del gatillo no funciona por completo Compruebe...

Страница 18: ...gistre el n mero de serie en el espacio provisto a continuaci n MODELO N CVPH43018 N MERO DE SERIE _______________ Mencione siempre el serial del modelo cuando ordene kits para el mismo LL MENOS PRIME...

Страница 19: ...___________ __________________________________________________________________ __________________________________________________________________ ______________________________________________________...

Страница 20: ...s de canales de terceros no autorizados CUALQUIER P RDIDA ACCIDENTAL INDIRECTA O RESULTANTE DA O O GASTO QUE PUEDA DERIVAR DE CUALQUIER DEFECTO FALLA O MALFUNCIONAMIENTO DEL PRODUCTO NO EST CUBIERTO P...

Страница 21: ...es de service intensif et sans souci AVERTISSEMENT Afin d viter de se blesser l utilisateur doit lire et comprendre le manuel du propri taire avant d utiliser ce produit Merci pour votre achat CONSER...

Страница 22: ...es d marrages accidentels S assurer que le commutateur est en position d arr t avant de brancher l outil Porter un outil avec le doigt sur son commutateur ou brancher un outil dont le commutateur est...

Страница 23: ...ces mobiles sont align es qu elles ne sont pas coinc es qu aucune pi ce n est cass e et inspectez la qualit du montage et toute autre condition pouvant affecter le fonctionnement de l outil Une pi ce...

Страница 24: ...P CIFICATIONS DU PRODUIT Support de la lame d acier Lames d acier tremp Manche telescopique Protection De Lame Carter de protection Bouton de lib ration rapide Lame du coupe gazon Commutateur de s cur...

Страница 25: ...z sur le bouton de lib ration rapide Assurez vous que le bouton de lib ration s enclenche fermement en position pour verrouiller la poign e en s curit Bouton de lib ration rapide Poign e arri re Bouto...

Страница 26: ...appuyez sur le bouton de r glage de l angle 2 Tournez la scie l angle d sir 3 L angle peut tre maintenu entre 20 et 60 degr s Bouton de r glage de l angle INSTRUCTIONS POUR LA COUPE RALLONGE Gardez t...

Страница 27: ...re service client le au 1 800 313 5111 pour obtenir de l aide MISE EN GARDE Ne laissez jamais de liquide de frein d essence de produits base de p trole d huiles p n trantes etc entrer en contact avec...

Страница 28: ...l information pertinente lorsque vous nous appelez ou nous rendez visite PI CES DE RECHANGE KITS ARTICLES Le num ro de mod le de s rie de cet outil se trouve sur une plaque ou une tiquette fix e au b...

Страница 29: ...__________________________ __________________________________________________________________ __________________________________________________________________ _______________________________________...

Страница 30: ...T QUI POURRAIT R SULTER D UN D FAUT D UNE D FAILLANCE OU D UN DYS FONCTIONNEMENT DU PRODUIT N EST PAS COUVERT PAR LA GARANTIE Certains tats ne permettent pas l exclusion ou la limitation de la dur e d...

Отзывы: