background image

eagletone.com

4

User’s manual 


Electronic keyboard Eagletone MPW49

IntroDuCtIon
taking care of your instrument

1.  Do not place or store the instrument in 

extremely damp, hot or dusty places.

2.  Avoid placing heavy objects on the 

instrument or exposing it to physical 

shocks.

3.  Do not use any chemical agents to clean 

its surface such as benzene or thinners.

Power supply

This instrument can be powered with 

batteries or with an DC adaptor (none of 

these are included). Follow the instructions 

below.

Batteries

Firstly, insert 6 C-size alkaline batteries 

(SUM-2 or R-14) in the battery holder.

1.  Open the battery holder located under the 

instrument.

2.  Insert the batteries and make sure you 

respect the polarity indicated on the 

instrument.

3.  Put the battery cover back on and make 

sure it is closed correctly.

Warning:
•  Do not use old and new batteries together.

•  Always use batteries of the same type.

•  Always remember to remove the batteries 

when the instrument is not to be used for 

an extended period of time.

DC adaptor

Use an DC adaptor whenever you want to 

use domestic electrical power. The DC 

adaptor must have a DC 9V, 500mA output, 

with a positive central pin. Make sure the 

instrument is turned off before connecting 

the DC adaptor in the wall outlet and its 

supply cord to the instrument. This will 

automatically bypass the batteries.

important:
•  When used, the DC adaptor can generate 

heat. This is normal.

•  Please disconnect the DC adaptor from the 

wall outlet when the instrument is not in 

use.

Never use a type of power supply that does 

not correspond to the one specified for the 

instrument.

Connecting headphones 

or an amplifier

•  Headphones can be plugged into the 

PHONES connector on the rear of the 

instrument.

•  The internal speaker is automatically 

disconnected when headphones are 

plugged into that jack output.

•  Plug an audio cable into the PHONES 

connector, and then plug the other end 

of the cable into the LINE IN or AUX IN 

connector of the amplifier.

PLayIng the keyBoarD

1.  To turn the keyboard on, move the 

[poWer]


switch to the “ON” position. The display 

lights up. 

note: To help you remember to save 

power while the instrument is on, the 

keyboard produces a sound automatically 

if you have not pressed a key for 

2 minutes.

2.  Adjust the volume to the desired level. 

Press the 

[/-]

 button repeatedly 

to increase or decrease it, from 0 (no 

sound) to 10 (maximum level). The level 

currently selected is displayed.

Playing a demo

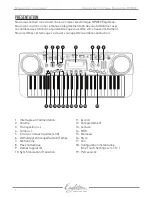
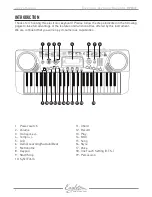
You can listen to any of the 50 songs listed on 

the right-hand side of the front panel.

1.  Press the 

[song]

 button. “SONG” and 

the current song number appear on the 

display. 

note: The keyboard selects the song 

Содержание MPW 49

Страница 1: ...www eagletone com Manuel de l utilisateur...

Страница 2: ...ossibilit s que vous offre votre nouvel instrument Nous sommes certains que ce clavier vous apportera enti re satisfaction 1 Interrupteur d alimentation 2 Volume 3 Transposition 4 Tempo 5 Ecran crista...

Страница 3: ...gt normal 4 Accord 5 Volume 6 Num ro de son Style Morceau 7 Tempo 8 M tronome Temps 9 Cl de Fa 10 Cl de Sol 11 Clavier 12 Une seule touche apprentissage 13 Ligne m lodique 14 M lodie d sactiv e 15 Mai...

Страница 4: ...he centrale positive Veillez teindre l appareil avant de brancher l adaptateur dans la prise secteur et son cordon l appareil Cela coupera automatiquement l alimentation par piles Important 1 L adapta...

Страница 5: ...e du clavier Remarque Le clavier a une polyphonie de 8 notes maximum Cela signifie que vous pouvez produire jusqu 8 notes diff rentes en m me temps avec la plupart des sons pr programm s du clavier 1...

Страница 6: ...e la mesure de transition Sinon pour ins rer une variation plus longue maintenez enfonc sync fill in L instrument jouera une variation jusqu ce que vous rel chiez sync fill in Emploi de l accompagneme...

Страница 7: ...lectionner n importe lesquels des modes suivants ONE KEY une touche Dans ce mode appuyez sur start stop et n importe quelle touche fera jouer l accompagnement et une note de la m lodie La note appara...

Страница 8: ...S O T S appara tra 4 Appuyez sur voice Le son pr programm correspondant au style automatique s lectionn appara tra Pour quitter cette fonction appuyez sur O T S et O T S dispara tra Emploi du sustain...

Страница 9: ...c est donc l instrument r cepteur d tre r gl sur le bon canal MIDI la mani re d un t l viseur qui re oit diff rents programmes sur diff rents canaux depuis une m me antenne Si les canaux d mission et...

Страница 10: ...o transition Fill in Sync d marrage arr t Sources d alimentation Adaptateur CC 9 V 6 piles de taille C Dimensions L x I x H 795 x 315 x 120 mm Poids sans piles 3 6 kg Caract ristiques et aspect sont s...

Страница 11: ...Cdim Augment Caug Quarte suspendue Csus4 Sixi me C6 Mineur sixi me Cm6 Septi me C7 Septi me mineure Cm7 Septi me majeure CM7 Septi me diminu e Cdim7 Septi me quarte suspendue C7sus4 Augment septi me...

Страница 12: ...nt Caug Quarte suspendue Csus4 Sixi me C6 Mineur sixi me Cm6 Septi me C7 Septi me mineure Cm7 Septi me majeure CM7 Septi me min quinte diminu e Cm7b5 Septi me quarte suspendue C7sus4 Septi me quinte d...

Страница 13: ...www eagletone com User s manual...

Страница 14: ...to take full advantage of the features and functionalities offered by this instrument We are confident that you will enjoy its numerous capabilities 1 Power switch 2 Volume 3 Transpose 4 Tempo 5 LCD...

Страница 15: ...mplified Fingering S Finger 3 Standard fingering Fingered 4 Chord 5 Volume 6 Voice Style Song number 7 Tempo 8 Metronome Beat 9 Bass clef 10 Treble clef 11 Keyboard 12 One key Learning mode 13 Melody...

Страница 16: ...ng the DC adaptor in the wall outlet and its supply cord to the instrument This will automatically bypass the batteries Important When used the DC adaptor can generate heat This is normal Please disco...

Страница 17: ...ress the voice button VOICE and the currently selected voice number are displayed Note Each time you switch the keyboard on the Grand Piano No 01 voice is loaded automatically 2 To choose a different...

Страница 18: ...play without any accompaniment or with 2 different types of accompaniment when pressing the accompaniment keys Normal Normal mode Chords are deactivated in this mode you can however select voice and s...

Страница 19: ...u wish to use follow these steps 1 Press the song button then press the learn button repeatedly until the black indicator faces ONE KEY on the right of the display 2 Select a song from the SONGS list...

Страница 20: ...ure Percussion Pads Using the percussion pads Percussion pads on your keyboard give you a choice of 5 different percussion instrument voices bass drum snare open hi hat closed hi hat and high tom To p...

Страница 21: ...using the VOLUME button 4 To select the desired MIDI channel 01 16 press the midi button repeatedly until the desired channel appears on the display 5 You can play the keyboard You will hear the music...

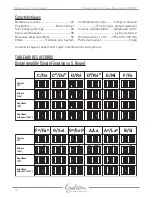
Страница 22: ...s manual Electronic keyboard Eagletone MPW49 Chord charts Simplified Fingering Single Finger or S Finger C C D D E F G G A A B F Major C Minor Cm Seventh C7 Minor Seventh Cm7 Major C Minor Cm Seventh...

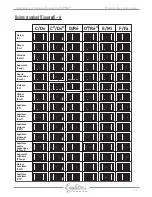
Страница 23: ...Minor Cm Diminished Cdim Augmented CAug Suspended Fourth Csus4 Sixth C6 Minor Sixth Cm6 Seventh C7 Minor seventh Cm7 Major seventh CM7 Minor seventh flat fifth Cm7b5 Seventh suspended fourth C7sus4 S...

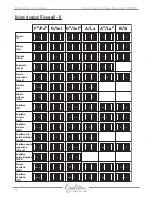
Страница 24: ...B F Minor Cm Diminished Cdim Augmented CAug Suspended Fourth Csus4 Sixth C6 Minor Sixth Cm6 Seventh C7 Minor seventh Cm7 Major seventh CM7 Diminished Seventh Cdim7 Seventh suspended fourth C7sus4 Augm...

Отзывы: