background image


Copyright © 2003-2005 Eagle Tree Systems, LLC 


Page 10 

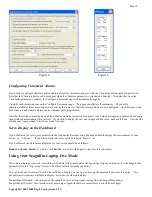
Windows 98SE™ and Windows Millennium™

:   When the Recorder is first connected to the USB port, the New 

Hardware Wizard will likely appear.   Follow the steps in the Wizard, choosing the options to allow Windows to find the appropriate 
drivers for the Recorder – these drivers are built into Windows.   If the devices you already have on your computer haven’t required 
the installation of the USB drivers, Windows will prompt you for your Windows CD to copy over the drivers.     Once this process is 
complete, you may be asked to reboot the system.   Reboot at this point, then relaunch the Recorder Application, and the New Flight 
Wizard should start up again.    
 

Windows 2000 ™ and Windows XP ™

:  When the Recorder is first connected to the USB port, Windows should automatically 

install the correct drivers without prompting you.   If you should receive a Windows prompt, however, do what it says. 
 
Once the Recorder is correctly discovered and installed by Windows, continue on with the New Flight Wizard, relaunching the app 
after reboot if necessary. 


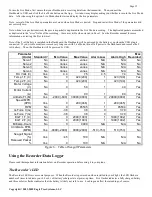
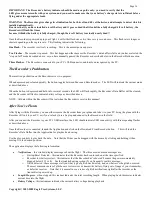
Telling the Recorder what to Log 


Your Recorder has built-in data logging capability.    The first time you run the app, you will be prompted to choose what driving 
parameters you wish to log.   The more items you log, the less record time will be available.     A description of the parameters is 
below: 
 

Servo movements

:   If


one or more of these parameters is checked, the recorder will log the positions of the corresponding servos, 

assuming you have the optional ‘Y’ cables installed.   Choose these options if you want to see controller movements during your 
flight, etc.   .      
 

Servo Glitches:  

If this option is selected, the recorder detects and logs three different types of servo glitches:  short servo pulses (less 

than 740uSec), long servo pulses (greater than 2.25 mSec) and missing servo pulses (no pulse for 100mSec).    The most common 
causes of glitches are low receiver or transmitter battery, driving out of range of your transmitter, or defective receiver.   Note that it is 
normal to see a series of glitch notifications right after the recorder or the transmitter is powered up. 

 
Receiver Battery Voltage:  

Selecting this parameter causes the recorder to log your receiver’s battery voltage (or whatever battery is 

being used to power the recorder).    Note that it is normal to see rapid spikes in the receiver battery voltage on playback, but if you are 
seeing voltage drops below 4.5 volts on a regular basis, you should test your battery.    The Recorder constantly monitors battery 
voltage even if this option is not checked, and will shut itself down if the battery voltage consistently is below around 4.5 volts to save 
power for the receiver.    The recorder will log an error in this case.   The recorder will “reboot” if the voltage falls below 4.35 volts 
even for a short period, and logs an error in this case also.   Error logs are displayed in the “Notification Area” of the application 
during playback. 
 

Speed:  

If this option is selected, the recorder logs the speed of your plane via the air pitot tube.  


Altitude

: If this option is selected, the recorder logs the flight’s altitude with each sample. 

 
RPM: 

If this option is selected, the recorder logs the RPM of your Flight.    

 
Temperature 1:  

Choose this option if you want to record temperature from the temperature sensor plugged into the “Tmp1” slot, 

sold separately. 

 
Temperature 2:  

Choose this option if you want to record temperature from the temperature sensor plugged into the “Tmp2” slot, 

sold separately. 

 
Optional Accessories:  

See the instruction manuals included with the optional accessories for information on logging these 

parameters.   Optional expanders for measuring Temperature, RPM, Servo movements, G-Force, Exhaust Gas Temperature, Electric 
Motor Current/Voltage, and other parameters are available from Eagle Tree Systems.  


Setting the Joystick Configuration Mode  


This setting only needs to be changed if you are logging servo movements.   The Recorder application defaults to US Mode 2 Joystick 
configuration, which is: 


Left Joystick controls throttle and rudder, and Right Joystick controls elevator and ailerons. 

 
If you desire, you can select US Mode 1 via the Tools->Set Joystick Configuration Mode.  Mode 1 is: 
 

Содержание Seagull Glide

Страница 1: ...ded Packing List Your Seagull Glide System includes the Wireless Telemetry Data Dashboard Receiver the Wireless Telemetry transmitter Flight Data Recorder approximately 3 feet 1 meter of Pitot Tube ho...

Страница 2: ...he model is in operation is strongly discouraged Use the programmable audible alarms or have a buddy look at the display as necessary The Seagull Transmitter and Dashboard Receiver antennas are very f...

Страница 3: ...e is mounted parallel to the direction of travel near the pitot tube as shown in the below figure Method C A static source can be obtained from the side of the fuselage with the rubber tube or a short...

Страница 4: ...protruding at right angles with your RX antenna to reduce the possibility of interference For example if you have a model plane with the receiver mounted horizontally along the plane s fuselage mount...

Страница 5: ...ding down this pushbutton for approximately two seconds zeros the Max parameters In Menu Mode this pushbutton takes you to the next menu item Pushbutton 4 Mute Power When the unit is in operation pres...

Страница 6: ...compensated and Receiver voltage Page two of the data displayed contains signal strength received packet percentage and raw climbrate non TE compensated If the Dashboard displays No Signal consult the...

Страница 7: ...reduced In fact if the magnet is mounted flush in another metal material it is quite possible that no shaft imbalance will occur if you only mount one of the magnets total To flush mount the magnets d...

Страница 8: ...sor to the recorder The power wire of the Y cable between the sensor and the recorder should be cut before connecting it to the recorder This is necessary to avoid connecting the power of the existing...

Страница 9: ...from Eagle Tree Systems which extends the USB pushbutton and LED to the outside of your plane This allows for easy downloading and control of the Recorder without removing the canopy or wing Installin...

Страница 10: ...receiver Note that it is normal to see a series of glitch notifications right after the recorder or the transmitter is powered up Receiver Battery Voltage Selecting this parameter causes the recorder...

Страница 11: ...from Eagle Tree Systems Also note that the display area is limited so not all parameters can be displayed at once Numeric parameters take up less space than instruments so more numeric parameters can...

Страница 12: ...running this utility Once the utility is successfully run the Finish button of the Wizard will ungray Seagull Dashboard Data Setup Utility Instructions This utility the Utility will appear the first t...

Страница 13: ...t the length of the silence between each of the beeps in the Length of silent pause between beeps window If you wish the beeps to repeatedly sound when the alarm condition occurs click on the Check he...

Страница 14: ...ude value uncheck this box Note that the altitude may jump around a bit if raw mode is chosen Servo Display on the Dashboard If you calibrated your servo movements with the App during Recorder setup t...

Страница 15: ...lue Alarm Low Alarm High Max Recorded Servo1 No Varies varies N A N A No Servo2 No Varies varies N A N A No Servo3 No Varies varies N A N A No Servo4 No Varies varies N A N A No RX Volts V Yes 4 4 7 5...

Страница 16: ...flash to indicate battery voltage as described above NOTE All data within the Recorder will be lost when the Recorder is reset in this manner After You ve Flown After flying with the Recorder you can...

Страница 17: ...ware and perhaps other spreadsheet brands Using Excel is useful for graphing the data output from the recorder To load in Excel save the data file from File Save Recorder File and in Excel choose File...

Страница 18: ...not using it requires PC connection Note that low power mode is the default Solution Try operating the Recorder Transmitter without any recorder cables connected to your radio RX This will require a s...

Страница 19: ...vehicle s power off WAIT 10 SECONDS turn your vehicle s power back on and then turn your Dashboard off and on Solution Make sure the Seagull ID is correctly set in both the Recorder and the Dashboard...

Страница 20: ...ations However there is no guarantee that interference will not occur in a particular installation If this equipment does cause harmful interference to radio or television reception which can be deter...

Страница 21: ...r average 60 milliamp Receiver RX Antenna Thin flexible stainless whip Temperature range 0 140 degrees F Battery Standard 9V or other 5V to 16V battery pack Display 16x2 character LCD Pushbuttons 4 US...

Страница 22: ...UENTIAL OR INCIDENTAL DAMAGES INCLUDING WITHOUT LIMITATION ANY LIABILTY FOR THIRD PARTY CLAIMS AGAINST YOU FOR DAMAGES FOR PRODUCTS NOT BEING AVAILABLE FOR USE OR FOR LOST DATA OR LOST SOFTWARE OUR LI...

Отзывы: