


Page G-4
ENGINE
Repair and Service Manual
Read all of Section B and this section before attempting any procedure. Pay particular attention to all Notices, Cautions, Warnings and Dangers
STARTER/GENERATOR BELT TEN-
SION
Tool List
Qty.
Belt Tension Gauge ..................................................... 1
Wrench, 13 mm ........................................................... 1
Wrench, 14 mm ........................................................... 2
Wrench, 15 mm ........................................................... 1
Ratchet ........................................................................ 1
Socket, 13 mm" ........................................................... 1
Socket, 15 mm............................................................. 1
The starter/generator belt tension should be checked
after the first 15 - 20 hours and set to 75 - 80 lbs. (34 -
36 kg).
A loose belt can cause audible vibration and squeal.
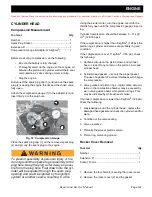
Tighten a
new
starter/generator belt to 90 - 110 lbs. (41 -
50 kg) tension when a gauge is applied half way
between the two pulleys (Ref. Fig. 10).
Fig. 10 Checking Belt Tension with Gauge
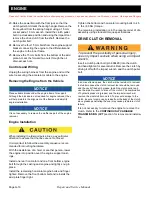
Although not as accurate, a
new
belt may be depressed
with a finger. A maximum deflection of 3/8" (10 mm) is
acceptable (Ref. Fig. 11).
Fig. 11 Checking Belt Tension with Finger
Re-tighten an
existing
belt to 75 - 80 lbs. (34 - 36 kg)
tension using the same technique. A maximum deflec-
tion of 1/2" (13 mm) is acceptable.
Adjusting the Belt
Loosen the two pivot bolts (13) and nuts (14) on the
starter/generator. Using two 14 mm wrenches; hold the
lower nut (11) and loosen the upper nut (12) on the
starter/generator adjusting bolt.
Fig. 12 Starter/Generator
Move the lower nut (11) up or down the adjustment bolt
until proper belt tension is achieved. Hold the lower nut
(11) in place and tighten the upper jam nut (12) against it
the lower nut to the specified torque value (Ref. Fig. 13).
Fig. 13 Adjusting the Belt Tension
NOTICE
3/8" (1 cm) Maximum
Deflection (New Belt)
1/2" (1.3 cm) Maximum
Deflection (Existing Belt)
14
13
14
13
12
11
10


