


ELECTRICAL
Read all of Section B and this section before attempting any procedure. Pay particular attention to all Notes, Cautions and Warnings
Starter/Generator Repair and Replacement
Tool List
Qty. Required
DVOM .......................................................................... 1
Torque wrench, 3/8" drive, ft. lbs . ................................ 1
Torque wrench, 3/8" drive, in. lbs . ............................... 1
Clean cloth .................................................................. 1
Socket, 3/8" drive ........................................................ 1
1. Commutator - Clean with a soft, clean cloth.
2. Replace any damaged or cracked brush holders or
brushes worn to less than 11 /16" (17 mm) in length or
to the line marked on the brush.
3. Test the insulation between the core and the commu
tator segments and shaft with a circuit tester. If conti
nuity is indicated, the insulation is defective and the
armature must be replaced.
4. With the brushes removed, using a DVOM, check the
field coils for continuity between 'F1' and 'F2' and 'DF'
and 'F1 '. If an open circuit exists, replace the field
coils. Check for continuity between all four terminals
and the frame (outer shell). If continuity is indicated,
the field coils are grounded against the frame and the
field coils must be replaced.
5. Clean all parts to be reinstalled and reassemble in the
reverse order of disassembly. Tighten bolts and nuts
to the following values:
• 4 mm - torque to 15 - 21 in. lbs. (17 - 24 kg/cm)
• 5 mm - torque to 30 - 43 in. lbs. (35 - 50 kg/cm)
• 6 mm - torque to 52 - 74 in. lbs. (60 - 85 kg/cm)
• 14 mm - torque to 33 - 40 ft. lbs. (450 - 550 kg/cm)
Tighten
terminal nuts
to the following torques:
• F1 - F2 - torque to 43 - 52 in. lbs. (50 - 60 kg/cm)
• DF - torque to 26 - 35 in. lbs. (30 - 40 kg/cm)
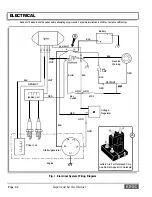
BATTERY VOLTAGE TEST
Battery voltage can be checked using a voltmeter. Attach
the negative(-) lead of the DVOM to the ground terminal
of the battery. The positive ( +) lead is then attached to
the positive battery terminal. The voltage reading
obtained should be 12 volts or above. If the reading is
below 12 volts, the battery requires either charging or
replacement.
A
WARNING.A
Hydrogen gas formed
during battery charging
is explosive. Avoid any
electrical spark or open flame near battery.
I
NOTE
I
If the temperature of the battery or the ambient
temperature is below 6rP F (15° C), the capac
ity of the battery will be less. It will require more time to charge.
A cold battery will build up voltage and more rapidly reduce the
charging rate.
Batteries that are new or have been stored must be fully
charged before being tested or placed in vehicle.
CAUTION
Do not overcharge battery.
STORAGE OF BATTERY
A battery that is removed from service for storage must
be cared for as follows:
For battery removal see 'Battery Removal' in Section B.
Charge fully. Cover terminals with petroleum jelly to pre
vent oxidation (use commercially available battery pro
tectant when installed in vehicle). Store in a cool place
not below 32
°
F (0
°
C) or above 80
°
F (27
°
C) Battery
should be charged every 30 days using a 2 amp trickle
charger.
Page K-8
Repair and Service Manual
Содержание 4 CADDY 1999
Страница 6: ...TABLE OF CONTENTS Notes __________________________ _ Page iv Repair and Service Manual...
Страница 10: ...SAFETY INFORMATION Notes _________________________ _ Page viii Repair and Service Manual...
Страница 26: ...SAFETY Notes _ _ ___________________________ _ Page B ii Repair and Service Manual...
Страница 48: ...BODY Notes _ _ ___________________________ _ Page C ii Repair and Service Manual...
Страница 56: ...WHEELS AND TIRES Notes __________________________ _ Page D ii Repair and Service Manual...
Страница 60: ...FRONT SUSPENSION AND STEERING Notes ________________________ _ Page E ii Repair and Service Manual...
Страница 72: ...SPEED CONTROL Notes _ _ ________________________ _ Page F ii Repair and Service Manual...
Страница 80: ...ENGINE Notes _ _ __________________________ _ Page G ii Repair and Service Manual...
Страница 94: ...FUEL SYSTEM Notes _ _ _________________________ _ Page H ii Repair and Service Manual...
Страница 104: ...CONTINUOUSLY VARIABLE TRANSMISSION CVT Notes _______________________ _ Page J ii Repair and Service Manual...
Страница 110: ...ELECTRICAL Notes _ _ _________________________ _ Page K ii Repair and Service Manual...
Страница 120: ...ACCESSORY WIRING Notes __________________________ _ Page L ii Repair and Service Manual...
Страница 148: ...REAR SUSPENSION Notes __________________________ _ Page N ii Repair and Service Manual...
Страница 154: ...REAR AXLE Notes _ _ ___________________________ _ Page P ii Repair and Service Manual...
Страница 158: ...PAINT Notes _ _ ___________________________ _ Page Q ii Repair and Service Manual...
Страница 162: ...TROUBLESHOOTING Notes _ _ ________________________ _ Page R ii Repair and Service Manual...
Страница 170: ...LIMITED WARRANTY Notes __________________________ _ Page S ii Repair and Service Manual...
Страница 176: ...LIMITED WARRANTY Notes __________________________ _ Page S 6 Repair and Service Manual...
Страница 178: ...GENERAL SPECIFICATIONS Notes _________________________ _ Page T ii Repair and Service Manual...


