background image

15

E-flite P-38/F-5E Lightning Assembly Manual


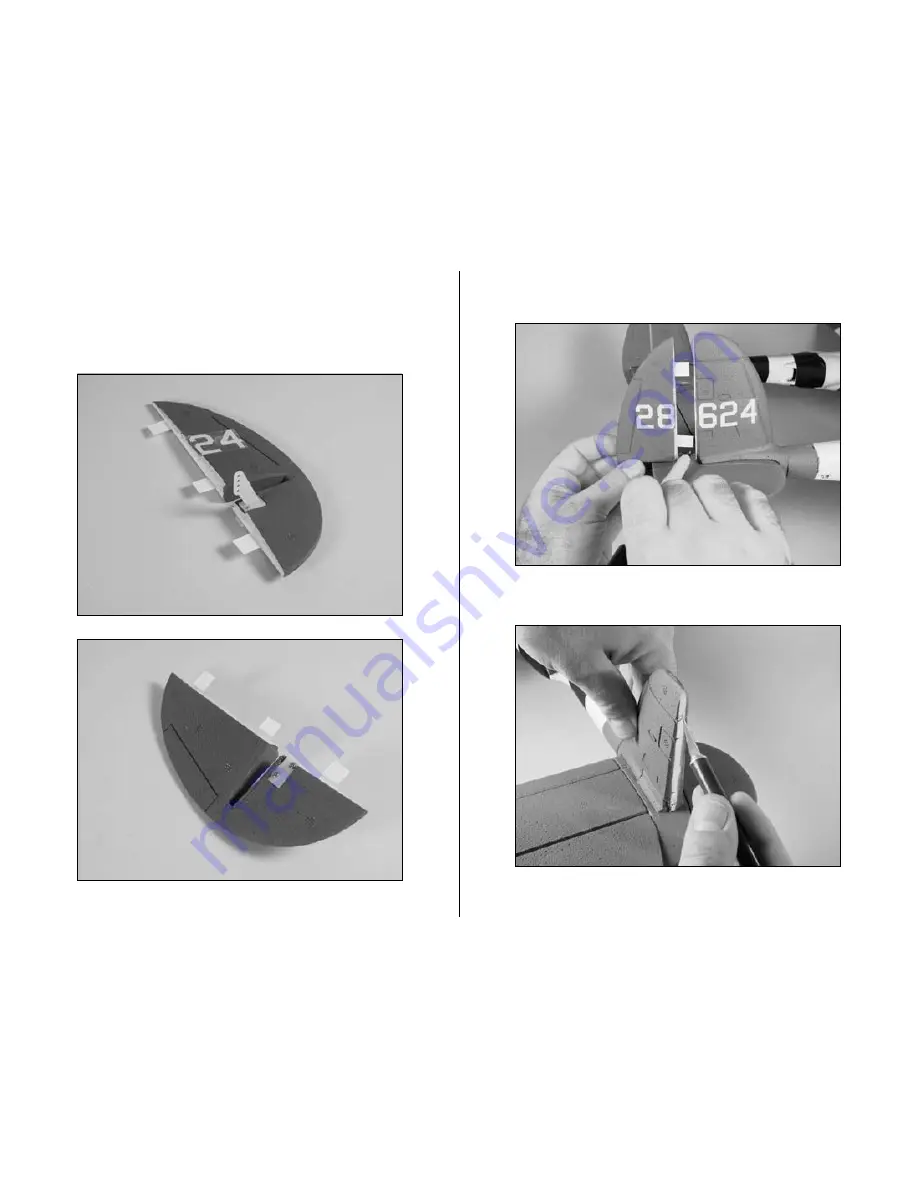
  5. Attach the control horn to the outside of the rudder 

using the backplate and two 2mm x 12mm screws.

Note

: Make sure to mount the horn on the outside of 

each rudder.


  6. Position the rudder against the fin. Use a felt-tipped 

pen to mark the location of the hinges onto the fin.


  7. Use a hobby knife to cut slots for the hinges in the fin.

Содержание F-5E Lightning 400 ARF

Страница 1: ...cifications Wingspan 48 in 1219mm Length 35 in 889mm Wing Area 307 sq in 19 8 sq dm Weight w o Battery 28 35 oz 794 992 g Weight w Battery 33 40 oz 936 1134 g P 38 F 5E Lightning 400 ARF Assembly Manu...

Страница 2: ...flown by most pilots with aileron equipped model experience The P 38 F 5E can be flown from smooth surfaces using the included landing gear and optional steerable nose wheel or from grass with the lan...

Страница 3: ...cle are performed once while steps with two circles indicate that the step will require repeating such as for a right or left wing panel two servos etc Remember to take your time and follow the direct...

Страница 4: ...JR Receivers And EFLRS75 7 5 Gram Sub Micro S75 Servo 3 required or up to 6 with optional rudders and steerable nose wheel EFLRYH3 3 Y Harness 1 or up to 3 with brushless power system and optional ru...

Страница 5: ...gest using a 30 35 amp ESC like the Castle Creations Pegasus 35P CSEP35P 16GA silicone wire can be substituted Recommended Brushless Motor Power System Setup This power system offers beyond scale like...

Страница 6: ...DER THIS WARRANTY IS THE EXCLUSIVE REMEDY OF THE PURCHASER This warranty covers only those Products purchased from an authorized Horizon dealer Third party transactions are not covered by this warrant...

Страница 7: ...Your local hobby store and or place of purchase cannot provide warranty support or repair Once assembly setup or use of the Product has been started you must contact Horizon directly This will enable...

Страница 8: ...e following address Horizon Product Support 4105 Fieldstone Road Champaign Illinois 61822 Please call 877 504 0233 with any questions or concerns regarding this product or warranty Safety Precautions...

Страница 9: ...Required Tools and Adhesives Phillips screwdriver small 1 Carefully remove the center section hatch from the fuselage by lifting it from the rear 2 Remove the servo cover from the bottom of the left...

Страница 10: ...the pushrod wire 5 Secure a 12 in 305mm servo extension onto the servo lead Use string to secure the servo lead to the servo extension 6 Pass the extension forward in the boom and underneath the plyw...

Страница 11: ...to the center fuselage 9 Attach the receiver to the fuselage using the included double sided tape Plug the elevator servo extension into the elevator channel of the receiver Note Use the manufacturer...

Страница 12: ...screw provided with the servo Thread the clevis on the pushrod in or out to adjust the length of the pushrod positioning the elevator level with the stabilizer when the servo is centered 12 Replace th...

Страница 13: ...hrod wire w clevis 10 3 4 in 273mm 2 Required Tools and Adhesives Hobby knife Felt tipped pen Thin or medium foam safe CA Note The installation of the rudders is optional If you choose not to install...

Страница 14: ...sides of the hinge where it will be inserted into the rudder If using thin foam safe CA the hinges can be inserted into slots in the rudder and fin without glue Then the CA can be applied in the middl...

Страница 15: ...f the rudder using the backplate and two 2mm x 12mm screws Note Make sure to mount the horn on the outside of each rudder 6 Position the rudder against the fin Use a felt tipped pen to mark the locati...

Страница 16: ...hinge slots in the fin as necessary Complete the rudder installation by applying foam safe CA to the hinges and sliding the hinges into the slots in the fin Be sure to set just enough gap between the...

Страница 17: ...Steps 1 though 9 to install the second rudder servo The control horn is mounted on the rudder facing away from the elevator The rudder servo is positioned with the servo arm pointing to the inside of...

Страница 18: ...w Hobby knife Soldering iron Solder Note The P 38 F 5E Lightning includes standard and reverse rotation propellers and spinners This allows the use of counter rotating propellers just like the full sc...

Страница 19: ...3 connecter from the electronic speed controls Cut a 16 in 406mm length of red and black wire 14 or 16 gauge for each ESC and solder them to the end of the battery leads on the speed control to extend...

Страница 20: ...e counterclockwise when viewed from the front The right hand motor when viewed from behind should rotate clockwise when viewed from the front Note If either motor is running in the opposite direction...

Страница 21: ...s Note If it is necessary to enlarge the hole in the propeller make sure to check the balance of the propeller afterwards 7 Install the propeller and spinner backplate as shown using the adapter inclu...

Страница 22: ...andard and reverse rotation Spinner assembly standard and reverse rotation Required Tools and Adhesives Phillips screwdriver Double sided tape Soldering iron Solder Note The P 38 F 5E Lightning includ...

Страница 23: ...ogrammed to Off Also be sure to use an ESC with the proper 9V cutoff when using 3 cell Li Po packs or 6V cutoff when using 2 cell Li Po packs 3 Check the motor stick to make sure it is secure in the b...

Страница 24: ...e 6 Check the operation of the motors The left hand gearbox shaft when viewed from behind should rotate counterclockwise when viewed from the front The right hand gearbox shaft when viewed from behind...

Страница 25: ...injury Always check the motor without the propeller to avoid injury Important Information About Your Propeller It is very important to check to be sure the propeller is balanced before installing onto...

Страница 26: ...tallation Required Parts Fuselage center section assembly Double sided tape 3mm x 35mm screw 2 Wing panels Servo w hardware 2 Servo extension 9 228mm 2 Y harness 3mm x 25mm screw 2 Pushrod wire w clev...

Страница 27: ...sided tape to install the servo in the wing with the output shaft toward the trailing edge and control horn 4 Remove the backing from the pre installed double sided tape on the wing panel cover Posit...

Страница 28: ...he fuselage and secure it using the 3mm x 45mm screw in the front and the 3mm x 35mm screw in the rear Note It may be necessary to slide the wing in and out of the slot in the boom a few times so that...

Страница 29: ...ve taped it down use caution as it could pull up your paint with it Landing Gear and Drop Tank Installation Optional Required Parts Assembled airframe Main gear right and left Nose gear 2mm x 10mm pan...

Страница 30: ...so it is as close to parallel with the steering arm as possible when the servo in the neutral position Use a knife or drill bit to enlarge the hole in the servo arm so the linkage will fit and move s...

Страница 31: ...loop strap to keep it from falling out during flight Note When using our recommended Brushed Motor Power System you MUST use a separate BEC or receiver battery pack to power the radio gear if using m...

Страница 32: ...itch in the fuselage and plug the switch into the receiver Or you can choose not to use a switch and simply plug and unplug the receiver battery from the receiver directly before and after flight 3 In...

Страница 33: ...dder should also move right Reverse the direction of the servo at the transmitter if necessary 2 Check the movement of the ailerons using the transmitter When the stick is moved right the right ailero...

Страница 34: ...he radio should be charged the night before going out flying Before each flying session be sure to range check your radio See your radio manual for the recommended range and instructions for your radi...

Страница 35: ...be established in front of which all flying takes place with the other side for spectators Only personnel involved with flying the aircraft are allowed at or in front of the flight line Intentional fl...

Страница 36: ...9941 2007 Horizon Hobby Inc 4105 Fieldstone Road Champaign Illinois 61822 877 504 0233 horizonhobby com E fliteRC com...

Отзывы: