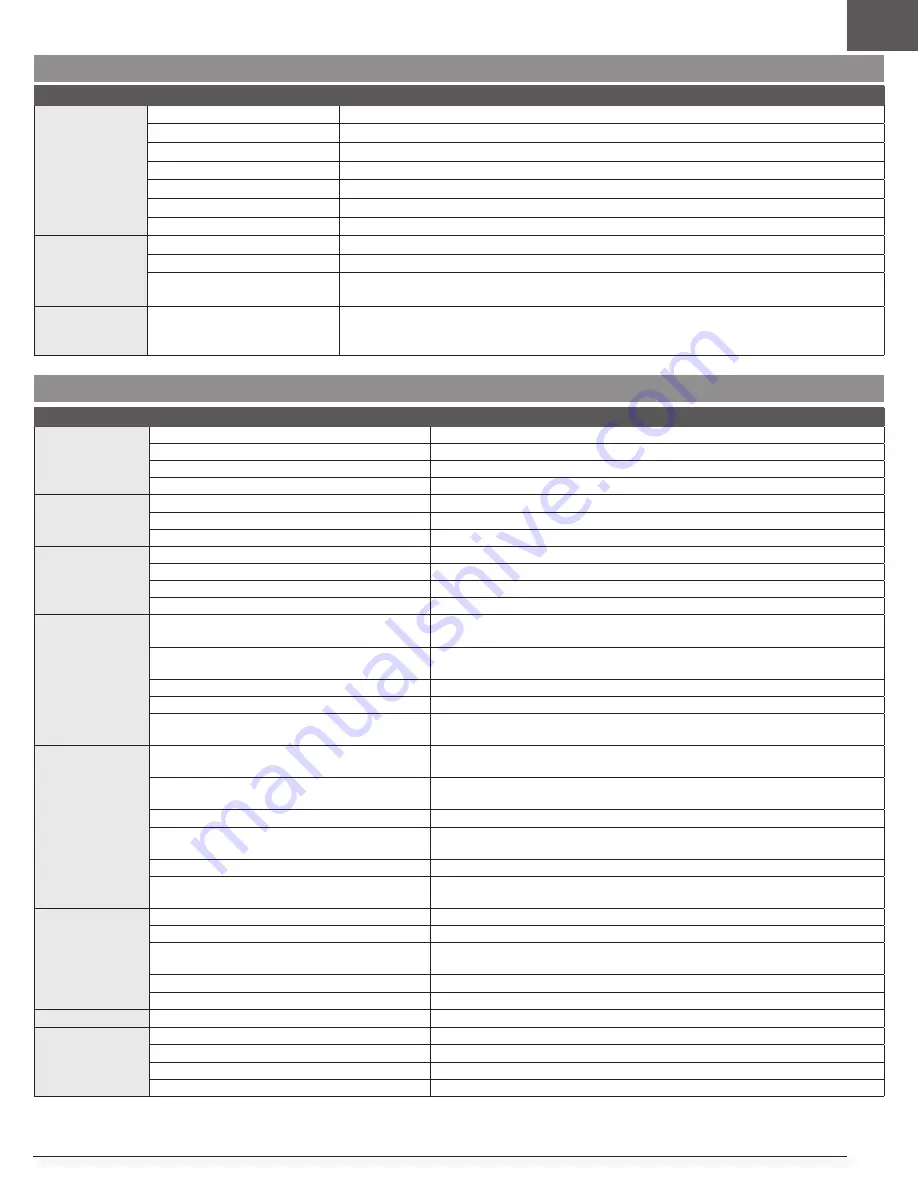
background image

EN

19

Problem

Possible Cause

Solution

Aircraft will not 

respond to throttle 

but responds to 

other controls

Throttle not at idle and/or throttle trim too high

Reset controls with throttle stick and throttle trim at lowest setting

Throttle servo travel is lower than 100%

Make sure throttle servo travel is 100% or greater

Throttle channel is reversed

Reverse throttle channel on transmitter

Motor disconnected from ESC

Make sure motor is connected to the ESC

Excessive impeller 

noise or Excessive 

vibration

Damaged impeller, nose cone, collet or motor

Replace damaged parts

Impeller is out of balance

Balance or replace impeller

Impeller nut is too loose

Tighten the impeller nut

Reduced flight 

time or aircraft 

underpowered

Flight battery charge is low

Completely recharge flight battery

Flight battery damaged

Replace flight battery and follow flight battery instructions

Flight conditions may be too cold

Make sure battery is not cold before use (Do not apply heat to the battery)

Battery capacity too low for flight conditions

Replace battery or use a larger capacity battery

Aircraft will not Bind 

(during binding) to 

transmitter

Transmitter too near aircraft during binding process

Move powered transmitter a few feet from aircraft, disconnect and reconnect flight 

battery to aircraft

Aircraft or transmitter is too close to large metal 

object, wireless source or another transmitter

Move aircraft and transmitter to another location and attempt binding again

The bind plug is not installed correctly in the bind port  Install bind plug in bind port and bind the aircraft to the transmitter
Flight battery/transmitter battery charge is too low

Replace/recharge batteries

Bind switch or button not held long enough during 

bind process

Power off transmitter and repeat bind process. Hold transmitter bind button or switch 

until receiver is bound

Aircraft will not 

connect (after 

binding) to 

transmitter

Transmitter too near aircraft during connecting 

process

Move powered transmitter a few feet from aircraft, disconnect and reconnect flight 

battery to aircraft

Aircraft or transmitter is too close to large metal 

object, wireless source or another transmitter

Move aircraft and transmitter to another location and attempt connecting again

Bind plug left installed in bind port

Rebind transmitter to the aircraft and remove the bind plug before cycling power

Aircraft bound to different model memory

(ModelMatchTM radios only)

Select correct model memory on transmitter

Flight battery/Transmitter battery charge is too low

Replace/recharge batteries

Transmitter may have been bound to a different 

aircraft using different DSM protocol

Bind aircraft to transmitter

Control surface does 

not move

Control surface, control horn, linkage or servo damage

Replace or repair damaged parts and adjust controls

Wire damaged or connections loose

Do a check of wires and connections, connect or replace as needed

Transmitter is not bound correctly or the incorrect 

airplanes was selected

Re-bind or select correct airplanes in transmitter

Flight battery charge is low

Fully recharge flight battery

BEC (Battery Elimination Circuit) of the ESC is damaged Replace ESC

Controls reversed

Transmitter settings are reversed

Perform the Control Direction Test and adjust the controls on transmitter appropriately

Motor power pulses 

then motor loses 

power

ESC uses default soft Low Voltage Cutoff (LVC)

Recharge flight battery or replace battery that is no longer performing

Weather conditions might be too cold

Postpone flight until weather is warmer

Battery is old, worn out, or damaged

Replace battery

Battery C rating might be too small

Use recommended battery

Troubleshooting Guide

Troubleshooting Guide AS3X

Problem

Possible Cause

Solution

Oscillation

Damaged rotor or nose cone

Replace rotor or nose cone

Imbalanced rotor 

Balance the rotor 

Motor vibration

Replace parts or correctly align fan unit or other parts and tighten fasteners as needed

Loose receiver

Align and secure receiver in fuselage

Loose aircraft controls

Tighten or otherwise secure parts (servo, arm, linkage, horn and control surface)

Worn parts

Replace worn parts (especially rotor, nose cone, or servo)

Irregular servo movement

Replace servo

Inconsistent flight 

performance

Trim is not at neutral

If you adjust trim more than 8 clicks, adjust the ball link to remove trim

Sub-Trim is not at neutral

No Sub-Trim is allowed. Adjust the servo linkage

Aircraft was not kept immobile for 5 

seconds after battery connection

With the throttle stick in lowest position. Disconnect battery, then reconnect battery and keep the aircraft 

still for 5 seconds

Incorrect response 

to the AS3X Control 

Direction Test

Incorrect direction settings in the 

receiver, which can cause a crash

DO NOT fly. Correct the direction settings (refer to the receiver manual), then fly

Содержание F-16 Falcon 80mm EDF

Страница 1: ...F 16 Falcon 80mm EDF Instruction Manual Bedienungsanleitung Manuel d utilisation Manuale di Istruzioni ...

Страница 2: ...nings in the manual prior to assembly setup or use in order to operate correctly and avoid damage or serious injury As the user of this product you are solely responsible for operating in a manner that does not endanger yourself and others or result in damage to the product or the property of others Always keep a safe distance in all directions around your model to avoid collisions or injury This ...

Страница 3: ...Surface Direction 15 Control Horn and Servo Arm Settings 15 Dual Rates and Control Throws 16 AS3X Control Response Test BNF Basic 16 In Flight Trimming BNF Basic 16 Flying Tips and Repairs 17 SAFE Select Flying Tips 17 Post Flight 18 Power System Installation and Service 18 Troubleshooting Guide AS3X 19 Troubleshooting Guide 19 Replacement Parts 20 Recommended Receivers ARF Plus 20 Optional Parts ...

Страница 4: ...ct mode and AS3X mode AS3X technology remains active with no banking limits or self leveling any time SAFE Select is disabled or OFF SAFE Select can be configured three ways SAFE Select Off Always in AS3X mode SAFE Select On with no switch assigned Always in SAFE Select mode SAFE Select On with a switch assigned Switch toggles between SAFE Select mode and AS3X mode 1 Remove and inspect contents 2 ...

Страница 5: ... the fuselage 2 Invert the fuselage and secure the stabilator rod in the fuselage with the included M3x10mm counter sunk machine screw B 2mm hex driver required Tighten the screw until the screw head reaches the countersink of the fuselage 3 Ensure the screw captures the groove on the stabilator rod 4 Insert the Z bend into the 3rd hole from the output shaft of the servo arm The pushrod should be ...

Страница 6: ...ion 1 Slide the short large diameter wing tube A into the front hole in the fuselage 2 Slide the long small diameter wing tube B into the rear hole in the fuselage 3 Slide each wing until it fully mates with the fuselage paying close attention to make sure the hands free connector aligns and engages 4 Secure the wing halves into position from the bottom using the four included M3x20mm counter sunk...

Страница 7: ...veled side is facing to the outside 2 Install the dummy missiles and drop tank stores according to the illustration below by inserting the mounting tabs into the mounting brackets on the wing 3 Slide each store backward to lock the tabs in place Disassemble in reverse order IMPORTANT The F 16 should always be flown with the wing tip missile rails A and B installed to protect the wing tips from dam...

Страница 8: ...cal Application Apply the included peel and stick decals to customize the aircraft as desired EN F 16 Falcon 80mm EDF 8 5 8 1 2 8 9 5 3 4 7 6 2 4 9 6 1 3 7 6 8 1 2 5 6 3 4 2 4 11 7 1 3 9 7 8 9 10 11 5 10 ...

Страница 9: ...EN 9 8 1 2 2 6 4 1 5 7 9 3 5 6 3 4 8 9 7 10 1 2 2 4 6 7 9 11 12 5 6 3 4 8 5 3 1 7 8 9 12 11 10 ...

Страница 10: ... servo lead found under the vertical fin 4 Apply contact cement E to the mating surface of the fuselage where the afterburner ring F will fit 5 Fit the ring to the fuselage 6 Reinstall the tailcone and the vertical fin 7 Unplug the ESC connector from the receiver and plug the ESC into a Y connector not included Plug the Afterburner Ring lead into the other Y connector and plug into the throttle ch...

Страница 11: ...act Channel to Reverse Set Aileron Expo to High Rate 10 Low Rate 5 Set Elevator Expo to High Rate 10 Low Rate 5 Set Rudder Expo to High Rate 10 Low Rate 5 DXe Refer to spektrumrc com for the appropriate download setup DX7S DX8 1 Go to the SYSTEM SETUP 2 Set MODEL TYPE AIRPLANE 3 Set WING TYPE 1 AIL DX6e DX6 Gen2 DX7 Gen2 DX8e DX8 Gen2 DX9 DX10t DX18 DX20 iX12 iX20 NX6 NX8 NX10 1 Go to the SYSTEM S...

Страница 12: ...ttery tray 4 Install the fully charged battery in the center of the battery compartment as shown Secure using the hook and loop straps 5 Connect the battery to the ESC If you have not completed the bind sequence do so at this time as outlined in this manual CAUTION Always keep hands away from the fan intake When armed the motor will turn the rotor in response to any throttle movement 6 Keep the ai...

Страница 13: ...ll the time or you can assign a switch to toggle between SAFE Select and AS3X modes Thanks to SAFE Select technology this aircraft can be configured for full time SAFE mode full time AS3X mode or mode selection can be assigned to a switch IMPORTANT Before binding read the transmitter setup section in this manual and complete the transmitter setup table to ensure your transmitter is properly progra...

Страница 14: ...9 on your transmitter Once assigned to a switch SAFE select ON gives you the flexibility to choose SAFE technology or AS3X mode while in flight If the aircraft is bound with SAFE select OFF the aircraft will be in AS3X mode exclusively IMPORTANT Before assigning your desired switch ensure that the travel for that channel is set at 100 in both directions and the aileron elevator rudder and throttle...

Страница 15: ...hould move up which will cause the aircraft to pitch up 4 Push the elevator stick forward The stabilators should move down which will cause the aircraft to pitch down Rudder 5 Move the rudder stick to the left The rudder and the nose wheel should move to the left which will cause the aircraft to yaw left 6 Move the rudder stick to the right The rudder and the nose wheel should move to the right wh...

Страница 16: ...ystem is active control surfaces may move rapidly This is normal AS3X remains active until the battery is disconnected During your first flight trim the aircraft for level flight Make small trim adjustments with your transmitter s trim switches to straighten the aircraft s flight path After adjusting the trim do not touch the control sticks for 3 seconds This allows the receiver to learn the corre...

Страница 17: ...ch LVC removes power supplied to the motor Power to the motor reduces showing that some battery power is reserved for flight control and safe landing Disconnect and remove the Li Po battery from the aircraft after use to prevent trickle discharge Charge your Li Po battery to about half capacity before storage During storage make sure the battery charge does not fall below 3V per cell LVC does not ...

Страница 18: ... lead to the aircraft receiver 1 Disconnect the flight battery from the ESC required for safety and battery life 2 Power OFF the transmitter 3 Remove the flight battery from the aircraft 4 Recharge the flight battery to storage voltage level 5 Repair or replace all damaged parts 6 Store the flight battery apart from the aircraft and monitor the battery charge 7 Make note of the flight conditions a...

Страница 19: ...to the aircraft and remove the bind plug before cycling power Aircraft bound to different model memory ModelMatchTM radios only Select correct model memory on transmitter Flight battery Transmitter battery charge is too low Replace recharge batteries Transmitter may have been bound to a different aircraft using different DSM protocol Bind aircraft to transmitter Control surface does not move Contr...

Страница 20: ...3g Digital Metal Gear SPMSA450R A450R Servo 13g Didgital Metal Gear Reverse SPMXAE1100A Avian 100 Amp Brushless Smart ESC 3S 6S 80mm EDF version SPMXAM1500 Motor 3280 2100kV BL Inrunner Part Description EFLA250 Park Flyer Tool Assortment 5 pc SPMXBC100 SMART Battery Checker and Servo Driver IC3 use SPMXCA507 DYN1405 Li Po Charge Protection Bag Large SPMR12000 iX12 12 Channel Transmitter Only SPMR6...

Страница 21: ...isuse no liability shall be assumed nor accepted for any resulting damage or injury By the act of use setup or assembly the user accepts all resulting liability If you as the purchaser or user are not prepared to accept the liability associated with the use of the Product purchaser is advised to return the Product immediately in new and unused condition to the place of purchase Law These terms are...

Страница 22: ... television reception which can be determined by turning the equipment off and on the user is encouraged to try to correct the interference by one or more of the following measures Reorient or relocate the receiving antenna Increase the separation between the equipment and receiver Connect the equipment into an outlet on a circuit different from that to which the receiver is connected Consult the ...

Страница 23: ...emarks or registered trademarks of Horizon Hobby LLC The Spektrum trademark is used with permission of Bachmann Industries Inc All other trademarks service marks and logos are property of their respective owners US 9 056 667 US 8 672 726 US 9 753 457 US 10 078 329 US 9 930 567 US 10 419 970 US 10 849 013 https www horizonhobby com Created 3 21 51047 EFL87850 EFL87870 ...

Отзывы: