‐
37
‐
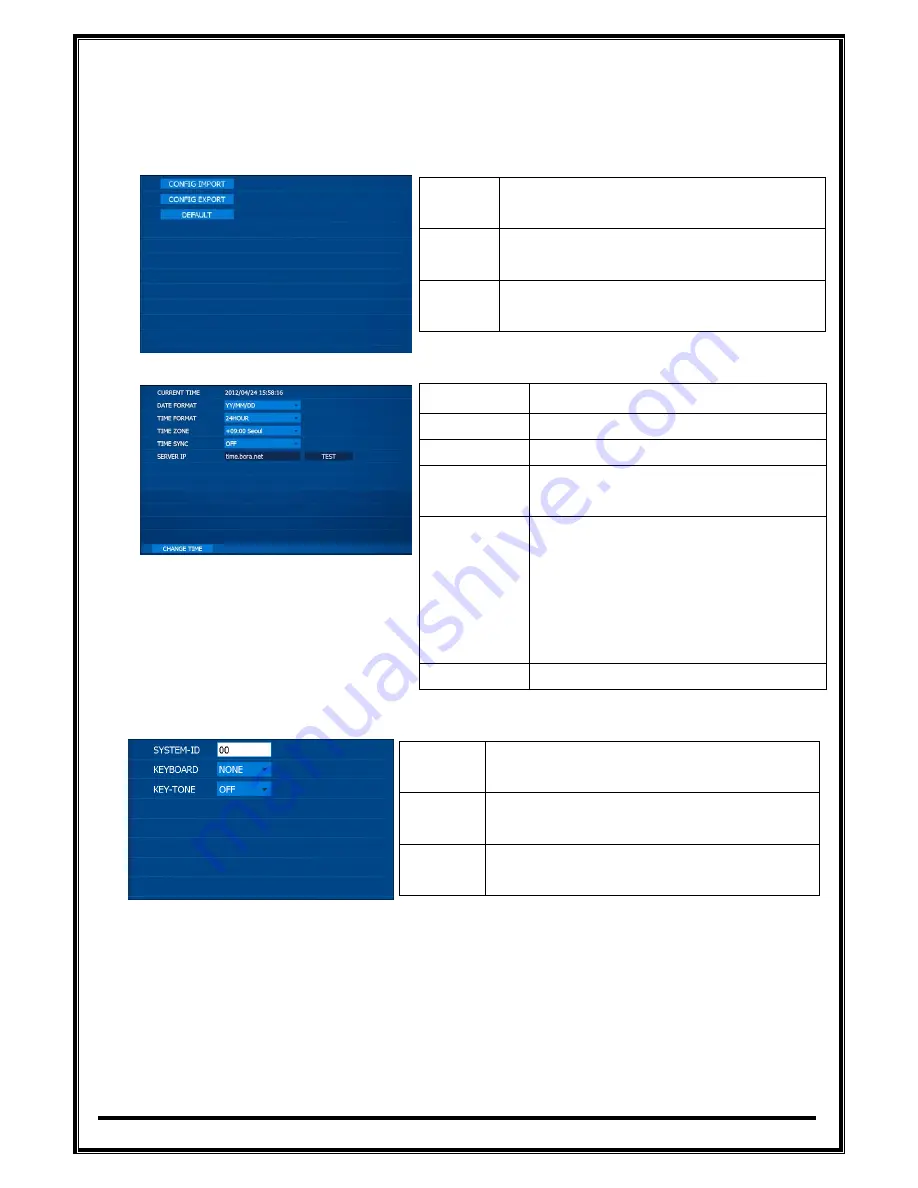
4.2.7.1.
CONFIG
System
setting
values
from
one
DVR
can
be
copied
to
others.
Insert
USB
device
into
USB
port
of
DVR
to
import
(load)
or
export
(save)
the
setting
values.
CONFIG
IMPORT
&
CONFIG
EXPORT
can
be
used
to
make
several
DVRs
to
have
the
same
setting
values.
CONFIG
IMPORT
Load
the
saved
configuration
file
from
USB
device.
CONFIG
EXPORT
Save
the
configuration
file
to
USB
device
to
copy
it
to
another
DVR
DEFAULT
Change
all
configuration
values
back
to
factory
default.
4.2.7.2.
TIME
DATE
FORMAT
Select
date
format
:
YY/MM/DD,MM/DD/YY
TIME
FORMAT
24HOURS
or
AM/PM
TIME
ZONE
Select
time
zone
of
your
location
TIME
SYNC
System
time
will
be
synchronized
with
selected
time
server
if
it
is
turned
ON.
SERVER
IP
Input
IP
or
domain
name
of
time
server.
Click
TEST
if
connection
with
server
is
OK.
DVR
checks
time
server
for
correct
time
every
1
hour.
Ex)
time.bora.net
(
http://
is
no
needed)
CHANGE
TIME
Change
time
manually
4.2.7.3.
INPUT
DEVICE
SYSTEM
‐
ID
Input
the
number
that
you
want
to
register
in
this
DVR.
KEYBOARD
DVR
system
can
be
connected
with
control
keyboard.
KEY
‐
TONE
Beep
whenever
button
is
pressed
if
ON
is
selected.
How
to
set
up
System
‐
ID
status
System
‐
ID
status
shows
whether
the
system
will
accept
key
from
remote
‐
control
or
not.
SYSTEM
‐
ID
is
used
when
user
operates
several
systems
with
one
remote
control.
SYSTEM
‐
ID
will
be
displayed
when
SYSTEM
‐
ID
is
other
than
0(zero).
By
using
DVR
‐
ID
button
of
remote
control,
remote
control
can
be
matched
to
SYSTEM
‐
ID,
or
if
SYSTEM
‐
ID
is
00,
system
‐
ID
is
not
displayed
and
system
accept
key
from
remote
control.
Содержание EOS960H
Страница 1: ...EOS960H DVR USER s MANUAL RoHS Version20140620 ...
Страница 6: ... 6 1 Introduction ...
Страница 10: ... 10 2 Installation ...
Страница 14: ... 14 3 How to start DVR ...
Страница 20: ... 20 4 MENU ...


