


7
For example, if you repeatedly press the letter
a
,
you will see
a à á â ã ä å
and so on through all the
variations available. The order in which the
character variations appear depends on the
language you have selected to use.
Saving your Label
You can save up to eight labels in memory.
To save a label
1. Type your label text.
2. Press
to display the memory locations.
Each memory location is represented by a box.
Memory locations that contain a stored label are
filled and when the cursor is positioned over a
location, the contents are displayed.
3. Use the arrow keys to select an empty location.
4. Press to save the label.
Recalling the Label from Memory
Once a label is saved to memory, you can recall
the label to print or edit.
To recall a label from memory
1. Press
. The memory locations are
displayed.
2. Use the arrow keys to move to the memory
location that contains the label you want and
press .
Deleting a Label from Memory
When you no longer need a stored label, you can
delete it from memory.
To delete a label from memory
1. Press
. The memory locations are
displayed.
2. Use the arrow keys to move to the memory
location that contains the label you want.
3. Press +
and then press to clear the
memory location.
Using the Hot Keys
You can create labels for specific applications
using hot keys. Hot keys are available for wrap-
around, fixed, patch panel, terminal block, and
barcode labels. See Figure 10.
Figure 10
Printing Wrap-Around Labels
You can create labels that
wrap around
a cable or
wire. The text is placed vertically or horizontally
along the width of the cable and repeated so that
you can read the label from any angle.
You can select from a number of different wire
gauges or cable lengths. Figure 11 for shows the
menu selections available.
Figure 11
To print vertical wire wraps
1. Enter the text for the label.
2. Press .
3. Select the desired wire gauge
or cable size, and press .
4. Press .
To print horizontal wire wraps
1. Enter the text for the label.
2. Press +
.
3. Press .
SAVE
RECALL
RECALL
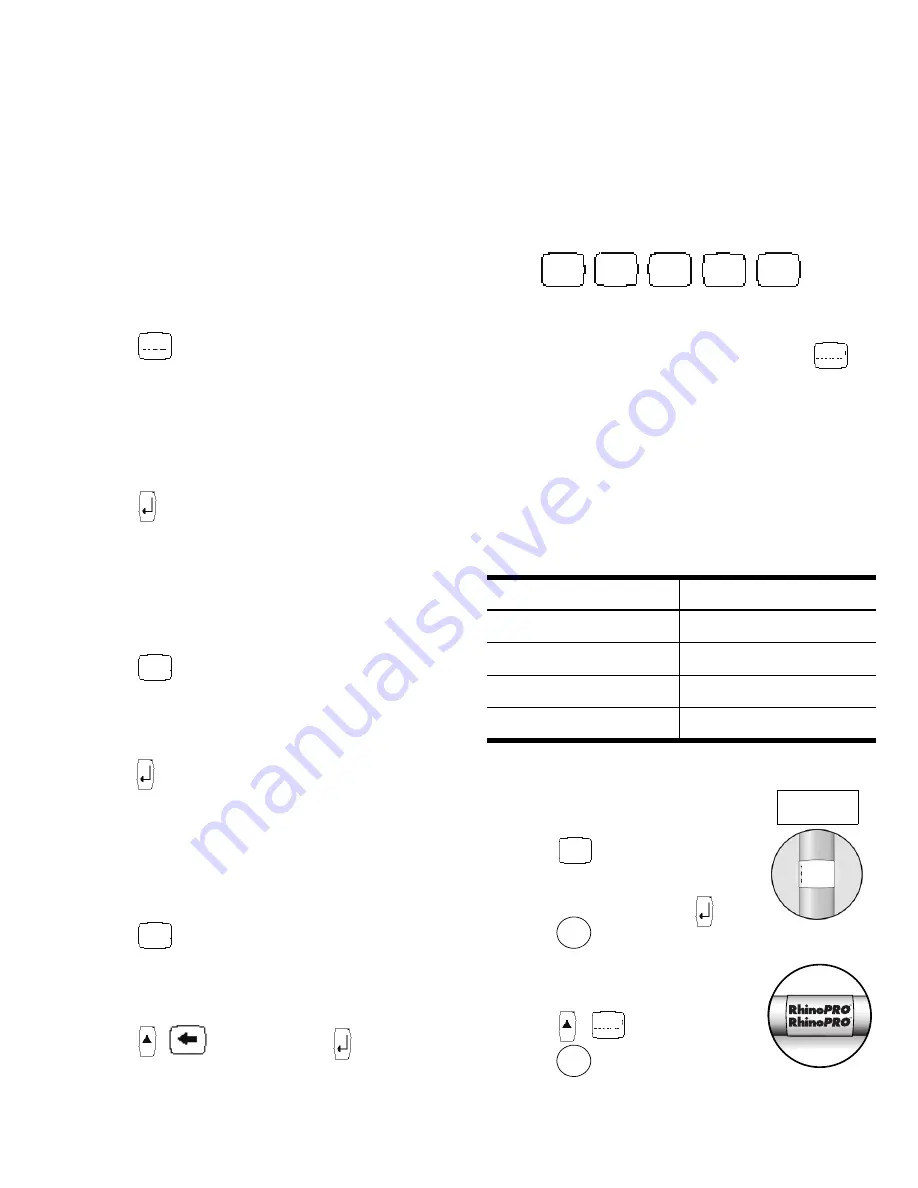
CAT X/COAX
1/0-4/0 AWG
22-16 AWG
CABLE 3.0”
14-10 AWG (Default)
CABLE 4.0”
8-4 AWG
CABLE 5.0”
3-1 AWG
CABLE 6.0”
WRAP
FIXED
PPANEL TBLOCK
VERT
BCODE
WRAP
Figure 12
123
123
123
123
12
3
12
3
12
3
WRAP
Figure 13
WRAP
Содержание RhinoPRO 5000
Страница 1: ...www rhinolabeling com UserGuide Page3 GuideD Utilisation Page13 ...
Страница 12: ...12 ...


