background image

10

To print multiple copies of the same serialized 

label, choose  +

 and enter the number of 

copies of each label to print. See 

Printing Multiple 

Copies

 on page 9.

Adjusting Print Quality (Advanced)

Depending on the label material you choose, you 
may need to lighten or darken the print on the label. 
Adjusting the print head temperature allows you to 
control the print quality (+/- 20).

To set the print head temperature

1. Press +

.

2. Use the arrow keys to select the print head 

temperature


and press  .

3. Repeat as necessary until you are satisfied with 

the print quality.

Cleaning Your Printer

Your printer is designed to give you long and 
trouble-free service, while requiring very little 
maintenance. 
Clean your printer from time to time to keep it 
working properly. Clean the cutter blade each time 
you replace the tape cassette.

To clean the cutter blade

1. Remove the tape cassette.
2. Press and hold down the cutter lever to expose 

the cutter blade.

3. Use a cotton ball and alcohol to clean both sides 

of the blade.

4. Release the cutter lever.

To clean the print head



Clean the print head using the cleaning tool 
located inside the tape compartment lid.

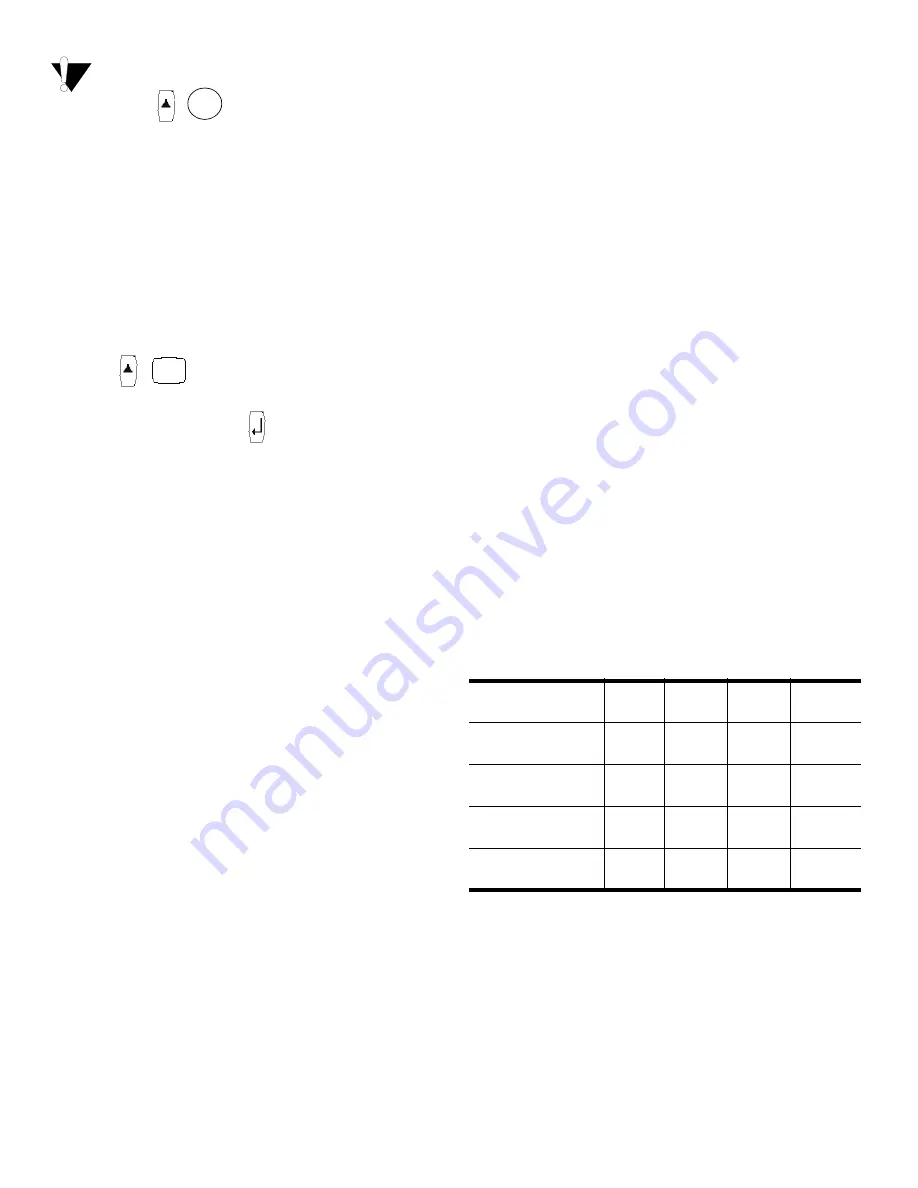
RhinoPRO Label Cassettes

The following industrial label cassettes are 
available for the RhinoPRO 5000 printer.

Print

SAVE

Material Type

3/8” 

(9 mm)

1/2” 

(12 mm)

3/4” 

(19 mm)

Length

Flexible Nylon 

White

18488

18489

11.5’ 

(3.5 m)

Flexible Nylon 

Yellow

18490

18491

11.5’

(3.5 m)

Permanent Polyester 

White

18482

18483

18484

18.0’ 

(5.5 m)

Permanent Polyester 

Metallic

18485

18486

18487

18.0’ 

(5.5 m)

Содержание RhinoPRO 5000

Страница 1: ...www rhinolabeling com UserGuide Page3 GuideD Utilisation Page13 ...

Страница 2: ... Shift Enter OK Space Bar Symbol Key Function Keys Alpha Keys Numeric Keys Backspace Clear All Power Button Escape Backlight Tape Exit AC Power Connector LCD Display Symbol Keys Hot Keys Thumb Latch for Tape Compartment Thumb Latch for Battery Compartment Cutter Lever ...

Страница 3: ...ly The printer can operate on AC or battery power To save power the printer will automatically turn off after five minutes of inactivity Inserting the Batteries The printer uses six AA batteries To insert the batteries 1 Press the thumb latch on the bottom of the labelmaker to open the battery compartment door See Figure 1 Figure 1 2 Insert the batteries following the polarity markings and 3 Close...

Страница 4: ...d between the print head and pinch roller See Figure 4 Figure 4 5 Press firmly until cassette clicks into place Make sure tape and ribbon are positioned correctly 6 Close the tape cassette door and press to turn on the power Selecting a Language Several language related features on the printer are determined by the language setting such as availability of special characters units of measure menu t...

Страница 5: ...ure is selected See Figure 6 Figure 6 Backlighting When the printer is used in a low light environment the display may become difficult to read The backlighting feature will light the display Press to turn backlighting on and off CAPS Mode The key toggles capitalization on and off When CAPS mode is turned on the CAPS indicator is shown on the display and all letters that you enter will be capitali...

Страница 6: ... for the first line and press 2 Type the text for the next line 3 Repeat these steps for each additional line Adding Symbols The printer supports the extended symbol set as shown in Figure 8 Figure 8 To add a symbol 1 Press The first row of symbols shown in Figure 8 is displayed 2 Use the arrow keys to move to the desired symbol Use and to move horizontally along a row of symbols Use and to scroll...

Страница 7: ...lete a label from memory 1 Press The memory locations are displayed 2 Use the arrow keys to move to the memory location that contains the label you want 3 Press and then press to clear the memory location Using the Hot Keys You can create labels for specific applications using hot keys Hot keys are available for wrap around fixed patch panel terminal block and barcode labels See Figure 10 Figure 1...

Страница 8: ...lt is a long label with multiple evenly spaced text for each port See Figure 14 Figure 14 To print a patch panel label 1 Enter the text for the first position on the label 2 Press 3 Enter the distance between each label and press The default is 0 5 12 mm and the value can be set in increments of 0 5 12 mm up to 20 480 mm 4 Follow the directions in Serializing Your Labels on page 9 to serialize the...

Страница 9: ...in printing between each label for more complex formats When printing is finished the number of copies to print returns to 2 Advancing the Label Tape The default leader space for all labels is approximately 5 16 10 mm To add additional blank space to the beginning or end of your label you can feed the tape in 0 25 6 mm increments Press Serializing Your Labels You can print serialized labels numeri...

Страница 10: ...iring very little maintenance Clean your printer from time to time to keep it working properly Clean the cutter blade each time you replace the tape cassette To clean the cutter blade 1 Remove the tape cassette 2 Press and hold down the cutter lever to expose the cutter blade 3 Use a cotton ball and alcohol to clean both sides of the blade 4 Release the cutter lever To clean the print head Clean t...

Страница 11: ...echnical question please contact Customer Support Problem Error Message Solution No display Ensure the printer is turned on Replace discharged batteries Poor Print Quality Replace discharged batteries Ensure tape cassette is installed properly Clean the print head Replace the tape cassette Poor Cutter Performance Clean the cutter blade See Cleaning Your Printer printer is jammed Remove cassette to...

Страница 12: ...12 ...

Отзывы: