background image

11

About the Built-In Software

The built-in software resides on the label maker. You do not need to install additional software or drivers to use the label maker 
with your computer.

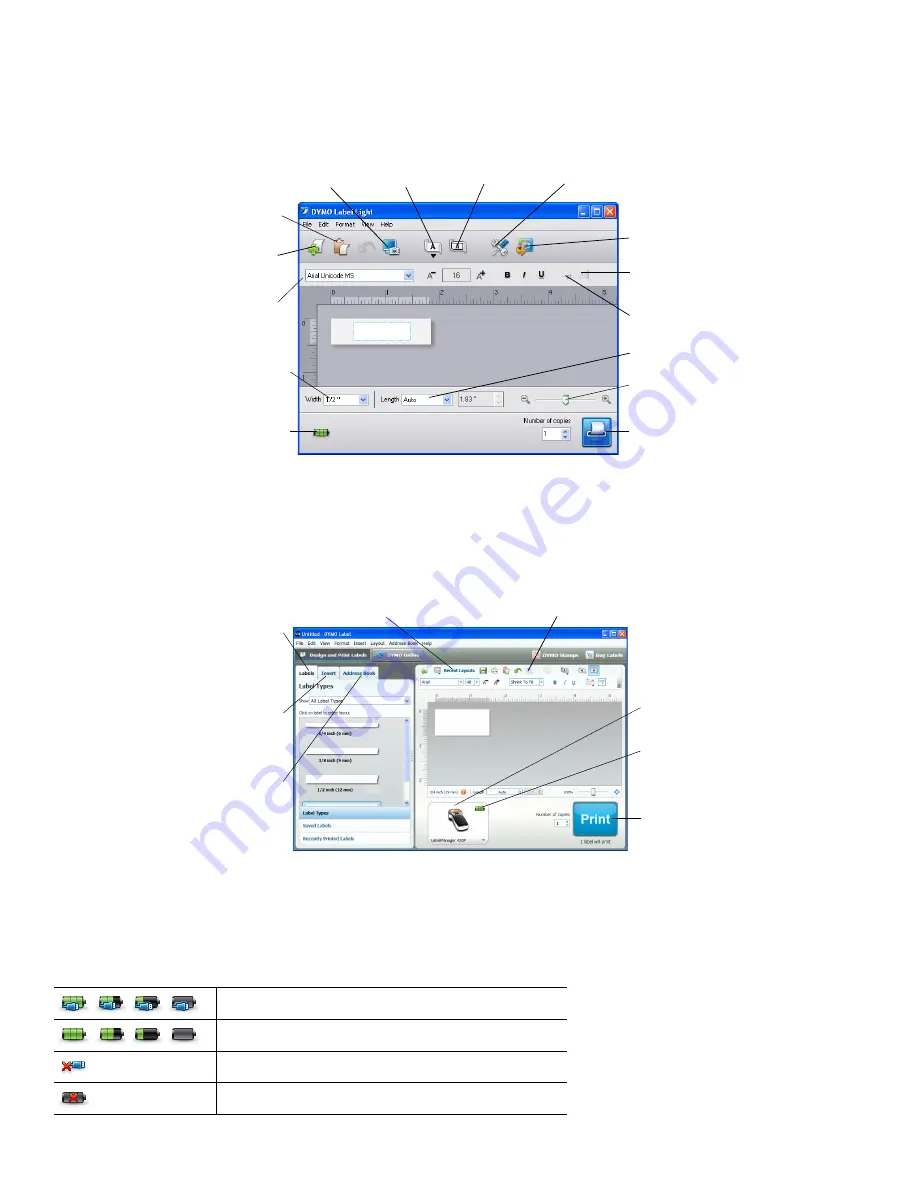
The following figure shows some of the features available in the software.

Refer to the 

LabelManager 420P Quick Start Guide

 for information about starting and using the built-in software.

About the DYMO Label™ v.8 Software

To take advantage of more advanced formatting features, download and install DYMO Label™ v.8 software from the DYMO 
Web site at 

www.dymo.com

.

The following figure shows some of the major features available in DYMO Label v.8.

For complete details on installing and using the DYMO Label v.8 software, refer to the 

LabelManager 420P Quick Start Guide


and the DYMO Label online Help.

Label Maker Status

The label maker status is displayed in the software window. The following table describes the possible states of the 
label maker.


Label maker is connected and battery is charging


Label maker is connected and battery is not charging

Label maker is not connected or is turned off

Label maker is connected and there is a problem with the battery

Insert text you’ve

copied to the

Clipboard.

Format your label

as you would in

any text editor.

Create a

new label.

Match the label

width to the label

cassette in the

label maker.

Start advanced 
DYMO Label v.8 
software.

Rotate images 90 
degrees.

Choose to print 

a horizontal or 
vertical label.

Add a border 
around the label.

Choose a fixed length for the 
label or make the label resize 
automatically to fit the text.

Crop an image 
added to the label.

Change the language 
settings (Windows only) 
or units of measure.

Capture an area of 

the screen and insert 
on your label.

View the status of

the label maker.

Print a label.

Zoom the label.

Insert text,

addresses,

images,

shapes, lines,

barcodes,

dates, and

counters.

Apply a layout to 
a label.

Store your

favorite

addresses or

other data in the

Address Book;

automatically

insert the data

on your label.

Visually

choose your

label type and

apply layouts.

Print a label.

Capture an area of the screen 
and insert on your label.

View the 
status of the 
label maker.

Select a label 
maker to print 
your labels.

Содержание LabelManager 420P

Страница 1: ...LabelManager 420P User Guide...

Страница 2: ...ave 11 Caps 19 Cancel 4 Settings 12 Numeric keys 20 Navigation 5 Symbols 13 Insert 21 OK 6 Shift 14 Font Size 22 Open 7 Backspace 15 New label Clear 8 Return 16 On Off Shift Insert 1 2 3 4 8 9 10 11 1...

Страница 3: ...ti Line Labels 7 Using Clip Art Symbols and Special Characters 8 Adding Clip Art 8 Adding Symbols 8 Adding International Characters 9 Using the Date Time Stamp 9 Setting the Date and Time 9 Setting th...

Страница 4: ...echarging the battery pack Use only the charging adapter that came with the label maker The charging adapter is only used for recharging the battery pack the charging adapter cannot be used to power t...

Страница 5: ...me or saved text on your label These features are described later in this User Guide Settings The key displays the language label width and date time submenus CAPS Mode The key toggles capitalization...

Страница 6: ...a label Use the left and right navigation keys to select the font size You can also quickly access the Font Size menu using the Font Size shortcut key Font Styles You can choose from 12 different font...

Страница 7: ...t and right navigation keys to select the text alignment Creating Fixed Length Labels Normally the length of the label is determined by the length of the text However you can choose to set the length...

Страница 8: ...and right navigation keys to select the desired clip art 3 When you locate the clip art press to add the clip art to your label Adding Symbols The label maker supports the extended symbol set shown b...

Страница 9: ...can insert the current date and time on your label Optionally you can add text before and after the date and time To add the date time stamp Press select Date Time and then press The date time stamp i...

Страница 10: ...Position the cursor at the location in the label where you want to insert the text 2 Press select Saved Text and press The first memory location is displayed 3 Use the navigation keys to select the te...

Страница 11: ...aker is connected and battery is not charging Label maker is not connected or is turned off Label maker is connected and there is a problem with the battery Insert text you ve copied to the Clipboard...

Страница 12: ...you should use these systems If you need more information on the collection reuse and recycling of this product please contact your local or regional waste administration You can also contact DYMO fo...

Отзывы: