background image

BlueWave® QX4® User Guide 


18 

Irradiation 

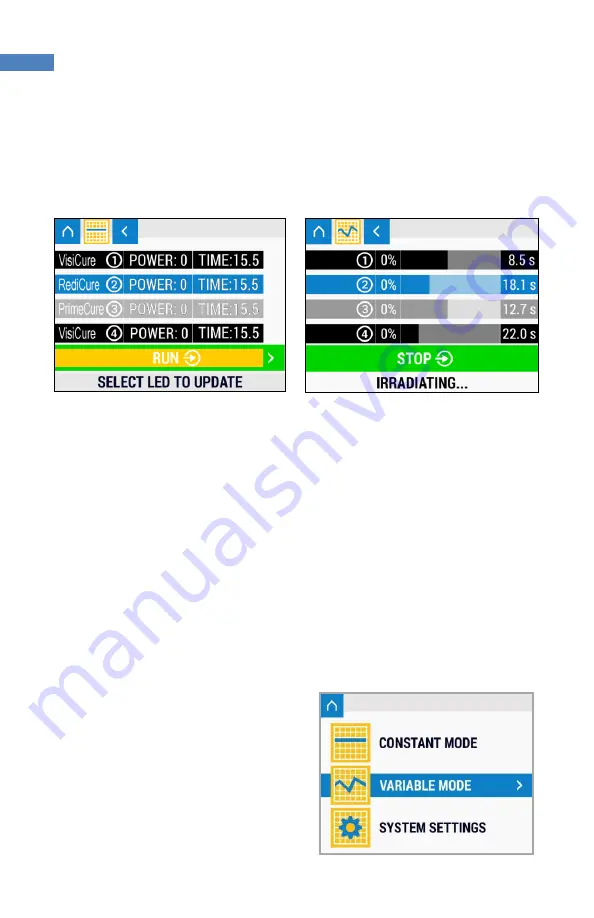
Once all of the LED heads have been configured, navigate to the RUN option. Press the 
run button to start irradiation. 

Figure 14. Select Run Row 


Figure 15. Screen During Irradiation 


During irradiation, the time will count down to indicate the time remaining on the 
current curing session.  Press the run button during an irradiation cycle to stop the 
irradiation and reset the cycle.  The Footswitch can also be used instead of pressing the 
run button.  

An indicator light will show on the bottom of the front display to show which heads are 
active during the irradiation cycle. A green light shows that the head is active with no 
faults. An orange indicator light shows that the corresponding head has reached the 
user-set temperature-warning threshold. The head will continue to function as normal 
until it reaches a critical temperature condition. 

Variable Mode 

Variable mode allows the user to set 
different power profiles in a given time 
frame for each head. Up to seven 
different programs can be stored into 
the unit.  

To enter variable mode, navigate using 
the up/down buttons, then press right 
button to enter. 

Figure 16. Select Variable Mode 


Содержание BluWave QX4

Страница 1: ...BlueWave QX4 User Guide Multi Head LED Spot Curing System Instructions for Safe Use Setup and Operation Maintenance Ordering Spare Parts and Accessories ...

Страница 2: ...speed of automated assembly allow for 100 in line inspection and increase throughput System designs enable stand alone configuration or integration into your existing assembly line Please note that most dispensing and curing system applications are unique Dymax does not warrant the fitness of the product for the intended application Any warranty applicable to the product its application and use is...

Страница 3: ...enefits of the BlueWave QX4 System 9 Validation 9 Front Control Panel 10 Back Panel 12 Unpacking 13 Parts Included 13 System Setup 13 System Connections 13 LED Heads Lenses 14 Constant Mode 16 Variable Mode 18 PLC Operation 22 4 Channel Mode 25 Controller Set Up 25 I O Connection 25 System Settings 29 Intensity Control Feature 31 Cleaning Maintenance 31 LED Head Optic Lens 31 Error Codes Troublesh...

Страница 4: ...email Dymax at info dymax com Contact information for additional Dymax locations can be found on the back cover of this user guide Additional resources are available to ensure a trouble free experience with our products Detailed product information on www dymax com Dymax adhesive product data sheets PDS on our website Material safety data sheets SDS provided with shipments of Dymax adhesives Safet...

Страница 5: ...uring systems as described below WARNINGS Looking directly at the high intensity light emitted by the heads of the BlueWave QX4 can result in eye injury To prevent eye injury never look directly at the end of the high intensity head and always wear protective goggles To avoid accidental exposure always point the LED head away and at the curing substrate Removing the cover from the BlueWave QX4 con...

Страница 6: ...pretation of the TLV over the UVA range for workers eyes and skin allows continuous exposure up to 1 mW cm2 intensity Unless you are placing bare hands into the curing area it is unusual to exceed these limits To put 1 mW cm2 limit into perspective a cloudless summer day will typically exceed 3 mW cm2 of UVA light and also include the more dangerous UVB light primarily responsible for sun tans sun...

Страница 7: ...be used to quickly create workstation shielding This UV blocking flexible urethane film is available from Dymax call for assistance High Temperature Surfaces Surfaces exposed to high intensity curing lights may rise in temperature The intensity distance exposure time cooling fans and composition of the surface can all affect the rise in surface temperature In some cases exposed surfaces can reach ...

Страница 8: ...ny combination and can be operated in constant or variable mode The system s LED heads can be used as hand held units or integrated into an automated manufacturing system allowing for maximum application flexibility Their output intensity levels can also be adjusted from 10 to 100 to meet process and adhesive requirements The BlueWave QX4 is rated for continuous operation However if the internal t...

Страница 9: ...changeable Replaceable focusing lenses in 3 5 and 8 mm diameters Allows tailoring of the unit to your curing requirements Instant on off No warm up period More energy efficient Efficient LED head temperature management Maximized continuous operation without overheating Comfortable hand held operating temperature Temperature monitoring assures maximum LED life PLC interface with 4 channel mode Easi...

Страница 10: ...nance Front Control Panel Front Control Panel Display Displays the currently selected menu Up Button Navigates the selector up one position It is also used to increase the selection value Down Button Navigates the selector down one position It is also used to decrease the selection value Right Button Selects the highlighted option and advances the screen to the next menu Left Button Navigates to t...

Страница 11: ...BlueWave QX4 User Guide 11 Figure 3 Front Control Panel Front Control Panel Display LED Head Indicators Run Button ...

Страница 12: ...ring cycle A second press will terminate a timed cure cycle immediately PLC Connector Terminals Connection points for an interface with a user supplied PLC for remote operation RS232 The RS232 port is a Dymax applicable troubleshooting port No user functionality is available at this time LED Head Connectors Connection points for up to four LED heads Each connector corresponds to an available chann...

Страница 13: ...h Safety Glasses BlueWave QX4 User Guide LED Heads LED Head Assembly Accessory Focusing Lenses Extra connection cable extensions can be ordered as accessories System Setup System Connections Power Cable Connection Attach the Power Cord to the Power Cord Receptacle located on the unit s back panel Figure 4 Press the Power Cord firmly into the receptacle until it clicks and locks into place The unit...

Страница 14: ...ram selection bits determine which program mode the unit will operate in See the PLC operation Section for more details When the PLC sense connection has a low signal the Front Screen will display the PLC connection and will lock out the buttons on the Front Control Display A low signal on the interlock connection will lock out the unit LED Heads Lenses The BlueWave QX4 led heads are available in ...

Страница 15: ...oved by unscrewing from the handle however removing the collimating lens is not recommended Error Reference source not found Fixturing If fixturing the LED head do not cover the cooling fins or overheating can result We suggest clamping on the flat portion of the handle Figure 8 Fixturing Recommendations Do Not Cover Cooling Fins Attach Fixture to the Flat Section of the Handle ...

Страница 16: ... The system is now ready for use Upon startup of the unit the main menu screen should appear in the display The main menu displays the two working modes of the unit as well as the system settings Hold down the left button for longer than one second to bring the display back to the main menu page Figure 9 Main Menu Screen Constant Mode Constant mode allows the user to configure each head at a prede...

Страница 17: ...he power press the run button Figure 13 The number will start blinking Use the up and down buttons to modify the value Press the run button again to set The power can be set from a value of 10 100 at 1 increments To edit the time navigate to it using the Down button Press the run button Figure 13 to edit Use the up and down buttons to change the value then press the run button again to set The max...

Страница 18: ...n indicator light will show on the bottom of the front display to show which heads are active during the irradiation cycle A green light shows that the head is active with no faults An orange indicator light shows that the corresponding head has reached the user set temperature warning threshold The head will continue to function as normal until it reaches a critical temperature condition Variable...

Страница 19: ...the LED Heads in the given program To edit the configuration of an LED Head navigate using the up and down buttons then press the right button to edit Any LED Head that is not connected will be grayed out on the display The user can still select and program any grayed out rows but the unit will not run the program for the disconnected LED Head On the edit menu Figure 19 the user will see the numbe...

Страница 20: ...n button to set Use the up and down buttons to set the time then press the run button to set The user can set an off step by entering 0 into the power field and setting a time period Adding an off step to the last step in a cycle allows the user to set a cool down time or an off period for a precise amount of time in between cycles Press the left button to go back to the previous menu Once the ste...

Страница 21: ...ession Pressing the center run button during the irradiation cycle will stop the irradiation The Footswitch can also be used instead of pressing the center run button An Indicator Light will show on the bottom of the front panel to show which LED Heads are active during the irradiation cycle A green light shows that the LED Head is active with no faults An orange indicator light shows that the cor...

Страница 22: ...bringing the PLC sense input to a logic 0V This will lock out the front control panel and will prevent the user from entering any commands using the front buttons Programs and run modes must be adjusted prior to entering PLC mode Figure 25 PLC Mode Screen Figure 26 PLC Inputs Outputs ...

Страница 23: ... panel displays lock screen Front panel will be locked All wands will be shut off All wants will be disabled All LED heads will function normally EXPOSURE 1 4 Timed Mode LED head n will start its program LED head n must complete its program before another assertion will be recognized LED head n ready for next assertion EXPOSURE 1 4 Manual Mode LED head n will turn on LED head n will turn off EXPOS...

Страница 24: ...ing screen will be displayed Front panel will be locked All LED heads will be turned off All LED heads will be disabled No LED heads or the controller are in alarm INTERLOCK STATUS INTERLOCK Input is asserted INTERLOCK Input is de asserted GND Reference Ground Pin INTENSITY 1 4 Active Wand PWM type signal from 0 to 100 duty cycle in 100 hz or 1 Khz Inactive Wand Output will be inactive Table 1 Pro...

Страница 25: ...need to have power set to the desired level and the time set to zero Figure 27 PLC Mode Screen Once all applicable LED Head channel programming has been completed the PLC control can be activated PLC operation mode is entered by bringing the PLC sense input to a logic 0V This will lock out the Front Control Panel and will inhibit any Front Panel or Footswitch activity Programs and run modes must b...

Страница 26: ...rent exposure cycle time is completed All Channel Exposure Control ALL Start Pulling the ALL Pin to LOW 0 for 10 mS or more will start irradiation on all LED Heads They will run in accordance with the profiles configured on Channels 1 2 3 and 4 Channels programmed to zero exposure time will activate for the duration that the ALL Pin is kept at LOW Pulling the ALL Pin to LOW 0 for 10 ms or more wil...

Страница 27: ...urns ON and stays ON until time expires If asserted a second time before all channel finish their sequence any channels in which time has expired will re start however any channel that still has time remaining will run for the balance of that remaining time and not restart its timer Example Setup The following is an example of how to set up the BlueWave QX4 LED Head Controls to operate individuall...

Страница 28: ...ly 10 mA 5 Channels that have a preset time will timeout and then stop Individual channels that have time set to zero will only activate if the connection to the GND is applied The channels that have time set to zero will not activate when using the ALL pin Throughout any exposure cycles all channels will remain independent of each other so they can be activated in any sequence or order ...

Страница 29: ... then press the center button to set Sound Settings To modify the sounds configuration navigate to the second row on the settings adjustment screen then press right button to enter The user can modify the beep volume sound made on button presses and alarm volume sound made when an error occurs To edit these values press the right button then use the up down buttons to adjust the value Press the ce...

Страница 30: ...or light will come on The head will continue to operate normally during the warning The LED Head will automatically shut off if it reaches an internal critical temperature point of 90 C Select the head from the list using up down buttons Press run button to edit Adjust the temperature in Celsius using the up down buttons Press center button to set Figure 35 Setting Adjustment Screen Figure 36 Temp...

Страница 31: ...ing validation and operation Cleaning Maintenance LED Head Optic Lens Based on the cleanliness of your operating environment establish a schedule for cleaning the LED head lenses When cleaning is required shut the unit down and allow it to cool When cool clean the surfaces of the lenses with a clean lint free cloth and isopropyl alcohol NOTE Never soak the lenses in isopropyl alcohol Damage could ...

Страница 32: ... 32 the screen and remain until the wand has cooled to a safe operating temperature The operator must then clear the warning screen before operation can resume Figure 37 Cool Down Screen Figure 38 Temperature Recovered Screen ...

Страница 33: ...e the cycle count is set to 0 Adjust the cycle count to the desired number LED head is not connected to the correct port channel Verify that the head is connected to the desired port channel BlueWave QX4 is operating normally and the head suddenly stops producing light Over temperature shutdown was triggered Check if the front panel over temperature indicator is red If so allow the head to cool an...

Страница 34: ...t 40505 LED Heads 1 5 meter VisiCure 43161 PrimeCure 43162 RediCure 43163 Lens Focusing ø3 mm Spot 43164 ø5 mm Spot 43165 ø8 mm Spot 43166 Extension Cables Connection Cable 0 5 M Extension 41563 Connection Cable 1 0 M Extension 41564 Connection Cable 1 5 M Extension 41565 Connection Cable 2 0 M Extension 41566 Power Cords Power Cord North America 41548 Power Cord China 41549 Key System Components ...

Страница 35: ...panel or PLC Cooling Natural convection Controller Dimensions 3 5 x 5 5 x 5 6 9 0 cm x 14 1 cm x 13 7 cm W x D x H LED Head Dimensions See Figure 40 Weight Controller 2 3 lbs 1 03 kg Head 0 2 lbs 0 08 kg Unit Warranty 1 year from purchase date Operating Environment 5 40 C 41 104 F non condensing Recommended Accessories 40505 ACCU CAL 50 LED Radiometer Measured with 3 mm lens using Dymax ACCU CAL 5...

Страница 36: ...BlueWave QX4 User Guide 36 Figure 40 Dimensions LED Heads Figure 41 Dimensions Controller ...

Страница 37: ...nt may void your warranty benefits The use of aftermarket replacement parts not supplied or approved by Dymax Corporation will void any effective warranties and may result in damage to the equipment IMPORTANT NOTE DYMAX CORPORATION RESERVES THE RIGHT TO INVALIDATE ANY WARRANTIES EXPRESSED OR IMPLIED DUE TO ANY REPAIRS PERFORMED OR ATTEMPTED ON DYMAX EQUIPMENT WITHOUT WRITTEN AUTHORIZATION FROM DYM...

Страница 38: ...ontrols 10 Help 4 Intensity Control Feature 31 LED Heads 14 Lens Cleaning 31 Operation 16 Optional Equipment 34 Parts Included 13 Parts List 13 PLC 22 Product Overview 8 Safety 4 Safety of UV Light Bright Visible Light 7 High Temperature Surfaces 7 UV Exposure 6 Settings 29 Language 29 Sound 29 Setup 13 Spare Parts and Accessories 34 Specifications 35 Support 4 Temperature Warning Setting 30 Troub...

Страница 39: ...BlueWave QX4 User Guide 39 ...

Страница 40: ...ir performance testing and evaluation by offering equipment trial rental and leasing programs to assist in such testing and evaluations MAN075DA 10 10 2018 Dymax Corporation 860 482 1010 info dymax com www dymax com Dymax Oligomers Coatings 860 626 7006 info_oc dymax com www dymax oc com Dymax Europe GmbH 49 611 962 7900 info_de dymax com www dymax de Dymax Engineering Adhesives Ireland Ltd 353 21...

Отзывы: