background image


24 

USE R   GUI DE


|


BL UE WAVE

®

  A X -5 5 0


Irradiation Setup 

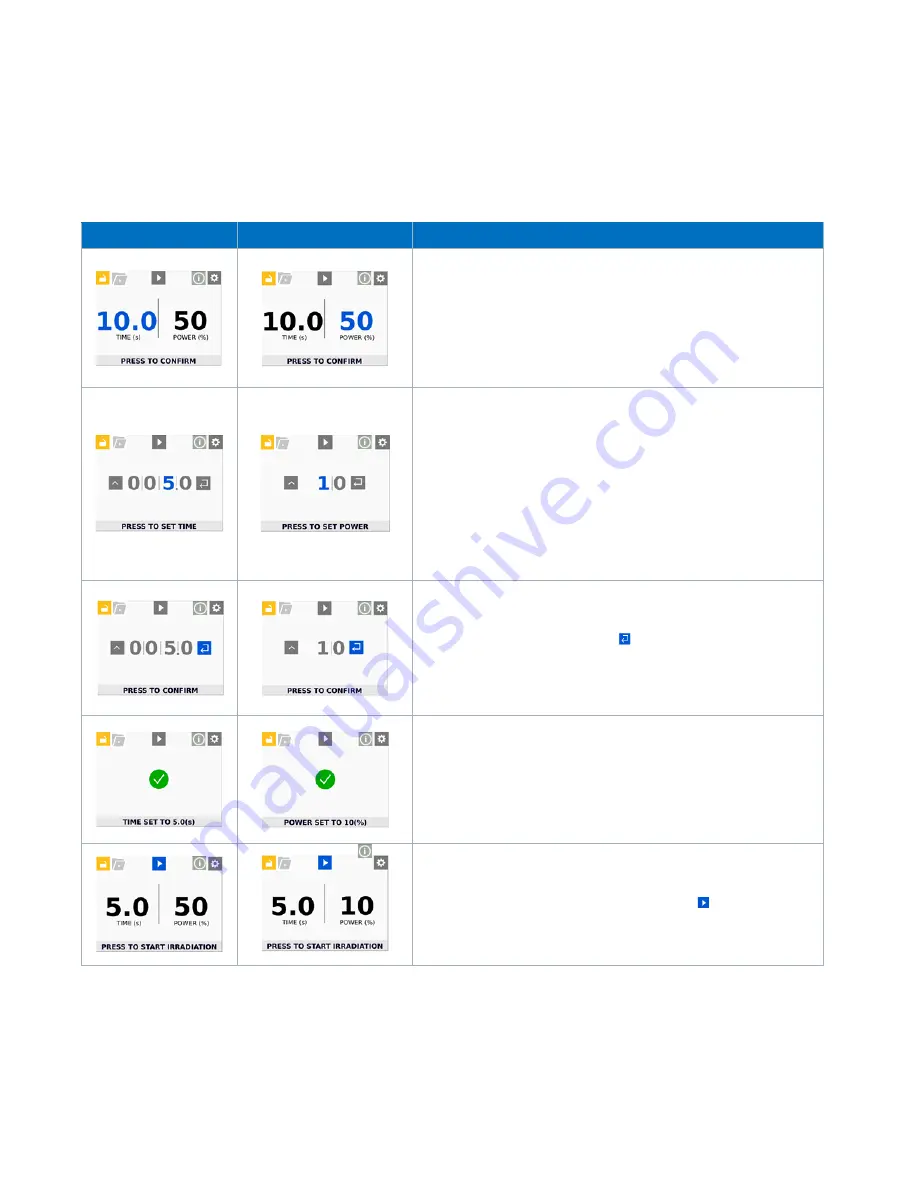
To start a new irradiation, it is necessary to confirm TIME and POWER values. These values can be changed in admin mode 
only. To modify the values, follow the steps shown below. 

Table 3.  

Irradiation Setup


Time Setting 

Power Setting 

Operation 


To choose between the TIME or POWER settings, turn the dial to 
the desired setting, it will turn blue, then press the dial, the time 
and power level screen will be accessed. 


TIME:  The irradiation time is shown in the first column on the 

heading “Time (s)”. The input range is from 0.1 to 999.9 

seconds with a resolution of 0.1(s), set the number one by one 
until get the desired time.  

POWER: The cure power intensity is displayed as a percentage 
in the second column, above the heading 

Power (%)

. Power 

may be set from 10 to 100%, the adjustment can be made in 
increments of 1%.  

NOTE: 

The timer value of 999.9 is displayed as 999. 


When the desired value has been selected, place the rotary 
pushbutton on the enter symbol  , then press the rotary 
pushbutton to set the new TIME or POWER values and return to 
the previous menu. 


A success screen will appear when the established data are 
valid. 


The setup is complete and the unit is ready to start a new 
irradiation by pressing the rotary pushbutton.   


Содержание BlueWave AX-550

Страница 1: ...BlueWave AX 550 All in One Large Area LED Flood System User Guide ...

Страница 2: ...n and increase throughput System designs enable stand alone configuration or integration into your existing assembly line Please note that most dispensing and curing system applications are unique Dymax does not warrant the fitness of the product for the intended application Any warranty applicable to the product its application and use is strictly limited to that contained in the Dymax standard C...

Страница 3: ... Initialization 17 Rotary Pushbutton 17 System Initializing 18 Information 18 System Settings 19 Program Load Save 23 Irradiation Setup 24 Irradiation in Production or Admin Mode 26 Irradiation in PLC mode 27 Maintenance 29 Product Cleaning 29 Emitter Replacement 29 Replace Fuse 30 Troubleshooting 31 Error Screen 31 Spare Parts Accessories 33 Accessories 33 Components Spare Parts 33 Specifications...

Страница 4: ...found on the back cover of this user guide Additional resources are available to ensure a trouble free experience with our products Detailed product information on our website www dymax com Dymax adhesive product data sheets on our website Safety data sheets SDS provided with shipments of Dymax materials Safety WARNING If you use this UV light source without first reading and understanding the inf...

Страница 5: ...rtion includes the controller and power supply which is designed to identify the type of emitter that is connected so the control portion of the system can be used with any of the three LED emitter configurations The BlueWave AX 550 functions as a flood curing system with a 125 mm x 125 mm 5 in x 5 in irradiated curing area The unit can be operated in admin mode unrestricted control or production ...

Страница 6: ...residue left on the window can adversely affect performance on the unit NOTE The BlueWave AX 550 power cord requires a snap on EMI Filtering Ferrite Core located near the plug end of the cord The ferrite core may be factory installed with optional wire tie not required Reference Quick Start QS101 BlueWave AX 550 V2 0 Power Cord Ferrite Core Installation Instructions for specific wire routing and i...

Страница 7: ...er failure to install screws will leave the potential for poor electrical grounding of the system NOTE All four screws MUST be installed to ensure proper grounding of the system chassis WARNING The BlueWave AX 550 is designed and certified to operate as instructed within this document Alteration of the system or its component installation may pose a shock hazard System Cooling The system can be us...

Страница 8: ...d to work with the Controller The Dymax supplied power cord contains a special ferrite at the plug end which is required for proper operation of the Controller WARNING The BlueWave AX 550 is designed and certified to operate with the Dymax supplied 10Amp 18AWG 3 conductor power cord with ferrite core Do not use any other non standard power cord that does not have the same current rating and does n...

Страница 9: ... 24 to AWG 16 General Instructions for Terminal Attachment To connect a hard wire to the terminal block such as the footswitch terminals Plug the end of the wire into the terminal Figure 9 To connect a soft wire to the terminal block or pull out the wire from the terminal block Use a flat screwdriver to push the orange tab located beside the terminal Then plug the wire in or pull the wire out Figu...

Страница 10: ...BIT Input Current 0 7mA 15 0 VDC GND Open OUTPUTS PLC POWER 1 24V 500mA maximum 8 Always On SYSTEM HEALTH Sink Current 50mA max 10 0 VDC GND Open LED STATE Sink Current 50mA max 11 0 VDC GND Open RETURNS These pins are common and may be used interchangeably PLC GND Common signal return 4 PLC mode Ground COM Common signal returns A B 16 Common Grounds CHASSIS GROUND These pins are common and may be...

Страница 11: ...wer WARNING If the BlueWave AX 550 controller is powered on without an LED emitter connected the controller screen will show an alert notification and audible alarm Connect the Inhibit Interlock PLC Controls There are 2 control inputs to disable the UV output These 2 signals must be connected to PLC GND or COM to enable proper operation of the system The factory supplied I O connector has jumpers ...

Страница 12: ... AX 550 Figure 13 Factory Jumpers on the PLC Connector Viewed from Backside Figure 14 PLC Connector Pin Map with Jumper locations highlighted Figure 15 Example Connection for LED INHIBIT and MASTER INTERLOCK Jumper Locations ...

Страница 13: ...connect as shown below Red Wire to LED ON OFF PIN 6 Black Wire to a COM PIN A Green Yellow Wire to CHASSIS GND PIN 14 Figure 16 Footswitch Figure 17 Footswitch Wiring Pin Locations Figure 18 Footswitch Schematic LED ON OFF PLC CONNECTOR 1 2 3 4 5 6 7 8 9 10 11 12 13 14 15 16 A B Shield_GND COM Foot Petal ...

Страница 14: ...n also control the intensity of the UV output When the INTENSITY IN EXT input Pin 7 is pulled down low by grounding to COM ground the Intensity will be controlled by the EXTERNAL ANALOG INTENSITY input voltage The ANALOG INTENSITY input Pin 3 is an analog voltage input The voltage range is 0 to 10VDC Any setting 1 VDC or below will set the Intensity to 10 and each additional volt increases intensi...

Страница 15: ...plication of these signals is shown below in Figure 20 Figure 20 Status Outputs Connection Using On Board 24V Source PLC Power channel is a 24V source available for use to drive PLC logic but must be current limited using pull down resistors to protect the BlueWave AX 550 when directly attached to the I O channels through the PLC connector Figure 21 PLC Status Outputs Using Customer Supplied 24V S...

Страница 16: ...Configurations for Monitoring Outputs PLC Power channel is a 24V source available for use to drive PLC logic but must be current limited using pull down resistors to protect the BlueWave AX 550 when directly attached to the I O channels through the PLC connector ...

Страница 17: ...p and run curing cycles Admin screen allows users to switch back and forth between admin production mode if the PLC mode is disabled Curing parameters are set in the admin screen Rotary Pushbutton The front panel on the controller features a rotary pushbutton which can be used for function selection and for modifying all adjustable irradiation parameters when not in PLC mode Specific irradiation s...

Страница 18: ...de The default password to enter admin mode is 00000 To change the password please see System Settings and Figure 32 NOTE Switching between PLC and non PLC mode can happen when the system is powered ON or OFF but the LED must be OFF for safety Information Information Displays system information Only available in Admin mode using the rotary pushbutton select the information icon in the upper right ...

Страница 19: ...e 28 In the production mode the settings screen layout is identical to the admin screen except the admin settings option is not available Figure 29 Settings Screen The settings and operations for both Admin and Production Mode are shown below Language Future support for multiple languages Brightness Opens the brightness screen where the adjustment of the LCD backlight can be modified in a range fr...

Страница 20: ...o ignore the changes made and keep the current value Used to change the language only English is available at this time Opens the brightness screen where the adjustment of the LCD backlight can be modified in a range from 1 to 10 1 to get the lowest luminosity and 10 the highest luminosity Used to change the operation volume in a range from 0 to 10 0 to get the mute mode and 10 the highest volume ...

Страница 21: ...perations for Admin Mode only are shown below Figure 31 Admin Only Settings Default User Mode Screen ADMIN ON BOOT Controller enters Admin mode immediately after power up PRODUCTION ON BOOT Controller enters production mode immediately after power up ...

Страница 22: ...irmed in the password screen via the rotary pushbutton The Password fields only accept a numeric password from 0 to 9 in each column the password must have 5 characters Follow the steps shown below to entry a new password Note For lost passwords contact Dymax Customer Support for Engineering Access Figure 32 New Password Screens ...

Страница 23: ...nfirm the password to enter the admin mode See Figure 35 Figure 33 Padlock Icon for Admin and Production Mode Figure 34 Enter Password Screen Figure 35 Confirm Password Screen Program Load Save Program Loads Saves the current time and power settings Only available in Admin mode using the rotary pushbutton select the program icon located in the upper left area of the display as shown Push the rotar...

Страница 24: ...Time s The input range is from 0 1 to 999 9 seconds with a resolution of 0 1 s set the number one by one until get the desired time POWER The cure power intensity is displayed as a percentage in the second column above the heading Power Power may be set from 10 to 100 the adjustment can be made in increments of 1 NOTE The timer value of 999 9 is displayed as 999 When the desired value has been sel...

Страница 25: ...el Screen By pressing the power display button you can access the power setting You must turn rotary pushbutton to select the desired power and press it to accept the set value Figure 40 The power level range is 10 to 100 in increments of 1 Figure 40 Power Level Screen Note the minimum power value to configure LED intensity must be 10 to avoid linearity in irradiation area intensity If the set val...

Страница 26: ... another exposure cycle A timed cycle may be interrupted before the timer counts down to zero You may re assert the trigger by rotary pushbutton or footswitch during the cycle and it will turn off the UV LED immediately and reset the timer to the pre set value and the system is ready to run another exposure cycle Power The UV power level can be set in the Admin Mode The range is from 10 to 100 of ...

Страница 27: ...arning of LED INHIBIT OPEN will be seen 3 LED Activated Displays the UV LEDs irradiation status as ON 3 a TRUE or OFF 3 b FALSE 4 LED Intensity Indicates the light intensity percentage value 4a 4b for the next time when the UV LEDs will operate The value can be set by either ANALOG INTENSITY input PIN3 in in PLC mode or the control panel in Admin mode 5 LED Intensity Control The status of INTENSIT...

Страница 28: ...INTERNAL mode uses the value set in the controller EXTERNAL source requires a voltage input based on a 1 volt DC 10 power up to 10 volts DC for 100 3 Assert both MASTER INTERLOCK and LED INHIBIT connected both to COM then assert the LED ON OFF line the system starts the irradiation irradiation will end when de asserting the LED ON OFF Figure 44 PLC Screen UV LED Inactivated Off Figure 45 PLC Scree...

Страница 29: ...ce the emitter follow these steps 1 Place the unit on a flat surface and remove the 4 M3 Screws located on the sides using a 2 0 mm Hex Screwdriver Figure 46 2 Remove the Emitter section carefully and replace it with the desired Emitter Figure 47 3 Reinstall the 4 M3 Screws Removed in Step 1 Figure 48 The unit is now ready to be used Figure 46 Remove M3 Screws Figure 47 Remove Emitter Section Figu...

Страница 30: ... Lift Fuse Holder 3 Take out the Fuse Holder Figure 51 Note that the fuse holder is labeled for correct orientation 4 Replace the fuses with Littelfuse 312 series 250V 10 amp fast acting fuses and put the fuse holder back into the power entry module Figure 52 Figure 51 Remove Fuse Holder Figure 52 Replace Fuse 5 Verify the installation is correct by noting the word FUSED in the window of the fuse ...

Страница 31: ...rating normally and the emitter suddenly stops emitting light Over temperature shutdown was triggered Verify error information MASTER INTERLOCK or LED INHIBIT is open Verify interlock jumpers are in place Verify PLC command structure for PLC mode LED emitter provides only low intensity light LED intensity set too low Increase LED intensity setting on Admin Settings or I O input for PLC Mode Contam...

Страница 32: ...perature 70 Fan not working properly or air intake blocked Driver 0 1 2 3 Channel 0 1 LED Temperature 0 ADC chip malfunction Driver 0 1 2 3 Channel 0 1 LED Temperature Low LED working temperature of Ch0 1 of Driver 0 1 2 3 found lower than low limit Driver 0 1 2 3 Channel 0 1 LED Temperature High LED working temperature of Ch0 1 of Driver 0 1 2 3 found higher than high limit Driver 0 1 2 3 Channel...

Страница 33: ...ounting Stand 43410 Three Sided Acrylic Shield 41395 Components Spare Parts Item Part Number BlueWave AX 550 System Controller 60943 BlueWave AX 550 Emitter VisiCure 405 nm 60754 BlueWave AX 550 Emitter PrimeCure 385 nm 60752 BlueWave AX 550 Emitter RediCure 365 nm 60753 Power Cord North America 35255 Power Cord Right Angle North America 43435 Power Cord Type G 40542 Power Cord Right Angle Asia 43...

Страница 34: ...Amps 50 60 Hz Cooling Air cooled Dimensions W x D x H 6 54 x 6 75 x 11 41 166 mm x 202 mm x 290 mm Weight 14 1 lbs 6 4 kg Unit Warranty 1 year from purchase date Operating Environment 10 C to 40 C 50 F to 104 F 0 80 relative humidity non condensing recommended 30 RH 2 000 meter max altitude Shipping and Storage Conditions Temperature 20 C to 50 C Humidity 10 80 RH non condensing Ship via standard ...

Страница 35: ...FF Change to High UV LED OFF 30 ms LED STATE Output Change to High 40 ms LED ON OFF Closed UV LED ON Manual Mode 150 ms LED STATE Output Change to LOW 180 ms LED ON OFF Open UV LED OFF 25 ms LED STATE Output Change to High 50 ms LED ON OFF Asserted Change form Open to Closed UV LED ON Timer Mode UV LED is OFF 140 ms LED STATE Output Change to Low 150 ms UV LED OFF Timer Mode Before Timer expired U...

Страница 36: ...g determine the exposure time required to achieve a full cure As with any manufacturing process it is advisable to incorporate a safety factor NOTE Dymax recommends intensities low at first to preserve LED life Contact the Dymax Application Engineering Team for additional process support Control Process validation confirms a minimum acceptable intensity Users can then choose to operate at full int...

Страница 37: ...ent may void your warranty benefits The use of aftermarket replacement parts not supplied or approved by Dymax Corporation will void any effective warranties and may result in damage to the equipment IMPORTANT NOTE DYMAX CORPORATION RESERVES THE RIGHT TO INVALIDATE ANY WARRANTIES EXPRESSED OR IMPLIED DUE TO ANY REPAIRS PERFORMED OR ATTEMPTED ON DYMAX EQUIPMENT WITHOUT WRITTEN AUTHORIZATION FROM DY...

Страница 38: ...Figure 57 Declaration of Conformity ...

Страница 39: ... Production or Admin Mode 26 Irradiation Setup 24 System Initializing 18 Optional Equipment 33 Parts Included 6 Product Overview 5 Safety 4 Spare Parts 33 Specifications 34 Support 4 System Assembly Connections 9 System Cooling 7 Wiring and Connections 8 System Screens Curing Time Screen 25 Power Level Screen 25 Settings Screen 19 System Settings 19 Admin Only Settings 21 General Settings 19 Swapp...

Страница 40: ... Corporation U S A Please note that most curing system applications are unique Dymax does not warrant the fitness of the product for the intended application Any warranty applicable to the product its application and use is strictly limited to that contained in Dymax s standard Conditions of Sale Dymax recommends that any intended application be evaluated and tested by the user to ensure that desi...

Отзывы: