background image

Green 

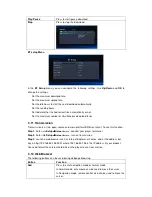
Press to pop up the address bar.   

Navigation buttons 

In Navigation mode, press navigation buttons to move cursor. 

In normal mode, press Up/Down to move to the top/bottom of the     

webpage. 

OK 

Press to enter selected hyperlink while in navigation mode. 

Play 

Press to load the web site when the cursor stays on the address 

bar. 

Return 

Return to exit web browser. 


3.13 NAS function 

This product functions as a NAS (Network Attached Storage) device when it is attached to the 

home network. This feature allows users to store and retrieve large amounts of data from their 

own local network.   

Step 1

, Enter 

into

 Setup

Network 

menu

,


connect your player to home network.


Step 2

, Enter 

into

 Setup

Network 

menu

, turn on 

NAS Mode

.   

Step 3

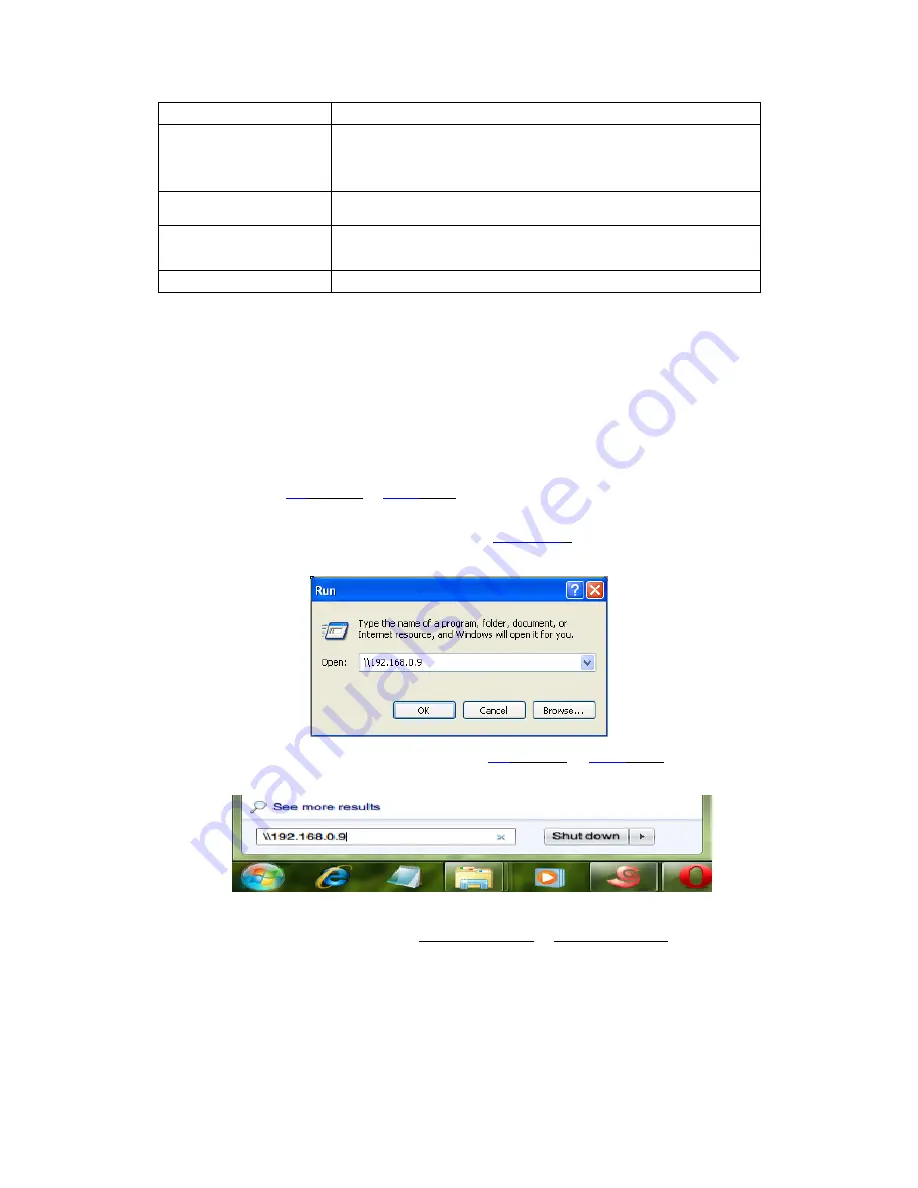
On Win XP

, key in 

\\IP

 Address or 

\\Host

 name

 in the Run window (click Run in the start menu) 

or in the address bar of a web browser, for example Internet Explorer on your PC (if the IP 

address of the product is 192.168.0.9, please key in 

\\192.168.0.

9), and click OK or press the 

Enter button on the keyboard. 


On Windows Vista or Windows 7

, please key in 

\\IP

 Address or 

\\Host

  name

 at the search 

bar, then press the Enter button on the keyboard. 


On Mac

Finder

Go

 Connect to Server

,

 key in

 smb://IP Address

 or

 smb://Host name

 and click 

Connect.   

Содержание DX-380

Страница 1: ... 5 A V Streaming via UPnP server 22 3 6 A V Streaming via Linux NFS server 22 3 7 Music playlist Photo Album management 23 3 8 File Copy Delete Move Rename 23 3 9 Internet Media 23 3 10 BT Download 24 3 11 Transmission 25 3 12 Web Browser 25 3 13 NAS function 26 3 14 FTP Server 27 3 15 Remote Management 27 3 16 Firmware upgrade 28 4 Appendixes 28 4 1 Specifications 28 4 2 Frequently Asked Question...

Страница 2: ...ose of the player be sure to dispose it appropriately Some countries may regulate disposal of electrical device please consult with your local authority 1 5 Hard disk cautions The player uses an internal hard disk for data storage in normal case format or repair is not required You should carefully read the Frequently Asked Questions chapter and check our website for latest information before form...

Страница 3: ...atic discharge and the strong electromagnetic field the product will malfunction then unplug the power cable and the product will return to normal performance next time it is powered on 2 Product Overview 2 1 Package list Part Quantity Player 1 USB 2 0 cable 1 Remote Control 1 Remote Control Battery 2 AC DC adaptor 1 User Manual 1 Note The actual contents in the package might be different from the...

Страница 4: ...Card slot 2 USB2 0 Host port 3 USB2 0 Device port Back Panel 1 RJ45 LAN socket 2 S PDIF OPTICAL jack 3 S PDIF COAXIAL jack 4 HDMI jack 5 Y Pb Pr OUT jack 6 A V OUT jack 7 A V DC IN jack 8 DC IN jack 9 ANT RF IN OUT socket ...

Страница 5: ... Blue 35 TTX Yellow No Button Function 1 STANDBY Press to enter standby mode or wake up 2 TV SYSTEM Press to switch between NTSC PAL 480P 576P 720P 1080I and 1080P 3 BROWSER Press to enter the file manager 4 Numeric buttons Press to enter numeric input when changing settings 5 REPEAT Press to set repeat option One All and Shuffle 6 FR Press to fast rewind the current playback Press repeatedly to s...

Страница 6: ...e scheduled recording in EPG menu 17 Green Edit Press to enter file editing menu in file manager which can process copy delete move rename multiple select 18 MUTE Press to mute audio output and press again to resume 19 REC Press to begin recording Press repeatedly to set one touch recording OTR length 30 MIN 60 MIN 90 MIN 120 MIN 180 MIN 240 MIN Off 20 COPY Press to enter the file selecting menu i...

Страница 7: ... and USB 2 0 Method 1 Install an internal hard disk Plug in power adaptor to the player s DC IN jack Connect this player to PC with the USB 2 0 cable Press U button on back panel of the player Method 2 Install an internal hard disk Power on this player Connect this player to PC with the USB2 0 cable connection the TV Depending on the jacks on your TV select the connection mode We suggest you to us...

Страница 8: ...Digital Audio Device connection Except for HDMI jack this player can output digital audio to amplifier though SPDIF coaxial or optical jack Please refer to 3 1 6 Changing Audio settings for more details ...

Страница 9: ...plug a TV cable to the ANT RF OUT socket then plug the cable to a TV or other TV receiver 2 4 2 Menu language The system language of this player can be set to English or other languages Change the language you wish via Setup System Menu language the selected language will take effect immediately 2 4 3 HDD Format For users who wish to install a new SATA HDD into the player first you need format the...

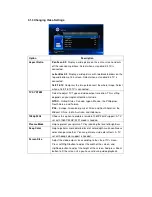
Страница 10: ...tion and then press OK There are six setup options including System Audio Video TV REC Network and MISC 3 1 1 Changing System Settings Option Description Menu Language Select to choose the OSD On Screen Display language Text encoding Select to set the text encoding option subtitle display Change system font Select to change system font Create a folder named Resource in the root directory of your U...

Страница 11: ...HDD BD Menu Here you can open the BDMV menu during BDMV folder or BD ISO playback And BD J is not supported Restore Default Restore to factory defaults 3 1 2 Changing Audio Settings Option Description Night Mode Choose from Off On Comfort If the option is turned on the audio output volume will be decreased to make you more comfortable HDMI Output Choose from LPCM and RAW SPDIF Output Choose from L...

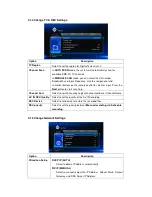
Страница 12: ...exico the Philippines South Korea and Taiwan PAL Europe Greenland parts of Africa and South America the Mideast China India Australia and Indonesia 1080p 24Hz Choose this option to enable or disable 1080P 24HZ support A TV set with 1080P 24HZ 24P mode is needed Plasma Mode Help to protect your plasma TV by reducing the level of brightness Deep Color Help to perform more detailed level of color dep...

Страница 13: ...input Press the Next button to start scanning Channel Sort Select to sort channel by Logical channel number or Channel Name AV IN REC Quality Select to set the quality of the AV IN recording REC Device Select to set device to restore the recorded files REC priority Select to set the priority between Manual recording and Schedule recording 3 1 5 Change Network Settings Option Description Wired Lan ...

Страница 14: ...nfrastructure AP and Peer to Peer Ad Hoc and WPS AP mode Follow the prompting message on the screen and press Red button to choose Peer to Peer Ad Hoc or WPS AP mode Infrastructure AP Infrastructure mode is used to connect computers with wireless network adapters also known as wireless clients to an existing wired network with the help from wireless router or access point Please follow following s...

Страница 15: ...put the pin code in the configuration menu of your router Select the PIN mode on this player to start testing the connection process will take for a while 3 1 6 Miscellaneous Option Description Version Info This tab shows you information about the software installed and about the material components of your player Network Info This tab shows you information about your network MAC Address IP addres...

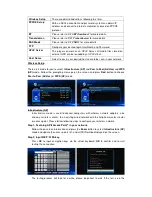
Страница 16: ...the favorite channel list press the Prev Next button in this menu Info Bar Press the Info button when watching TV programs an info bar will be displayed to show the channel information There re 5 strings displayed on the bar Taking the info bar in the above photo for example 9 Stands for TV rating ENG Stands for the voice language SS Stands for subtitle TT Stands for Teletext 576 Stands for resolu...

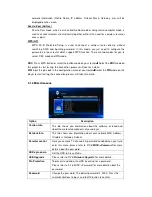
Страница 17: ...y to set one touch recording length 30 MIN 60 MIN 90 MIN 120 MIN 180 MIN 240 MIN Off Time Shifting Time shift function allows you to pause live TV and resume the program from the point you left it While paused the program is recorded to the internal HDD as long as the space is available Press the TIME SHIFT button to active time shift function Press PLAY button to resume the program Time shift mod...

Страница 18: ...schedule status and history Create a New Schedule In timer list press the RED button on the remote control to add a new schedule recording then the schedule setting screen appears Use the Left Right button on the remote control to move between fields and press the up down button to adjust each setting Source Select the video source or TV channels for the recording Start Time Enter the date and tim...

Страница 19: ...hedule recordings 3 2 4 Channel Edit To enter channel edit menu press Menu button when watching TV programs and select Edit in the option menu In this menu you can delete and swap TV channels and also edit your favorite TV list Use Up Down buttons to select and modify the settings Note A password needed when you try to enter this menu please refer to 3 1 6 MISC for more details about the password ...

Страница 20: ... press Menu button you can choose different review mode Thumbnails List or Preview 3 3 2 Browse via Media Library Enter into Movie Photo Music interface only supported files will be displayed Please refer to Appendixes in chapter 4 1 Specifications for more details about the supported files In media library press MENU button to display the option menu you can get following functions though the opt...

Страница 21: ...functions though the Option menu Function Description Title menu Useful for DVD IFO and ISO playback Title menu return to the main menu of entire disc Root menu return to the root main of each title Root menu Video Setting Adjust Brightness Contrast Saturation and Hue Slide Timing With these three options you can choose the Interval Transition effect and background music during the photo playback ...

Страница 22: ...omputer and share the media files though it To stream your media files shared though a UPnP server Step 1 Enter into Setup Network menu connect your player to the home network Step 2 Visit Files Manager UPnP menu on the player select the UPnP server then you can browse the media library shared by UPnP server 3 6 A V Streaming via Linux NFS server This system enables you to browser the media files ...

Страница 23: ...le editing menu or press Copy button to enter file selecting menu then follow the on screen information to finish file copy delete move rename 3 9 Internet Media This feature is additional function All contents and services under this feature are provided by third party service providers our company does not offer any contents and services of this feature and it not responsible for any contents an...

Страница 24: ...te your torrent file in file manager menu then press OK button to add the torrent to start downloading Also you can add a download task via remote management Please refer to Remote Management for more details Select the BitTorrent icon on internet media menu you can see the status of torrents download progress and configure the BT download settings in this menu Download Menu After add the BT torre...

Страница 25: ... and cross platform BitTorrent client To use this function Step 1 Enter into Setup Network menu connect your player to internet Step 2 Enter into Setup Network menu turn on transmission Step 2 Launch a web browser such as Internet Explorer or Firefox and at the address bar key in http 192 168 50 196 9091 where 192 168 50 196 is the IP address of your product You need format the external hard disk ...

Страница 26: ...nd retrieve large amounts of data from their own local network Step 1 Enter into Setup Network menu connect your player to home network Step 2 Enter into Setup Network menu turn on NAS Mode Step 3 On Win XP key in IP Address or Host name in the Run window click Run in the start menu or in the address bar of a web browser for example Internet Explorer on your PC if the IP address of the product is ...

Страница 27: ...successful you will be able to upload download files via FTP Server 3 15 Remote Management This product comes with a unique remote management feature that allows user to remotely access from the internet to operate the following functions on the product via a built in HTTP server To access via HTTP server in your local network Step 1 Enter into Setup Network menu connect your player to home networ...

Страница 28: ...t 5 seconds or more and then loosen your finger on the U button Firmware installation will start Method 2 Step 1 Copy install img to the root directory of a USB stick and connect it to the USB HOST port of the player Step 2 Enter Setup Misc menu select USB Upgrade firmware installation will start 4 Appendixes 4 1 Specifications I O INTERFACES SUPPORTED 3 5 SATA HDD USB 2 0 Device port USB 2 0 HOST...

Страница 29: ...ng the device again later message what should I do Answer Close any program that might be accessing data on the player including Windows Explorer If it does not work close all programs and wait for another 20 seconds then try the green arrow icon again If it still does not work you should shut down the player and disconnect the USB cable Question 2 I find new file names and folder names that I nev...

Страница 30: ...and will display a blue screen or screensaver Question6 Why couldn t the player find the hard disc Answer You need format the hard disk on the player before usage If hard disc failure occurs in file manager please backup your data and format your HDD on the player Question7 Why I can t find my USB drive in file manager Answer Try to replace a short USB cable or plug in the power cable to your USB ...

Страница 31: ...ed for institutional or other commercial purposes Loss of customer s software firmware information or memory data Improper handling or installation 7 GPL Statement This product contains free software which is licensed under the GNU General Public License After you purchase this product you may procure modify or distribute the source code of the GPL LGPL software that is used in this product To obt...

Отзывы: