


- 27 -
Screen Size Change Procedures
The HD-700 is delivered from the factory with settings for a 100” diagonal screen and a 4:3 aspect ratio. The
unit is capable of a wide range of screen sizes, however, from 60” diagonal to 300” diagonal.
If you wish to change the screen size, follow these steps:
Establish the correct projector to screen distance using the projector installation software. If you do not have
access to the software, the projection distance may be set by multiplying the screen’s width by 1.25 and
adding 9" to reach the distance to the green lens at the front of the projector or by multiplying the screen
width by 1.25 and adding 18" to reach the distance to the center of the ceiling mount bracket.
Remove the projector top cover.
With the projector fixed at the correct distance, connect the power and a video source so that the unit may
turn on, establish a mechanical focus by first using the back ring of the lens and then the front ring of the
lens.
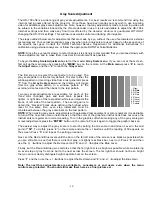
Adjust red, green and blue optical Focus following the instructions outlined on FOCUS section of this manual.
Ignore the fact that the test patterns will not overlap at this time.
Mechanical Center Alignment:
IMPORTANT NOTE:
It is important that this step be
performed
DO NOT
adjust for alignment using the centering
rings on the back of the tubes or depend on the
convergence system to make the adjustment. In order to
preserve memory space for normal convergence adjustments
it is very important that a echanical alignment be performed
when the screen size is changed.
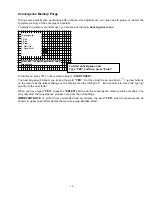
When three channels have been focused use the menu
system to call up the Red Convergence pattern. You may
reach this menu by pressing “
Menu
” to reach the Main Menu,
“8”
to reach the
“Adjust”
menu, “
4
” to reach the main
“Convergence”
menu and finally,
“1”
to reach the red
convergence.
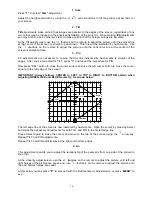
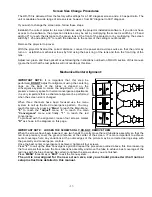
To proceed with the alignment, loosen four screws market
"R"
as shown in the diagram on this page.
B
B
B
R
R
R
B
R
IMPORTANT NOTE: LOOSEN THE SCREWS ONLY, DO NOT
REMOVE THEM
.
When the screws have been loosened, use two hands to gently move the red tube/lens assembly so that the
red lines precisely cover the green reference at the center of the screen. IT is more important to achieve
center coverage here; any variations at the outer edges of the picture may be corrected during setup with
the geometry and convergence controls.
Once the best center convergence is achieved, tighten all four screws.
Press
“2”
to call up the Blue Convergence grid and repeat the procedure outlined above, this time loosening
the four screws that secure the blue tube/lens assembly and move the tube to achieve best coverage of the
red lines with the blue channel. Be certain to tighten the screws when you are finished.
Press “
MENU
” three times or “
EXIT
” to exit the menu system.
The unit is now aligned for the new screen size, and you should proceed with all normal
setup instructions detailed in this manual.