background image

Quick Start Guide


3. Click X on upper left corner of the Time and Date window when done.


* Closing the window will automatically save the changes made.


STEP 3: 

Configure Network


Please have the following information ready before starting the network configuration.


Camera Network


Local Network (LAN)


IP Address


Subnet Mask / 

Netmask


Default Gateway / 

Gateway


Not Applicable


DNS Servers


Not Applicable


* Camera Network and Local Network cannot be on the same network.


Windows 

1. Double click Network Connections on the Desktop 


2. Right click on the Ethernet with cable connected and click Properties. 

NOTE 

If you are not sure what information to enter, contact your Network Administrator or Internet Service Provider 

for the information.


NOTE 

The Blackjack Cube’s network settings are set to DHCP as default.


3. Click X on upper left corner of the Time and Date window when done.


* Closing the window will automatically save the changes made.

5


Linux


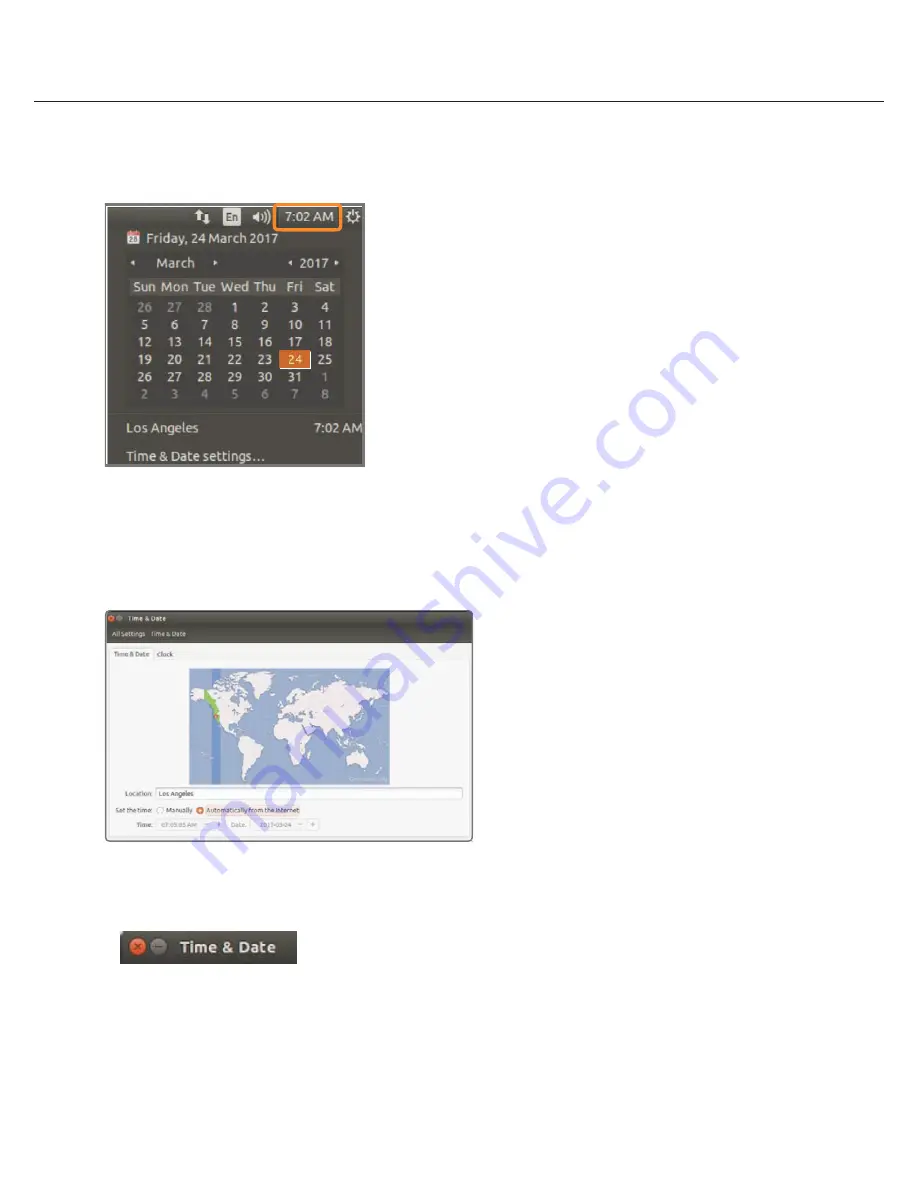
1. Update Date and Time by clicking on the time on the upper right-hand corner then click “Time & Date settings…”


2. If the server will be connected to the Internet, leave Set the Time to “Automatically from the Internet” and update the Location to 
the correct Time Zone. Enter the nearest major city to select the correct Time Zone. If it shows multiple cities in the list, select the 
correct city. (e.g., New York for EST, Chicago for CST, Denver for MST, and Los Angeles for PST)


Press OK after adjusting to the correct date and/or time. 

4. Press OK to close Date and Time when done. 


Linux 

1. Update Date and Time by clicking on the time on the upper right-hand corner then click “Time & Date settings…”


2. If the server will be connected to the Internet, leave Set the Time to “Automatically from the Internet” and update the Location to the correct 

Time Zone. Enter the nearest major city to select the correct Time Zone. If it shows multiple cities in the list, select the correct city. (e.g., 

New York for EST, Chicago for CST, Denver for MST, and Los Angeles for PST)


Содержание Blackjack P-RACK

Страница 1: ...mation on features and functionality Default Login Information for DW Spectrum IPVMS Username admin Password admin1234 WHAT S IN THE BOX P RACK Server 1 Set Keyboard and Mouse 1 Set Quick Start Guide...

Страница 2: ...e Processor to i7 Memory 8GB 16GB Option DW RME8 Upgrade Memory to 16GB NIC 2x Gigabit Ethernet RJ45 2x Gigabit Ethernet RJ45 Option DW R2NIC Upgrade DUAL 1GB NIC Card OR DW R4NIC Upgrade QUAD 1GB NIC...

Страница 3: ...propriate power source Recommend to use UPS system recommend to use 3000VA or higher 3 Turn on the server if the server does not turn on automatically Press the Power Button on the front of the P RACK...

Страница 4: ...rect default is UTC 08 00 Pacific Time Press OK after selecting the correct Time zone Click Change date and time to update the date and time if they are not correct Verify the Time zone before updatin...

Страница 5: ...ade 5 Linux 1 Update Date and Time by clicking on the time on the upper right hand corner then click Time Date settings 2 If the server will be connected to the Internet leave Set the Time to Automati...

Страница 6: ...ed and click Properties NOTE If you are not sure what information to enter contact your Network Administrator or Internet Service Provider for the information NOTE The Blackjack Cube s network setting...

Страница 7: ...DNS server addresses will be selected automatically 5 Enter IP address and Subnet mask of the camera network do not enter anything for the Default gateway Preferred DNS server and A DNS server NOTE It...

Страница 8: ...Enter IP address and Subnet mask of the camera network 6 Click OK to close then click Close to go back to Network Connections Local Network 7 Right click on the other Ethernet the one with network cab...

Страница 9: ...uble click the Network icon on the Desktop 2 Select Wired that has arrows pointing up and down from the list If neither of the wired are showing arrows up and downs then make sure the network cable is...

Страница 10: ...d with picture of network port and repeat 2 to 8 of STEP 3 Configure Network 13 Click on the DNS Servers field box and enter DNS server address 14 Click Save 15 Connect a network cable to the Ethernet...

Страница 11: ...L LAUNCH To launch the DW Spectrum Software on the Windows Based P RACK OR Windows Linux OS Configure Cameras using DW IP Finder Refer to the camera s QSG to configure Digital Watchdog camera s IP add...

Страница 12: ...en DW Spectrum Client by double click on the DW Spectrum icon 2 Click on the preconfigured server 3 Enter password and click connect Default password admin1234 case sensitive Login admin Password admi...

Страница 13: ...art Guide STEP 2 To rename the server 1 Right click on the server name listed on the Resources then click Server Settings 2 Go to General tab then type in the new server name in the Name field and cli...

Страница 14: ...STEP 3 To check for update 1 Click on the menu then click System Administration 2 Go to Updates tab Click Update System if turned orange 14...

Страница 15: ...latest version installed and the Update System button will be greyed out STEP 4 Enter License 1 Go to System Administration then click License tab 2 Enter License Key then click Activate License butt...

Страница 16: ...3 Click OK to when the License is activated STEP 5 Configure recording 1 Right click on the camera to setup recording then click Camera Settings 16...

Страница 17: ...t Guide 2 Go to Recordings tab 3 Click to turn on recording 4 Configure Schedule Settings for Quality FPS and Recording Type 5 Click and drag mouse over the Recording Schedule to assign the recording...

Страница 18: ...Click on All to apply to the all schedules 6 Red dot will appear next to the camera when the recording is started 18...

Страница 19: ...ick General tab 2 Click Create Backup button 3 Navigate to the folder where to save and enter name of the backup file then click save Strongly recommend to also backup to the external storage media NO...

Страница 20: ...multiple clients LAN WAN 2 Do you have a Gigabit network Check your network speed My camera appears disconnected 1 Under camera settings make sure the user name and password are correct 2 Under the c...

Отзывы: