Dürkopp Adler 550-867 Скачать руководство пользователя страница 23

Operation

Additional Instructions 550-867 - 01.0 - 02/2019

21

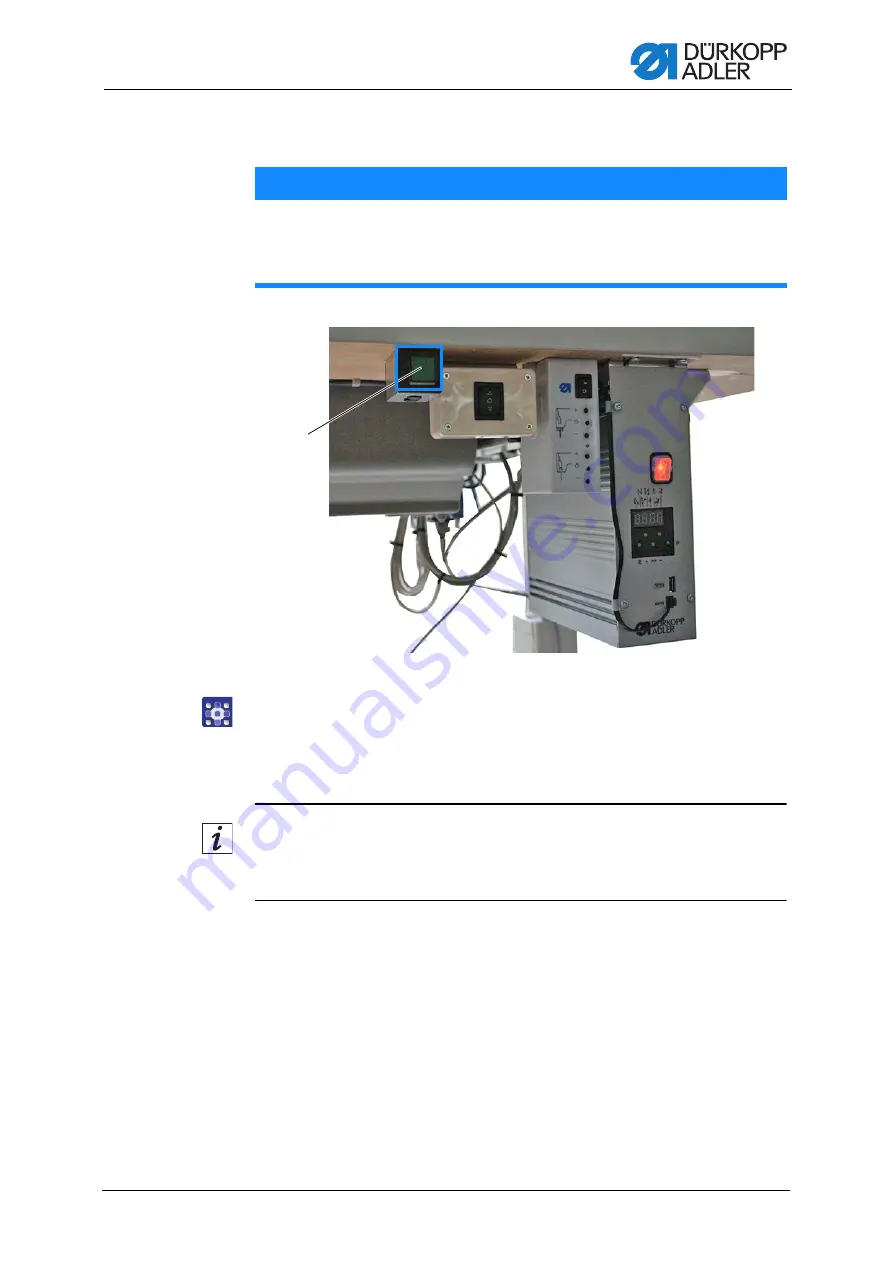
3.2 Logging in using the fingerprint scanner

Fig. 24: Logging on using the fingerprint scanner (1)

To log in using the fingerprint scanner (3):

1. Briefly press the access button (1) once. 

The access button (1) flashes once before lighting up green 
permanently, indicating that the login procedures has started. 

Information

If pressing the access button too long, you will start the login procedure for 
the hand scanner rather than the fingerprint scanner. 

NOTICE

Property damage may occur!

Damage to the fingerprint sensor. 

Do not exert excess pressure on the fingerprint sensor. 

(1)

- Access button

Содержание 550-867

Страница 1: ...550 867 Additional Instructions Fingerprint scanner...

Страница 2: ...er AG and protected by copyright Any reuse of these contents including extracts is prohibited without the prior written approval of D rkopp Adler AG Copyright D rkopp Adler AG 2019 IMPORTANT READ CARE...

Страница 3: ...termining the software version 4 2 2 Updating the software 5 2 3 Connecting the fingerprint scanner 9 2 4 Setting up the USB port 11 2 5 Activating the fingerprint scanner 13 3 Operation 15 3 1 Creati...

Страница 4: ...Table of Contents 2 Additional Instructions 550 867 01 0 02 2019...

Страница 5: ...og into the system using a hand scanner and barcode via software using the fingerprint scanner Components of the kit Check whether the scope of delivery for kit 0867 590914 is correct prior to setup a...

Страница 6: ...p 11 5 Activate the fingerprint scanner p 13 Software versions V16 8 and later make it possible to insert a fingerprint scanner into the machine Determining the software version that has been installe...

Страница 7: ...4 2 Update the software version 3 Connect the fingerprint scanner p 9 4 Set up the USB port p 11 5 Activate the fingerprint scanner p 13 Software versions V16 8 and later make it possible to insert a...

Страница 8: ...Updating the software 2 4 Confirm with Yes Important It is absolutely necessary that you confirm the message with Yes instead of with PC down This is the only way to exit the program and leave the co...

Страница 9: ...ou do not wish to delete the old files you need to save them under a different name or in a different location Otherwise the new files of the same name will overwrite the old files 10 Rename the old f...

Страница 10: ...nd you do not wish to delete them you need to save them under a different name Otherwise the new files will overwrite the old files 15 If necessary rename the files Messages csv Messages txt and Messa...

Страница 11: ...port p 11 5 Activate the fingerprint scanner p 13 Fig 6 Connecting the fingerprint scanner 1 CAUTION Risk of injury Risk of injury from tripping or becoming caught Route the connecting cable in such a...

Страница 12: ...able opening 1 and under the tabletop without kinking or crushing the cable Fig 7 Connecting the fingerprint scanner 2 3 Insert the connecting cable 2 into the control box 4 under the tabletop The con...

Страница 13: ...13 Once the USB port is connected at the control box the control panel will display a new USB port The names assigned automatically by the system vary however making it necessary to rename the port I...

Страница 14: ...nal COM3 port is named DAUSB001A The USB port of the Fingerprint scanner is named A906YYN7A This port mus be renamed as COM19 11 To rename the USB port right click on the new USB port The menu opens 1...

Страница 15: ...sion if necessary p 5 3 Connect the fingerprint scanner p 9 4 Set up the USB port p 11 5 Activate the fingerprint scanner To activate the fingerprint scanner 1 Log in with security level 2 Fig 10 Acti...

Страница 16: ...019 Fig 12 Activating the fingerprint scanner 3 4 Check the box for the component Finger Print Sensor 5 Confirm with OK The fingerprint scanner has been activated Information If the fingerprint scanne...

Страница 17: ...scanner must have already been set up p 4 i e con nected p 9 and activated in the software p 13 To create a new user using fingerprint detection 1 Log in with security level 2 Fig 13 Creating a new u...

Страница 18: ...user tap the 0 1 or 2 button The check mark on the button indicates which security level has been selected in this case 0 6 To store a user image tap the User photo button Information The user photo c...

Страница 19: ...9 BRIEFLY press the access button 1 once The access button 1 flashes once before lighting up green permanently This indicates that the login procedure using the fingerprint scanner has been started I...

Страница 20: ...rint detection 6 10 Confirm with OK Fig 19 Creating a new user using fingerprint detection 7 11 Place your finger tip on the fingerprint sensor 2 for approximately 3 seconds The display switches to Fi...

Страница 21: ...been detected successfully 3 times The process does not have to be canceled 12 Confirm with OK 13 Place your finger tip on the fingerprint sensor 2 for approximately 3 seconds The display switches ag...

Страница 22: ...uctions 550 867 01 0 02 2019 Fig 23 Creating a new user using fingerprint detection 11 17 Confirm with OK The information for the new user is saved 18 Tap the Save button The new user has been created...

Страница 23: ...cess button 1 once The access button 1 flashes once before lighting up green permanently indicating that the login procedures has started Information If pressing the access button too long you will st...

Страница 24: ...The control panel switches from the start screen to the start screen of the corresponding security level Information If the fingerprint is not recognized because it is unknown or was captured only pa...

Страница 25: ...the fingerprint scanner To deactivate the fingerprint scanner 1 Log in with security level 2 Fig 26 Deactivating the fingerprint scanner 1 2 Tap the Check button on the start screen The display switc...

Страница 26: ...scanner 24 Additional Instructions 550 867 01 0 02 2019 Fig 28 Deactivating the fingerprint scanner 3 4 Deselect the check box for the component Finger Print Sensor 5 Confirm with OK The fingerprint...

Страница 27: ......

Страница 28: ...ermany Phone 49 0 521 925 00 Email service duerkopp adler com www duerkopp adler com Subject to design changes Part of the machines shown with additional equipment Printed in Germany D rkopp Adler AG...

Отзывы: