Duplo DB-200 Скачать руководство пользователя страница 16


13 


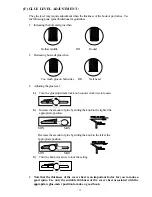
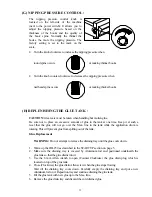
(G) NIPPING PRESSURE CONTROL : 


The nipping pressure control knob is 
located on the left-side of the machine 
(next to the power switch). It allows you to 
adjust the nipping pressure based on the 
thickness of the books and the quality of 
the book spine. Normally the thinner the 
books, the more the nipping pressure. The 
factory setting is set to the mark on the 
scale.


• 

Turn the knob clockwise to increase the nipping pressure when 


round spine occurs    


                 or making thinner books. 


• 

Turn the knob counter clockwise to decrease the nipping pressure when 


nail head spine occurs 


     or making thicker books. 


(H) REPLENISHING THE GLUE TANK : 


CAUTION: 

Great care must be taken when handling hot molten glue.


Be sure not to place an excessive amount of glue in the tank at one time. Keep it at such a 
level that the glue will not go over the Max. line in the tank while the application drum is 
rotating. This will prevent glue from spilling out of the tank. 


Glue Replacement  

 
WARNING: 

Do not attempt to remove the draining tray until the glue cools down. 


1.  Warm up the DB-250 as described in the STARTUP section on page 5. 
2.  Make sure the draining tray is covered by Aluminum foil and positioned underneath the 

glue tank so that the glue drains into it.  

3.  Use the 6 mm Allen wrench to open (Counter Clockwise) the glue drain plug, which is 

located on top of the glue tank.  

4.  Close (Clockwise) the glue drain Allen screw when the glue stops flowing. 

Wait till the draining tray cools down. Carefully empty the draining tray  and put a new 
Aluminum foil on it. Reposition tray and continue draining the glue tank. 

5.  Fill the glue tank with new glue up to the Max. line. 
6.  Remove the glue drain tray and discard the cold drained glue. 


Содержание DB-200

Страница 1: ...PERFECT BINDER DB 200 OPERATION MANUAL Duplo USA Corp June 2000 LED Rev 1 3...

Страница 2: ......

Страница 3: ...Specification 2 Accessories 2 Adhesive 2 Installation 3 Control Panel 4 Operation Procedures 5 A STARTUP 5 B MANUAL MODE 6 C AUTO MODE 8 D PADDING MODE 10 E STANDBY MODE 10 F GLUE LEVEL ADJUSTMENT 12...

Страница 4: ...has implemented the secondary thermostat to protect the glue tank temperature over 392 F 200 C When it occurs the power of DB 250 will be automatically turned off You have to wait for the glue tank t...

Страница 5: ...cles per hour Production Speed Up to 200 books per hour Power Source 110V 60 Hz Option 220V 50 Hz Power Consumption 10 Amps Machine Weight 255 LBS 116 Kg Machine Dimension 46 L x 22 W x 15 H 1150x560x...

Страница 6: ...de in the bottom cover first Then slide in the glue draining tray underneath the glue tank as shown 4 Place your DB 250 on a safe firm and solid table Then mount the cover sheet holder to the right si...

Страница 7: ...4 LED DISPLAY 1 The amount of books bound ____100 2 Operating status BIND 3 Perform self test and stir the hot melt glue S TEST 4 Error messages ERR L1 5 CLEAR Clear the display counter for books boun...

Страница 8: ...s one minute for this example as shown 3 Melting glue is processing The status is WARM and the elapsed time is 10 minutes for this example as shown 4 After heating for a while the glue temperature has...

Страница 9: ...1 Load book to the RIGHT of the red line Step 2 Slide the book to The far LEFT 2 Then press the CLOSE button to clamp down the book block and you will see the flashing PUSH START display Note In case...

Страница 10: ...process for the book block and cover sheet Note If you accidentally remove or drop the cover sheet during the clamping station returning to the nipping station the control panel will show COVER At th...

Страница 11: ...e RIGHT of the red line then slide the book block to the far LEFT of the clamps and you will see the flashing PUSH CLOSE display 2 Then press the CLOSE button to clamp down the book block and you will...

Страница 12: ...u have to place the cover on the nipping station and press START button to recover the process Having completed one bound book the clamp will automatically open and display UNLOAD so that you can remo...

Страница 13: ...mps and you will see the flashing PUSH CLOSE display Step 1 Load book to the RIGHT of the red line Step 2 Slide the book to The far LEFT 2 Then press the CLOSE button to clamp down the pad block and y...

Страница 14: ...s in accordance with F Glue Adjustment 5 Repeat step 2 to 4 for more books in PAD operation E STANDBY MODE Press STANDBY button the DB 250 will temporarily lower the temperature of glue tank so it won...

Страница 15: ...Turn the glue adjustment lock knob counter clockwise to loosen 2 Increase the amount of glue by sliding the knob to the right at the appropriate position MIN MAX Decrease the amount of glue by slidin...

Страница 16: ...one time Keep it at such a level that the glue will not go over the Max line in the tank while the application drum is rotating This will prevent glue from spilling out of the tank Glue Replacement W...

Страница 17: ...T and CLEAR keys the clamp station will return to its home position Open the clamps to the maximum position Clean their surfaces and wax them 5 Turn the DB 250 off APPENDIX SETUP FOR TIMERS To enter t...

Страница 18: ...over ERROR DISPLAY LED Display Description Cause of Error ERR L1 Clamp station is 1 MT1 fuse blown not in the home position 2 LS1 sensor is bad 3 MT1 motor problem ERR L2 Clamp station is 1 MT1 fuse b...

Отзывы: